For years, the living room was the room I could never quite get right. The freestanding bookcase was too narrow to hold everything and too bulky to look intentional. The TV was mounted on the wall but floated there without context, a black rectangle surrounded by empty painted drywall. Decorative objects got shuffled from surface to surface, a vase here, a ceramic bowl there, never landing anywhere that felt permanent or purposeful. Every time I tried to style the space, it looked like a collection of things that happened to share a room, not a room that had been designed. I kept thinking the answer was more furniture, more storage, more stuff. It took me an embarrassingly long time to realise the answer was the opposite.
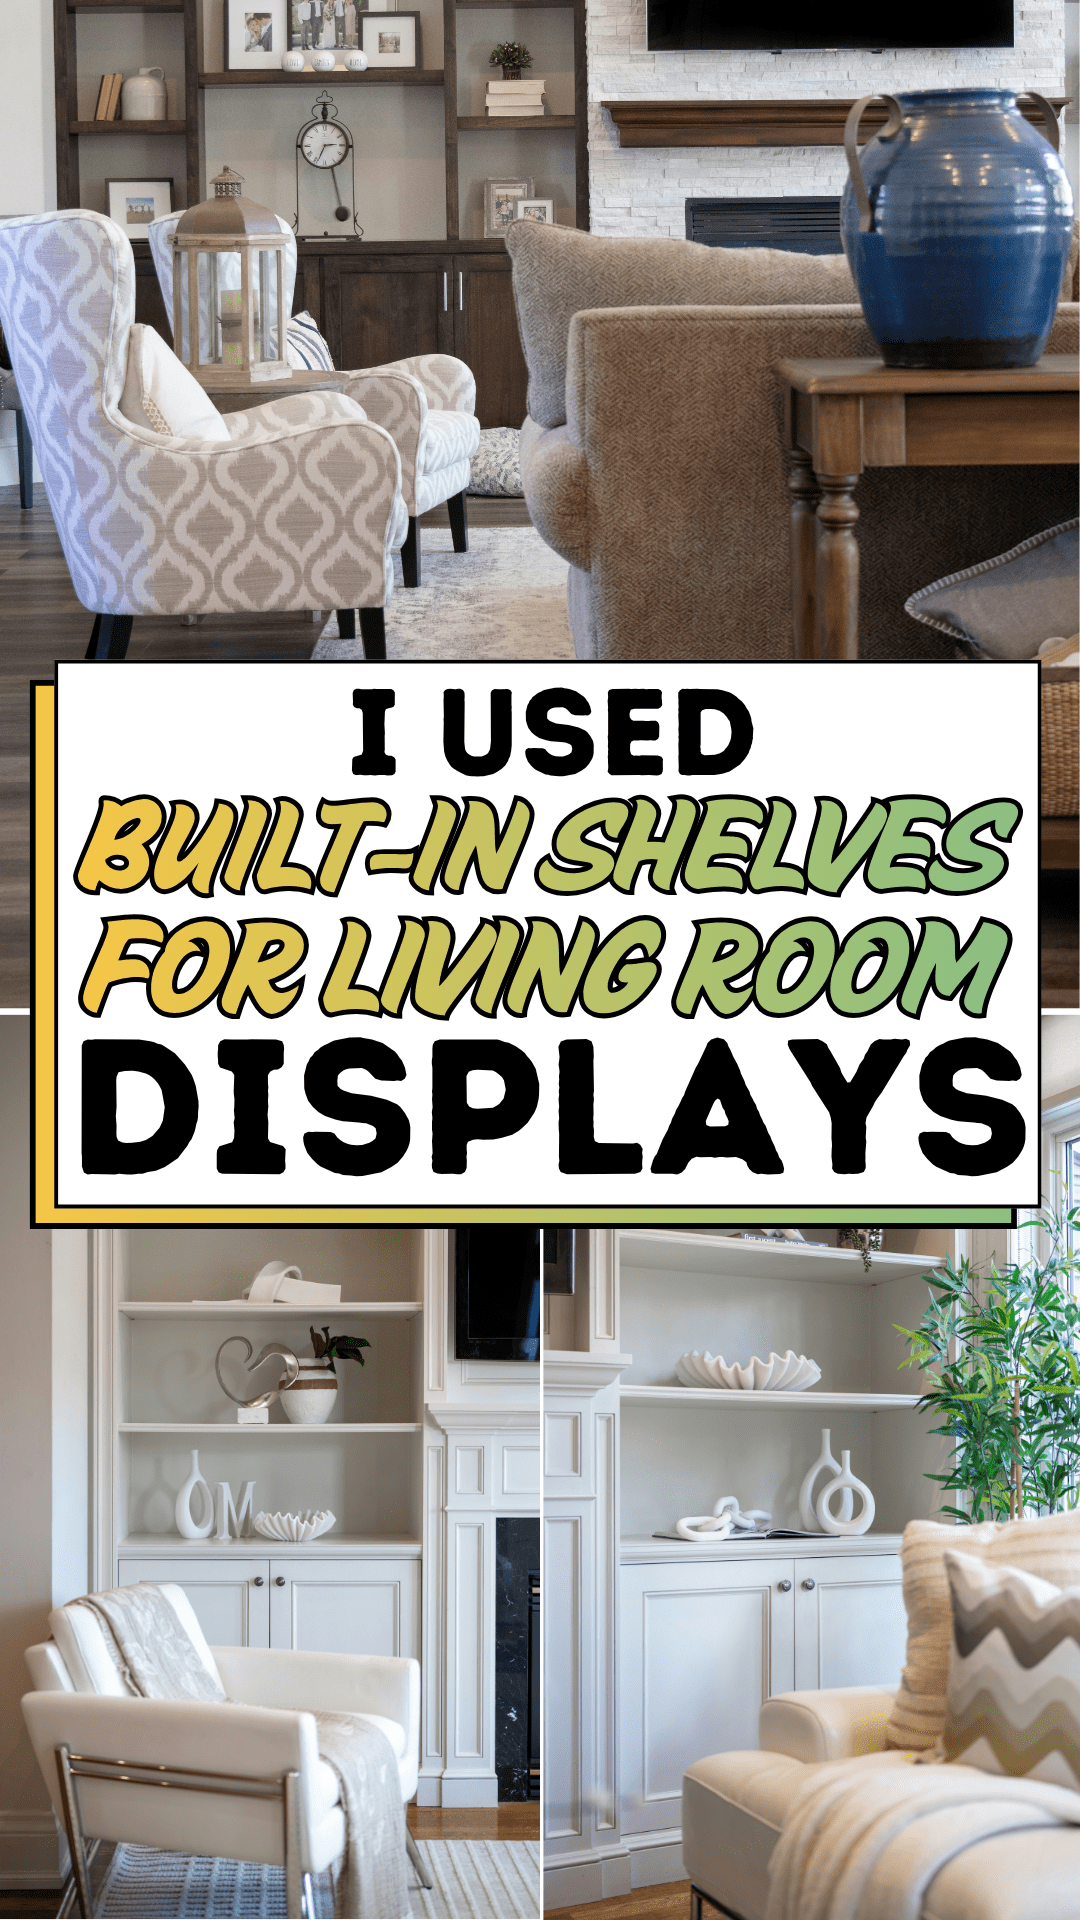
The turning point came when I finally looked seriously into built-in shelves for living room walls. Not a flat-pack unit pushed against the wall, but a properly built-in flush with the architecture, painted to match, with open display shelves above and closed cabinet storage below. What I found in every example I studied was the same quiet transformation: a room that had felt unfinished suddenly had a backbone. The TV had a home. The decorative pieces had a context. The floor had breathing room. Built-in shelves for living room spaces did not add more to the room; they gave everything already in the room somewhere to belong.
This guide documents exactly what I learned through that process: how to plan this kind of installation, how to style the shelves once they are in place, and how to avoid the mistakes that turn a beautiful project into a frustrating one. Whether you are hiring a carpenter, using a flat-pack system, or building from scratch, the principles here apply directly. Built-in shelves for living room displays are one of the most impactful upgrades a home can receive, and they are far more achievable than most people assume.
The Built-In Shelves for Living Room Blueprint
Planning built-in shelves for living room spaces requires more upfront thought than most DIY projects, but that planning is exactly what separates a result that looks custom and considered from one that looks like an afterthought. Follow this sequence, and the build itself becomes straightforward.
Step 1: Define the Wall and the Purpose
Before anything else, decide which wall is getting the unit and what it needs to do. In most living rooms, the best candidate is the wall that anchors the main seating arrangement, the wall the sofa faces, or the wall that currently holds the TV. Built-in shelves for living room walls work best when they serve multiple purposes simultaneously: open shelves for display above, closed cabinets for hidden storage below, and a designated space for media equipment integrated into the design. Write down what the unit needs to hold before you decide on dimensions.
Step 2: Measure and Plan the Proportions
The proportions of a built-in unit determine whether the finished unit feels architectural or accidental. A unit that is too shallow reads as a decorative afterthought. A unit that is too deep invades the room. For most living rooms, a shelf depth of 30–35cm for open display shelves and 40–45cm for lower cabinets works well. Height should ideally reach the ceiling; floor-to-ceiling built-in shelves for living room walls create the most dramatic and spatially generous effect. If ceiling height is limited, topping the unit with a simple cornice or crown moulding that closes the gap between the unit and the ceiling achieves the same visual result.
Step 3: Choose Your Build Method
There are three realistic approaches to built-in shelves for living room projects. The first is a fully custom carpenter-built unit, the most expensive option but also the most precisely tailored to your space. The second is the IKEA or flat-pack hack method, where standard bookcases or cabinet units are combined, fixed to the wall, and finished with custom fascia, trim, and paint to read as truly built-in. The third is a DIY build from MDF or plywood. All three approaches produce excellent results when executed with care; the choice depends on budget, skill level, and the complexity of the wall.
Step 4: Plan the Electrical and Media Integration
If the unit will house a television, plan the electrical requirements before the unit goes in. This means deciding where the TV will sit, routing cables through the wall or through a dedicated cable channel within the unit, and positioning power outlets where they will be concealed by the unit itself. A TV mounted to the wall within a built-in shelving unit, as in the image above, where the flat-screen sits flush within the overall composition, looks entirely different from a TV mounted to bare drywall. The unit gives the screen a frame and a context that makes it feel like part of the room’s design rather than a piece of technology that has been bolted to a wall.
Step 5: Paint Everything the Same Colour as the Walls
This is the step that makes built-in shelves for living room spaces look genuinely architectural rather than simply furniture. When the unit is painted the same colour as the surrounding walls, as in the white-on-white treatment in the image above, it reads as part of the building itself rather than something placed against it. The shelves, the cabinet fronts, the interior of each shelf bay, and the surrounding wall should all share the same finish. This single decision is responsible for most of the transformation that separates a great built-in from a good one.
Step 6: Style the Shelves with Intention and Restraint
Once the unit is in place, the styling determines whether the result looks curated or cluttered. The most effective approach is to treat each shelf bay as a composition rather than a storage slot. Vary the heights of objects: a tall vase beside a low ceramic bowl beside a stack of books creates visual rhythm. Leave deliberate space on each shelf; negative space is not wasted space, it is breathing room that makes every displayed object more visible and more intentional. Limit your colour palette on the shelves to two or three tones that connect to the room’s overall scheme.
Expert Secrets for Success
Pro-Tips for a Better Result
- Light the shelves from within. Recessed LED strip lighting along the underside of each shelf transforms built-in shelves for living room displays from daytime features into evening focal points. Warm white LEDs at 2700K complement white and neutral palettes without creating a clinical look.
- Use the lower cabinets for everything ugly. The closed cabinet section beneath open display shelves is where cables, routers, game consoles, and media clutter live. The unit works visually because everything messy disappears behind closed doors, while everything beautiful stays visible above.
- Vary shelf heights intentionally. Not all shelves need to be evenly spaced. A taller bay for artwork or large ceramics, a shorter bay for books, and adjustable shelves allow the unit to evolve as your collection changes.
- Add back panel interest. Painting the back panel of each shelf bay in a contrasting tone, a deep charcoal, a warm clay, a dusty sage, creates depth and makes displayed objects read more clearly against a distinct background.
- Integrate the fireplace into the composition. Where a fireplace exists on the same wall, a shelving unit that frames it symmetrically on either side creates a focal wall that anchors the entire room. The fireplace becomes the centrepiece rather than a competing element.
Common Mistakes to Avoid
- Building shelves that are too shallow. Shelves under 25cm deep look proportionally small and cannot hold most real-world objects gracefully. Always build to at least 30cm depth for display shelves.
- Filling every shelf. Over-styled built-in shelves for living room walls are one of the most common results of an otherwise well-executed project. Restraint is essential. A shelf that is 60–70% filled reads as deliberately curated. A shelf that is 100% filled reads as storage.
- Mixing too many object colours. When styling built-in shelves for living room displays, limiting the palette to two or three colours creates cohesion. The white ceramic pieces in the featured image work because they share a single tonal language; nothing competes, everything contributes.
- Ignoring the cable situation. Cables trailing visibly from a television mounted within a built-in shelving unit undermine the entire effect. Plan concealed cable routing before the unit is installed, not after.
- Skipping the cornice or top trim. A built-in unit that stops short of the ceiling with a visible gap reads as unfinished. A simple cornice, crown moulding, or painted MDF panel closing the gap between the unit and the ceiling completes the architectural illusion that makes a well-built unit so visually powerful.
Why Built-In Shelves for Living Room Spaces Matter
The living room is the room a home leads with. It is where guests form their first impression, where the household gathers at the end of the day, and where the visual tone of the entire home is set. A living room that feels unfinished or disorganised does not just affect how the space looks; it affects how the people in it feel. Clutter on surfaces and a lack of visual structure create a background sense of incompleteness that is difficult to name but impossible to escape. Built-in shelves for living room walls resolve this at the architectural level: they give the room a structure that cannot be moved, cannot shift, and cannot accumulate clutter in the way that freestanding furniture always eventually does.
There is also a particular satisfaction in completing a project at this scale. A project like this is not a weekend purchase they are a considered decision that changes the character of a room permanently. When the paint dries, and the shelves are styled, and you sit in the room for the first time, and it looks exactly the way you imagined it could, something settles in you that goes beyond interior design. You made a decision, you followed it through, and the room is genuinely better for it. That feeling of competence, of follow-through, of a home that reflects intention rather than accumulation is what this kind of project quietly delivers alongside the storage and the style.
For families, the impact extends further still. A room with a place for everything, media tucked into cabinets, display objects at height and out of reach, books organised and accessible, is a room that functions more peacefully. Children know where things belong. Adults stop spending mental energy on visual noise. The room becomes a place to actually inhabit rather than a space to manage. A well-designed built-in unit is not a luxury upgrade. They are one of the most practical investments a living room can receive.
Frequently Asked Questions
How much do built-in shelves for living room walls typically cost?
The cost range for this type of project is wide. A fully custom carpenter-built unit typically runs between £1,500 and £5,000, depending on size, material, and complexity. A flat-pack hack using IKEA BILLY or PAX units finished with custom trim and paint can achieve a near-identical look for £400–£900. A DIY MDF build falls somewhere between the two, depending on material costs and the time investment involved. In all cases, the paint finish and the quality of the trim details determine most of the perceived value. A well-finished flat-pack unit can be genuinely indistinguishable from a custom build.
Can I add built-in shelves for living room walls in a rented property?
Freestanding units styled to read as built-in are the practical alternative for renters. Deep, floor-to-ceiling bookcases fixed temporarily to the wall with reversible fixings, painted to match the wall colour, and topped with a cornice that closes the ceiling gap can achieve 80% of the visual effect of a true built-in with no permanent changes to the property. Some landlords will also permit genuine built-in work if the tenant covers the cost and the installation adds value to the property always worth asking directly.
What objects work best on built-in shelves for living room displays?
The most effective objects for these displays share a limited colour palette, vary in height and silhouette, and include a mix of organic and geometric forms. White and neutral ceramics, natural materials like wood and stone, books grouped by spine colour, and one or two statement pieces with genuine sculptural interest all work well together. Avoid plastic, highly branded packaging, and anything that was not consciously chosen for the shelf. The rule is that every object on the display shelf should be there because you want to look at it, not because it needs somewhere to go.
How do I make built-in shelves for living room walls look expensive without a large budget?
Three details make the finished unit read as high-end regardless of the underlying construction: a flawless paint finish applied to the unit and surrounding walls simultaneously; quality hardware on the lower cabinet doors in a single consistent metal finish; and internal shelf lighting that activates the display after dark. These three elements, paint, hardware, and light, are the finishing layer that separates a good built-in from a great one, and none of them requires a large budget to execute well.
How many items should I display on each shelf?
As a working rule for styling built-in shelves for living room displays, aim for each shelf to feel 60–70% filled with intentional negative space, accounting for the rest. A shelf with three objects and open space reads as curated. A shelf with nine objects reads as storage. Group items in odd numbers of threes and fives and ensure at least one item on every shelf is taller than the others to create vertical rhythm within each bay. Edit regularly; the best-styled units evolve with the seasons and with your eye.