The fireplace surround had been on the renovation list for three years. Not because it was broken, the brick was structurally sound, the firebox functioned correctly, and the original 1980s brass surround had survived two decades of use without failing in any way that could be called objective. The problem was purely atmospheric: the brass trim and the pink-toned brick communicated a very specific historical moment in interior design that had nothing to do with the home I was trying to build around it.

Every time I sat in the living room, the fireplace was the room’s primary focal point, which meant that every time I sat in the living room, I saw the gap between what the fireplace was communicating and what the room was supposed to say. I had looked at fireplace tile ideas for two years, collected boards of modern farmhouse fireplace tile ideas specifically, and had not acted on any of them because the project felt larger than a weekend, and the cost felt unpredictable in a way that made starting difficult.
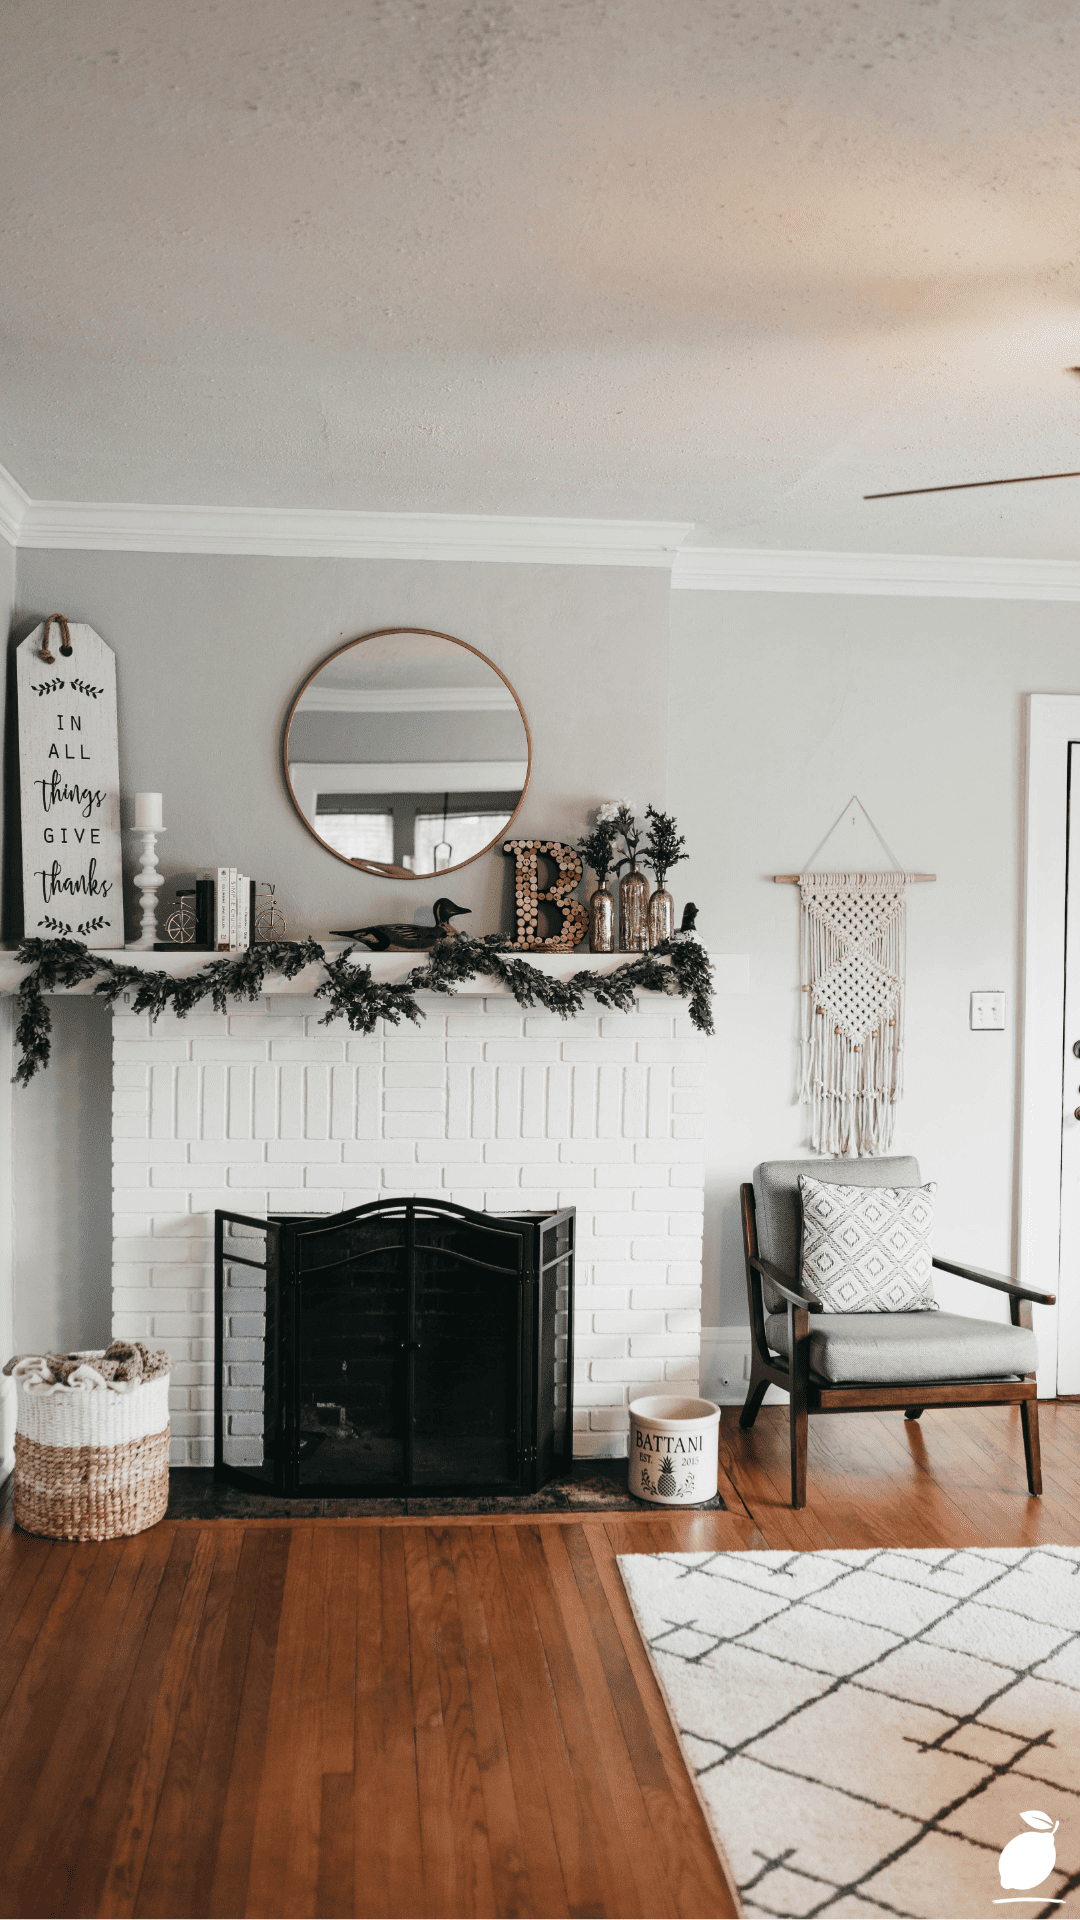
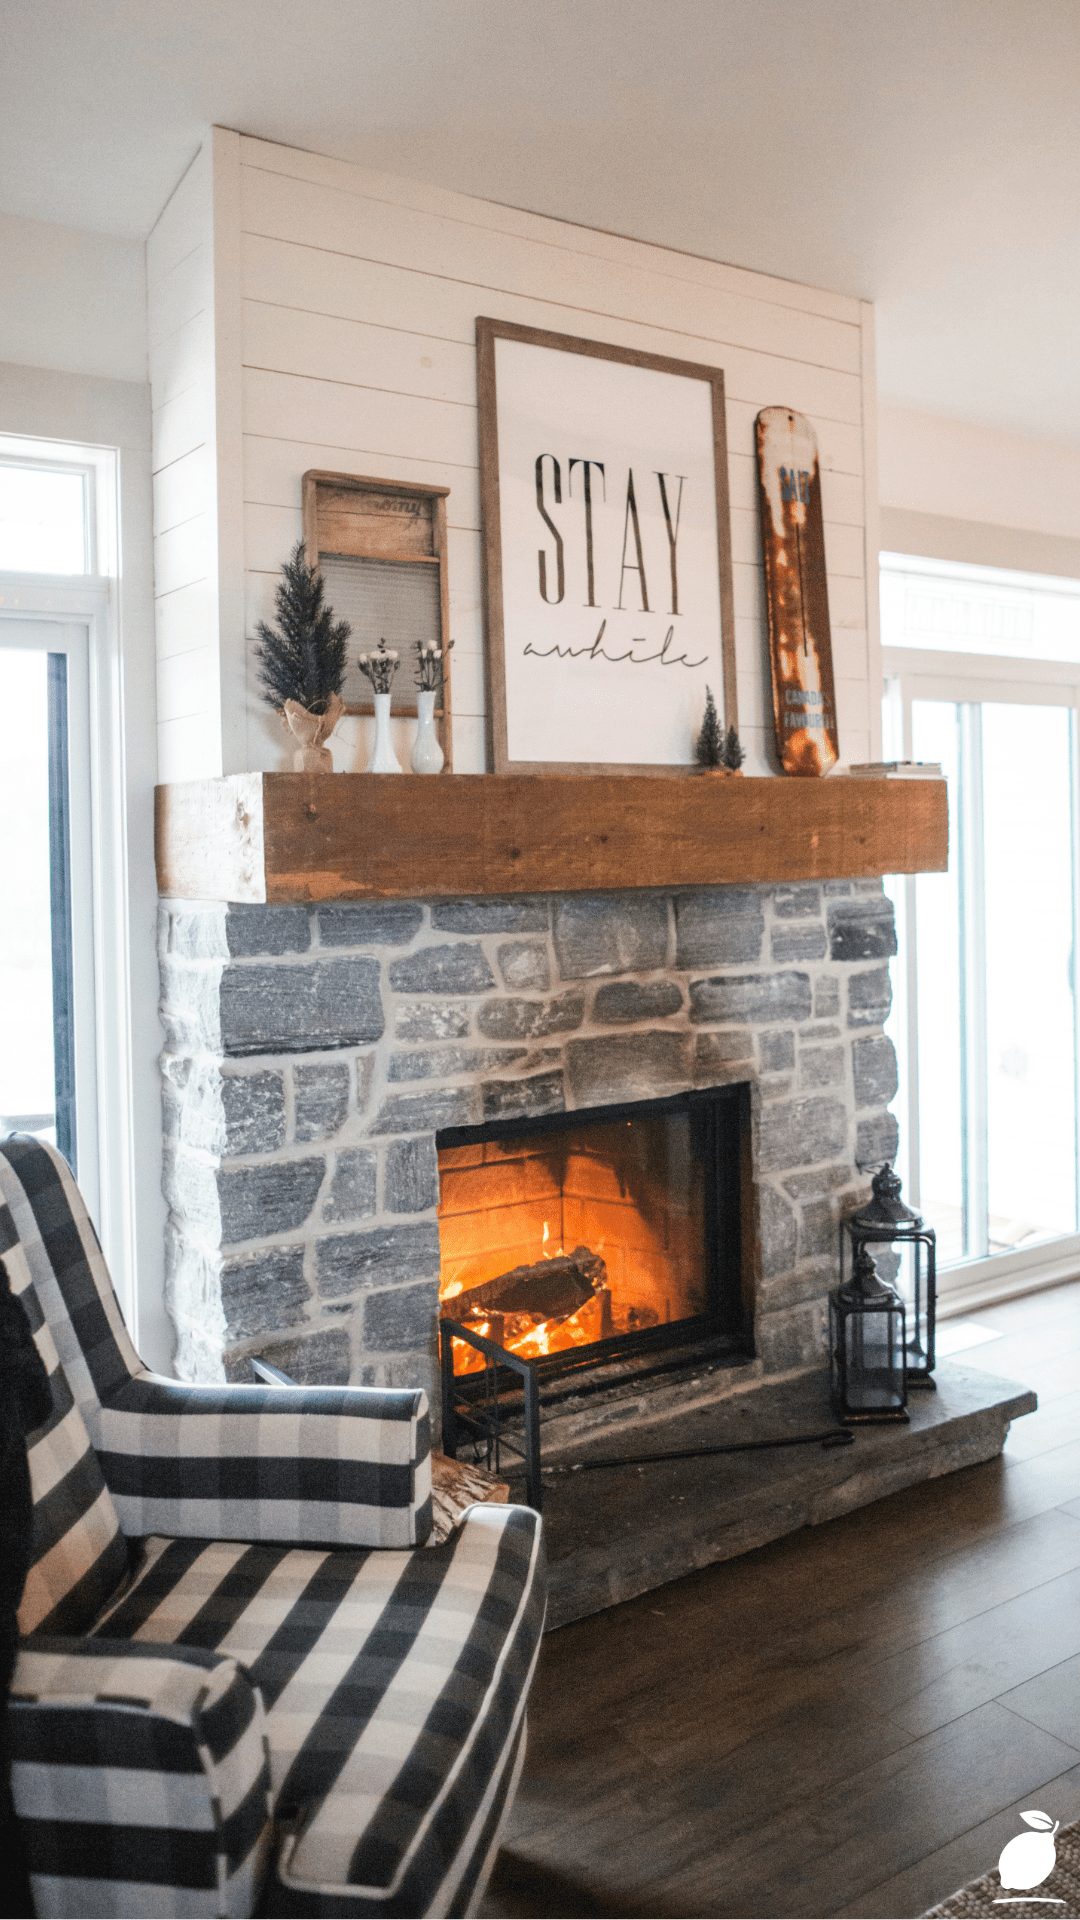
The fireplace in the image above ended the hesitation. A stacked stone surround in gray and white that reads as simultaneously ancient and completely contemporary, the stone material belonging to the oldest tradition of fireplace construction, the gray-and-white color palette belonging to the most current expression of modern farmhouse interior design. A rustic wooden mantel in rich brown that provides the organic warmth the stone field requires without competing with it. A lit fire casting warm orange light against the stone’s cool gray surface, producing the specific contrast of warm light against cool material that makes stone fireplace tile ideas so specifically compelling as a living room focal point.
White shiplap walls above the stone surround, dark hardwood flooring below, large windows with white trim on either side, allowing natural light that changes the stone’s appearance from morning to evening in the specific way that natural materials always do. The “STAY” sign on the mantel, the pine trees, the wooden snowboard leaning against the wall personal objects placed against a fireplace surround that can hold them without competing with them, because the stone’s organic, natural quality provides a background of earned character rather than manufactured decoration. This is what modern farmhouse fireplace tile ideas look like when they are executed at the level of the image: material, not decorative; honest, not themed.
The fireplace tile ideas in this guide are organized around the specific design challenge the image resolves: creating a custom, authentic modern farmhouse fireplace look using materials and techniques accessible to any homeowner, regardless of renovation experience, at a cost significantly below professional fireplace resurfacing. The stacked stone fireplace tile idea demonstrated in the image is achievable as a DIY project in a single weekend using manufactured stone veneer panels, a material that produces the image’s authentic stacked stone appearance at a fraction of the cost and installation complexity of genuine field stone. This guide gives you every step from the existing surround’s surface preparation through to the final styling of a mantel that looks like the image, with the specific fireplace tile ideas knowledge that makes the difference between a professional-quality result and a clearly amateur one.
The Fireplace Tile Ideas Blueprint
Step 1: Assess the Existing Fireplace Surround for Fireplace Tile Ideas Compatibility
The first step in any fireplace tile ideas project is a thorough assessment of the existing surround’s condition and the substrate materials beneath the existing surface that the new fireplace tile ideas will adhere to. Modern farmhouse fireplace tile ideas applied over an existing surface require that surface to be clean, stable, and able to accept the adhesive bonding that the new tile or stone product requires. A fireplace surround with loose mortar, cracks in the substrate, or surfaces that flex or move under hand pressure will produce fireplace tile installations that fail within one to three heating seasons, regardless of the quality of the new material applied.
Test the existing fireplace surround’s structural integrity by pressing firmly on the surface at multiple points. The surround should be completely rigid without any flex, creak, or movement. Check for loose sections of existing tile or brick by tapping with a rubber mallet. A hollow sound indicates a debonded area beneath the surface that will need to be removed and re-bonded before applying fireplace tile ideas can be applied over it. Inspect all mortar joints for cracking, crumbling, or gaps. Existing mortar that is failing will continue to fail beneath any new surface applied over it.
For existing brick fireplaces (the most common existing condition for modern farmhouse fireplace tile ideas projects), assess the brick’s heat-exposure history: bricks in the firebox interior and immediately surrounding the firebox opening may have developed hairline cracks from thermal cycling that are invisible at the surface, but that will propagate through any fireplace tile ideas material bonded to them. Fireplace tile ideas applied to the firebox interior require specifically heat-rated refractory cement and refractory-rated tile or stone standard tile adhesive, and non-refractory stone veneer products are not rated for the high temperatures of the firebox interior and will fail rapidly when exposed to active fire heat.
Step 2: Choose the Modern Farmhouse Fireplace Tile Ideas, Stone, or Tile Material
The stacked stone surround in the image is the modern farmhouse fireplace tile idea that most completely and most immediately transforms a fireplace’s character, and it is achievable through manufactured stone veneer panels rather than the individually placed field stone that the image appears to demonstrate. Manufactured stone veneer panels (available from suppliers including Eldorado Stone, Coronado Stone, and Boral Versetta Stone) replicate the stacked stone appearance of the image through molded polyurethane or cement composite panels that are secured to the existing surface with a single panel adhesive rather than individual stone setting with mortar. The panel system produces the image’s visual result in a single day of installation, versus the three to five days that individual stacked stone placement requires.
For modern farmhouse fireplace tile ideas in the gray and white palette of the image, the most appropriate manufactured stone veneer finishes are those in the stacked ledge or stacked linear categories profiles that produce the horizontal layering of the image’s stone courses rather than the irregular, fieldstone-style profiles of more rustic stone veneer products. Specific products to consider: Eldorado Stone Stacked Stone in Silverado or Granite Falls colorways for the gray-dominant palette of the image; Boral Versetta Stone Ledgestone in Oakfield Ledgestone for a warmer gray-and-beige stacked pattern; and ProVia Manufactured Stone in the Dimensional Ledgestone category for the most faithful reproduction of the image’s specific stacked gray-and-white profile.
For modern farmhouse fireplace tile ideas that prefer a ceramic or porcelain tile approach rather than stone veneer, a simpler, lower-profile alternative to the stacked stone’s dimensional quality, large-format gray porcelain tile in a concrete or stone-effect surface provides the modern farmhouse fireplace tile ideas palette without the three-dimensional installation complexity. 60cm × 30cm porcelain tile in a gray concrete or stone finish, laid in a horizontal running bond pattern from floor to ceiling on the fireplace surround, produces a clean, contemporary modern farmhouse fireplace tile ideas result that relates to the image’s gray-and-white palette without replicating its dimensional texture.
Step 3: Prepare the Existing Fireplace Surface for Fireplace Tile Ideas Installation
Proper surface preparation is the modern farmhouse fireplace tile ideas step that most determines the finished installation’s longevity and adhesion quality, and the step most frequently abbreviated in the enthusiasm to reach the visible transformation. Any fireplace tile installation that adheres incorrectly, lifts at the edges, or produces hollow spots within the first heating season can almost always be traced to inadequate surface preparation rather than poor material quality or incorrect application technique.
For brick fireplace surfaces, clean all existing mortar joint faces and brick surfaces with a wire brush to remove loose mortar, efflorescence, and surface contamination that would prevent fireplace tile ideas adhesive from bonding to the substrate. Follow with a TSP (tri-sodium phosphate) scrub of the full surround surface using a stiff-bristle brush, rinse thoroughly with clean water, and allow to dry completely for a minimum of 24 hours before any fireplace tile adhesive is applied. Apply a coat of bonding slurry (a mixture of portland cement, water, and bonding agent in the proportions recommended by the bonding agent manufacturer) to the entire cleaned brick surface and allow it to become tacky but not dry before beginning stone or tile installation. This bonding slurry is the critical preparation step that converts a smooth-ish brick surface into a mechanically and chemically receptive substrate for the fireplace tile adhesive.
For existing tile fireplace surfaces, the preparation approach depends on the existing tile’s condition. Tiles that are fully adhered with no hollow spots or cracked surfaces can accept a new fireplace tile application directly after cleaning and sanding with 60-grit sandpaper (to degloss the existing tile surface), followed by a coat of tile-over-tile bonding primer. Tiles with any hollow or debonded areas must be removed from the substrate before new fireplace tile material is applied.
Step 4: Install the Modern Farmhouse Fireplace Tile Ideas Material From the Bottom Up
The installation sequence for modern farmhouse fireplace tile ideas, whether stacked stone veneer panels or ceramic tile, is always from the bottom of the surround upward, because each course of material above the first relies on the material below it for physical support during the adhesive’s curing period. Starting at the top and working downward produces the specific installation failure of material that slides or shifts before the adhesive sets, producing irregular coursing and gaps at the horizontal joints that are impossible to correct after the adhesive has cured.
For stacked stone veneer panel installation, apply panel adhesive to the back of each panel using a 6mm V-notch trowel, the specific notch size that produces adequate adhesive coverage without the squeeze-out that larger notches generate at the joints between panels. Press each panel firmly against the prepared fireplace surface, applying sustained hand pressure for thirty to sixty seconds to ensure full contact between the adhesive and both the panel back and the substrate surface. Use a rubber mallet to tap the panel into its final position if needed. Never use a metal hammer, which will crack the panel’s surface detail. Level each panel horizontally before the adhesive sets by referencing a spirit level across the panel’s full width.
Begin the modern farmhouse fireplace tile ideas installation with the bottom course positioned directly on the hearth surface or, if the fireplace surround extends to the floor, on a level reference line snapped across the surround base with a chalk line. Complete the bottom course across the full width of the surround before beginning the second course. Stagger the vertical joints between adjacent courses by at least one-third of the panel length to produce the running bond pattern that makes the stacked stone fireplace tile ideas look natural, rather than constructed vertical joints that align between adjacent courses, which read as a manufactured pattern rather than an organic stone arrangement.
Step 5: Complete the Modern Farmhouse Fireplace Tile Ideas With the Mantel and Hearth
The wooden mantel in the image is the modern farmhouse fireplace tile ideas element that most completes the stone surround’s visual composition, providing the warm organic material that the cool gray stone requires as a contrasting material companion, and creating the horizontal shelf that defines the top boundary of the fireplace surround and provides the surface for the styled mantel objects that give the fireplace its personal character. The rich brown wood of the mantel in the image is the specific material decision that prevents the gray-and-white stacked stone from reading as monochromatic. The warm wood brings the palette’s warmth that the stone alone cannot provide.
For modern farmhouse fireplace tile ideas mantel selection, a solid wood beam mantel, either a genuine reclaimed timber or a manufactured beam in the same profile, provides the most authentic modern farmhouse fireplace tile ideas material quality. Reclaimed timber beam mantels are available from architectural salvage suppliers and online retailers at $150 to $400 for standard fireplace-width lengths; manufactured beam mantels in faux-reclaimed finishes are available from fireplace supply retailers at $80 to $250. Both options produce the visual quality of the image’s rich brown wood mantel; the reclaimed timber provides genuine age character that manufactured beams approximate.
The hearth extension of the floor-level surface immediately in front of the firebox is the modern farmhouse fireplace tile installation that most directly affects the fireplace’s practical safety and its visual completeness. For modern farmhouse fireplace tile ideas hearths, large-format slate, flagstone, or dark-toned porcelain in 30cm × 60cm or larger provides the grounding horizontal surface that completes the fireplace surround’s composition while meeting the fire safety clearance requirements that most jurisdictions specify for combustible-material setback from the firebox opening.
Step 6: Style the Modern Farmhouse Fireplace Tile Ideas Mantel as a Composed Personal Vignette
The mantel styling in the image, the “STAY” sign, the pine trees, the vases, and the wooden snowboard are the modern farmhouse fireplace tile ideas’ final and most personal layer. The stone surround and wooden mantel provide the architectural frame; the mantel objects provide the personal declaration that transforms the fireplace from a well-executed design project into the living room’s most characterful and specific element. The objects in the image read as personal rather than staged because they belong to a specific life (the snowboard, the “STAY” text) rather than to a styling catalog.
Apply the fireplace tile ideas composition principle the image demonstrates to your own mantel: one central anchor text or graphic object that declares something specific about the household (the “STAY” sign), two to three organic elements at varying heights (the pine trees, the vases), one unexpected personal object that has nothing to do with conventional mantel styling (the snowboard), and one hearth-level grounding element that extends the composition to the floor (the black metal lantern). This five-element modern farmhouse fireplace tile ideas mantel formula produces the specific quality of a composed, personal, layered arrangement that looks like it arrived rather than was placed.
Expert Secrets for Success
Pro-Tips for a Better Result
Dry-lay the full fireplace tile ideas, stone, or tile installation before applying any adhesive. Lay out the complete first two to three courses of stacked stone panels or tile on the floor in front of the fireplace in the exact arrangement they will be installed, and check the visual quality of the coursing, the stagger between courses, the variation in panel widths, and the horizontal joint consistency before committing any piece to the adhesive. Fireplace tile ideas installations where the dry layout reveals a visual problem (panels that line up too uniformly, cuts at the surround edge that produce awkwardly narrow strips) can be corrected before any adhesive is applied; the same problems discovered after installation require material removal and reapplication.
Use a laser level rather than a spirit level for the fireplace tile ideas’ horizontal course lines. The coursing of the stacked stone in the image reads as horizontal and consistent across the full width of the surround because each course was laid to a reference line rather than to visual assessment. A self-leveling laser level projects a continuous horizontal reference line across the full surround width, allowing each panel to be positioned to the same datum regardless of how far apart the panels are on the wall surface. A spirit level can only reference the immediately adjacent panel, and accumulated error across a wide fireplace tile installation produces a visible tilt that becomes more apparent as additional courses are laid above it.
Apply a penetrating sealer to the completed stone veneer fireplace tile surface before the first fire. Manufactured stone veneer panels have a porous surface that absorbs wood smoke, ash residue, and airborne grease from the room’s air in the first heating season without sealer protection. Apply a penetrating masonry sealer rated for high-temperature applications to the completed and fully cured stone veneer surface. The sealer penetrates the surface pores and creates a protective barrier that allows the surface to be wiped clean of smoke and soot deposits without staining the stone. Apply the sealer at least 48 hours before the first fire to allow full penetration and curing.
Install the fireplace tile ideas mantel bracket system before completing the upper stone courses. The wooden beam mantel in the image is supported by steel angle brackets or L-brackets lag-screwed into the wall studs above the fireplace surround, a support system that must be installed in the wall before the upper stone courses are placed, because the brackets’ wall penetration points need to be accessible for the lag screw installation. Planning the mantel bracket positions and installing the lag screws in the studs before the fireplace tile installation reaches the mantel height allows the stone to be installed around the bracket locations and the mantel to be slid onto the installed brackets. This installation sequence produces the cleanest result.
Common Mistakes to Avoid
Don’t use standard tile adhesive for fireplace tile ideas applications in the heat zone around the firebox opening. The heat zone of a fireplace, the area within 30cm of the firebox opening on all sides, reaches temperatures that standard tile adhesive formulations are not rated to withstand, producing adhesive failure and tile delamination within one to two heating seasons. Use heat-rated fireplace mortar or refractory cement for all fireplace tile applications within the heat zone, and standard tile adhesive only for the cooler outer sections of the surround that are more than 30cm from the firebox opening. Check the adhesive product’s temperature rating on the packaging before purchasing for any fireplace tile ideas application.
Don’t install fireplace tile ideas or stone veneer without checking the wall’s structural capacity for the added weight. Stacked stone veneer panels weigh significantly more than ceramic tile, typically 25kg to 40kg per square meter compared to 15kg to 20kg per square meter for standard ceramic tile. A full stone veneer fireplace tile installation on a standard drywall-over-stud fireplace surround may exceed the wall’s structural capacity if the drywall is not specifically rated for the load. Verify that the existing fireplace surround wall is drywall type X (fire-rated) rather than standard drywall, and confirm that the weight of the planned fireplace tile installation does not exceed the manufacturer’s published load rating for the wall assembly.
Don’t cut stacked stone fireplace tile ideas or panels with a standard wood saw or oscillating tool. Manufactured stone veneer panels require either a wet tile saw with a diamond blade or an angle grinder with a diamond disc for all cut edges. The panel’s aggregate-and-cement composition dulls standard wood-cutting saw blades immediately and produces the rough, crumbling cut edge that is visible from the room. Wet cutting with a diamond blade produces clean, precise cut edges that read as dressed stone at the surround’s perimeter cuts and at the firebox opening reveals, where the cut edge quality is most visible in the finished fireplace tile installation.
Don’t apply the mantel sign or personal objects until the fireplace tile installation has been completely assessed without them. The mantel objects in the image are placed against a completed stone surround that has been fully assessed and approved as a finished installation. The stone installation’s quality is confirmed before any styling element is introduced to confirm or compensate for it. A fireplace tile ideas installation that is assessed while already dressed with mantel objects may have visual quality issues (uneven coursing, poor color variation, visible adhesive at joints) that are masked by the objects and that will be apparent after the objects are removed. Assess the stone installation thoroughly in its bare state before introducing any mantel styling.
Why Fireplace Tile Ideas Matter
The fireplace is the room’s oldest focal point, the element that every other furnishing in the room is implicitly arranged around, that the eye goes to first when entering the living room, and that carries more atmospheric authority per square foot of surface area than any other architectural element in residential interior design. Fireplace tile ideas that transform a dated, builder-grade surround into a modern farmhouse focal point of the image’s quality do not just improve a surface they reorganize the entire room’s visual hierarchy, making every piece of furniture and every accessory in the space read as the occupant of a room that knows what it is rather than a collection of objects sharing a room with a fireplace that does not belong.
Research in residential psychology and home valuation has consistently identified the fireplace as the single most emotionally significant architectural element in residential spaces, the feature most associated with feelings of warmth, security, family gathering, and domestic belonging. The fireplace tile ideas that produce a surround of genuine material quality and visual authority amplify these associations for every household member who sits in front of the fire, connecting the daily experience of a lit fireplace to the specific, earned character of a stone surround that looks like it has been in the room for decades rather than installed last weekend. That quality of apparent permanence is what custom-look fireplace tile ideas produce, and it is available to any homeowner willing to invest a weekend and the specific knowledge this guide provides.
Easy Peasy Life Matters is built on the conviction that the fireplace is the living room’s most deserving surface for genuine design investment and that modern farmhouse fireplace tile ideas, executed with the material intelligence, surface preparation discipline, and styling vision this guide provides, produce a focal point of such consistent quality that the living room’s entire character is elevated by the transformation. The stone surround in the image is not the product of professional installation or an extraordinary budget. It is the product of the right material choice, the right preparation, and the right installation sequence applied with the patience and care that fireplace tile ideas specifically reward. These steps are the path from the fireplace you have to the fireplace that the image demonstrates.
Frequently Asked Questions
What is the best material for modern farmhouse fireplace tile ideas?
The material that most authentically and most cost-effectively produces the modern farmhouse fireplace tile ideas quality demonstrated in the image is manufactured stone veneer in the stacked ledge or stacked linear profile, in a gray-and-white color palette. Manufactured stone veneer provides the dimensional texture and natural material appearance of genuine field stone at 30 to 50 percent of the installed cost, with a significantly lower installation complexity that makes DIY execution feasible for homeowners with basic tiling skills. For flat-profile modern farmhouse fireplace tile ideas, large-format gray porcelain tile in a concrete or stone effect provides a simpler installation path at slightly lower material cost, sacrificing the dimensional quality of the stacked stone for a cleaner, more minimal modern farmhouse fireplace tile ideas result.
How long does a fireplace tile installation take as a DIY project?
A complete modern farmhouse fireplace tile installation, surface preparation, stone veneer panel installation, mantel installation, and grout/sealer application typically requires two full days for a standard single-sided fireplace surround (approximately 3m to 4m² of installation area). Day one covers surface preparation (cleaning, bonding slurry application, and drying) and the first half of the stone panel installation; day two completes the installation, allows the adhesive to cure sufficiently for the mantel installation, and completes the penetrating sealer application. The adhesive requires a minimum of 24 hours of cure time before the first fire is used; 48 to 72 hours is preferable in cool or humid conditions.
Can I install fireplace tile ideas over existing brick without removing the brick first?
Yes, and for most existing brick fireplace surrounds, direct application of stone veneer panels or tile over the existing brick is the preferred modern farmhouse fireplace tile ideas approach, because it avoids the dust, debris, and potential structural damage that brick removal produces. The preparation requirements for successful over-brick fireplace tile installation are: the brick must be structurally sound (no loose, crumbling, or hollow-sounding sections), the brick surface must be clean and free of paint, sealers, or efflorescence, and a bonding slurry must be applied to the brick surface before the fireplace tile adhesive to ensure adequate bonding to the relatively smooth brick face. Properly prepared, over-brick fireplace tile installations are as durable and as long-lasting as installations on new construction substrates.
What color palette works best for modern farmhouse fireplace tile ideas?
The gray-and-white palette of the image is the most versatile and most authentic modern farmhouse fireplace tile ideas color palette because it bridges the cool, contemporary quality of the gray and the warm, traditional quality of the white in a combination that relates naturally to both the white shiplap walls and the warm wood floors that characterize the modern farmhouse interior aesthetic. Secondary modern farmhouse fireplace tile ideas palettes that work within the same aesthetic register are: warm beige and cream (warmer than gray-and-white, specifically appropriate for modern farmhouse interiors with warm-toned wood floors and amber lighting), charcoal and white (cooler and more graphic than gray-and-white, appropriate for modern farmhouse interiors that lean toward the contemporary end of the traditional-contemporary spectrum), and warm brown and tan (the most traditional palette within modern farmhouse fireplace tile ideas, appropriate for rooms with significant warm wood tones at multiple scales).
How much does a modern farmhouse fireplace tile project cost as a DIY?
A complete DIY modern farmhouse fireplace tile ideas project, manufactured stone veneer panels, bonding materials, a reclaimed or manufactured beam mantel, and penetrating sealer typically costs between $400 and $900 for a standard single-sided fireplace surround, depending on the quality of the stone veneer product chosen and the mantel source. The manufactured stone veneer panels represent the project’s highest material cost at $8 to $18 per square foot for standard products and $15 to $30 per square foot for premium products; the mantel adds $100 to $400, depending on whether reclaimed timber or manufactured beam is chosen; bonding materials, tools, and sealer add $50 to $100 to the total. Professional installation of equivalent materials typically costs $1,500 to $4,000; the DIY approach in this guide produces the same result at 20 to 40 percent of the professional cost.