The vinyl shutters had faded from whatever color they originally were to a washed-out, chalky approximation of that color that was worse than no shutters at all because no shutters would have been a decision, while these shutters were a visible record of sun exposure and elapsed time and the specific resignation that comes from looking at something that needs attention every single day without doing anything about it. I had priced replacement shutters and discovered that vinyl shutter replacement on a colonial-style house with twelve windows costs considerably more than I wanted to spend on what I kept telling myself was a small cosmetic issue. I had looked at painting the vinyl shutters and encountered a consistent chorus of discouragement online: vinyl can’t be painted, vinyl doesn’t hold paint, you’ll waste money, and it’ll peel within a year, and I had half-believed this because it came from so many sources. What none of those sources had addressed was the difference between painting vinyl shutters without preparation, without the correct primer, and without the correct paint, and painting vinyl shutters with all three in place.
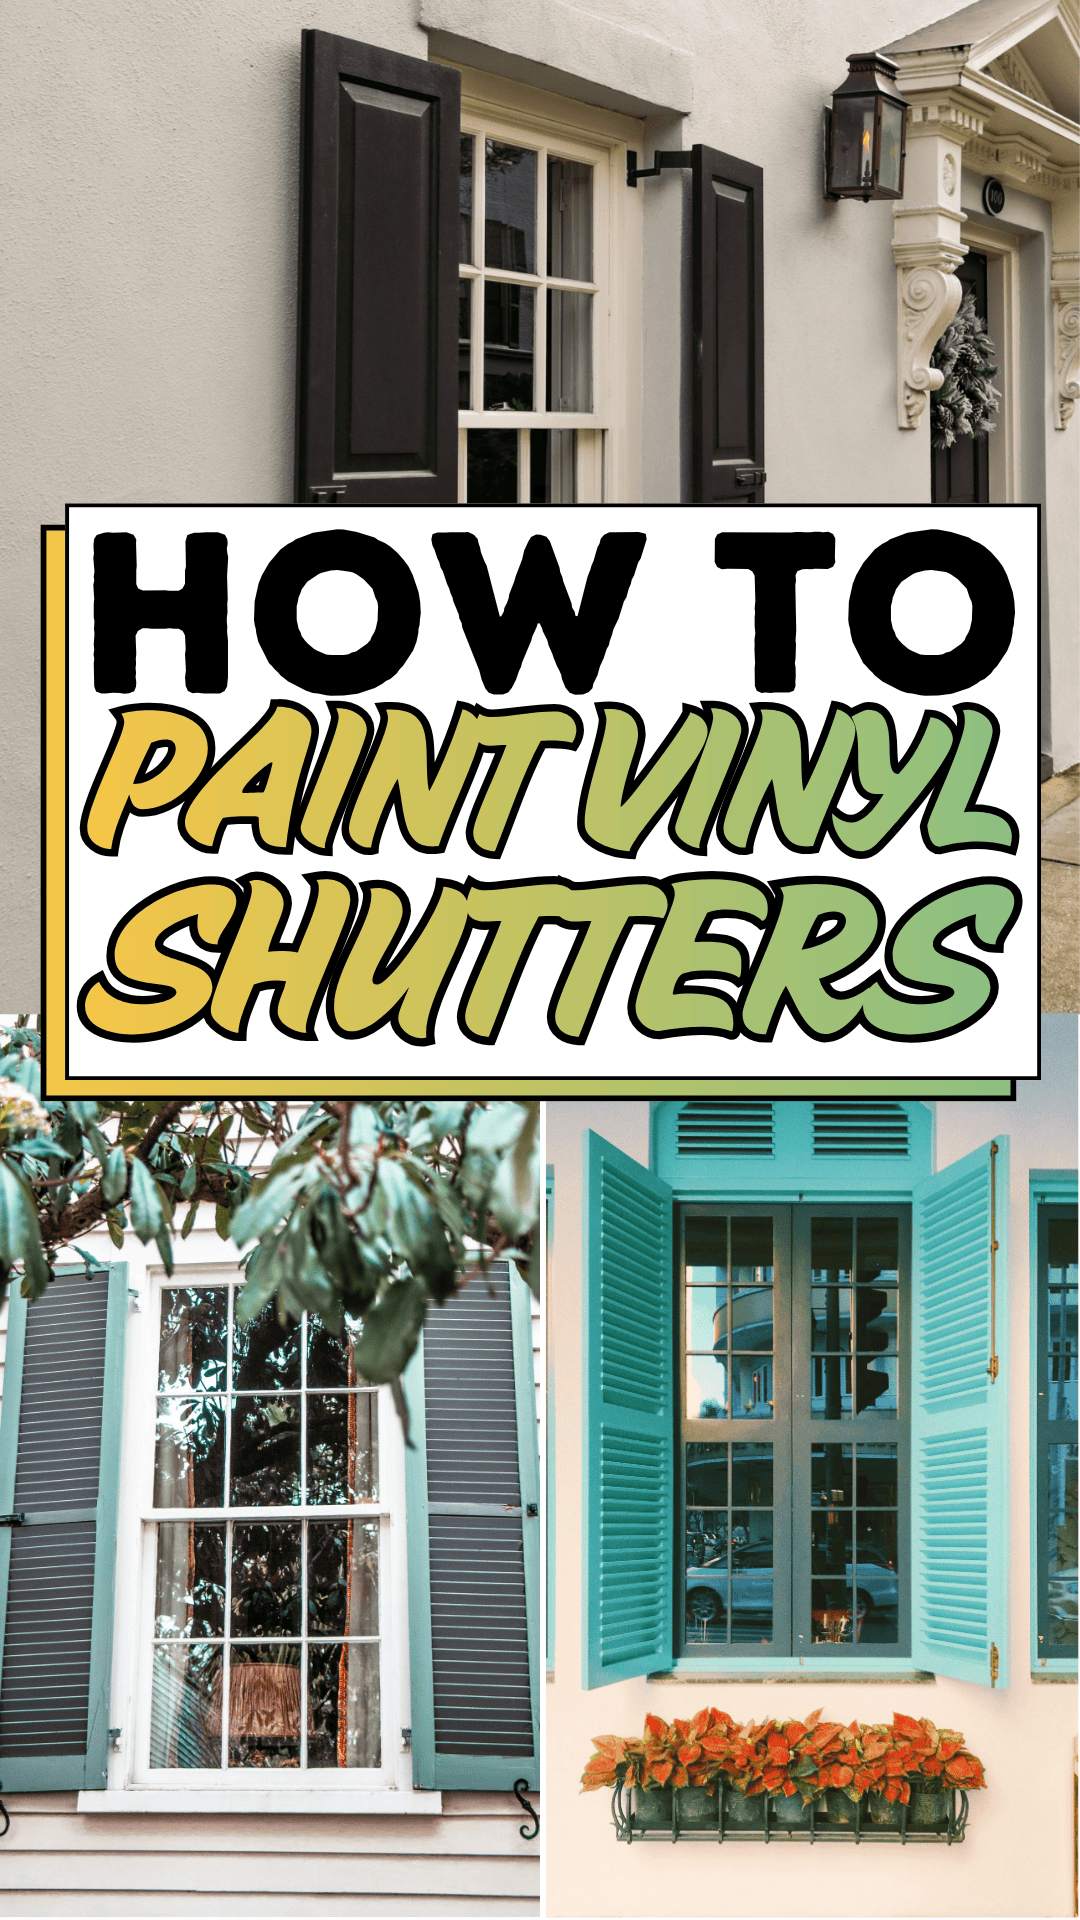
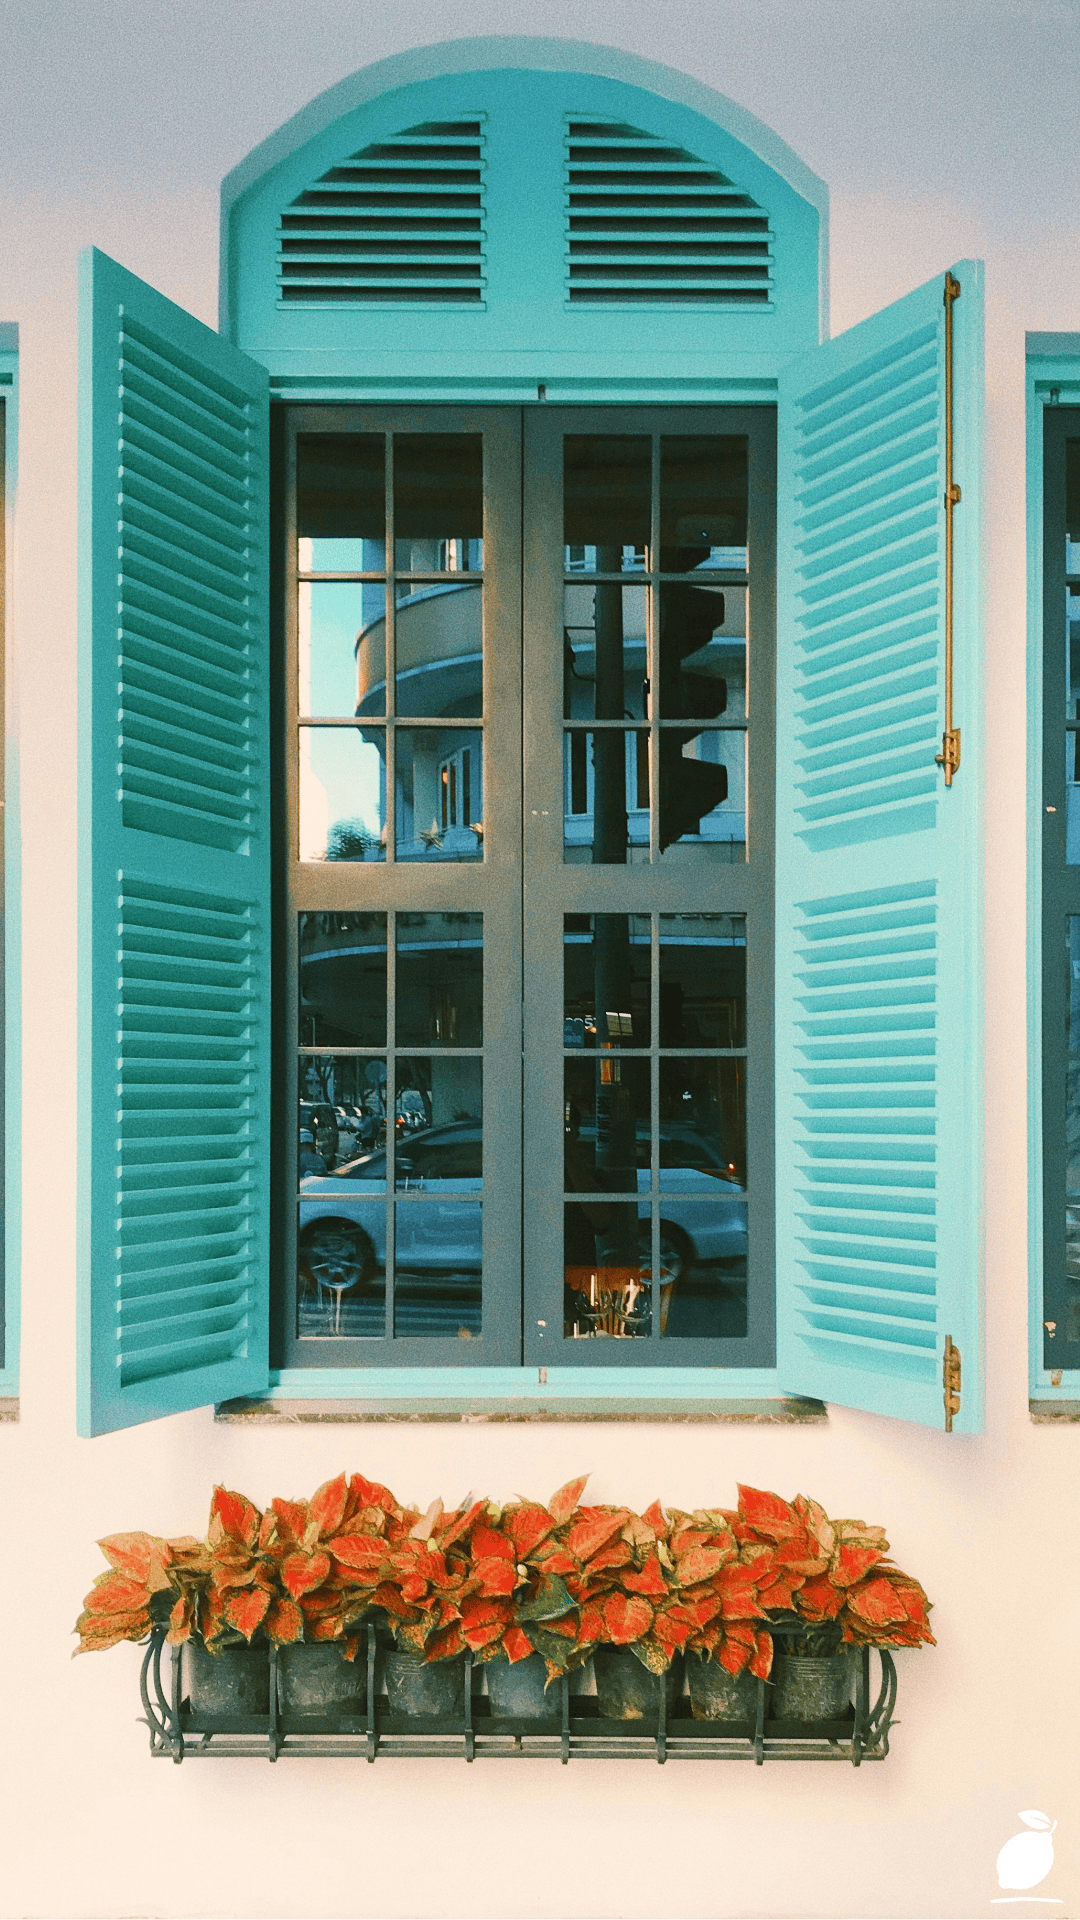
The colonial-style window in the image above is the result of the second approach. White vinyl siding, white window trim, white window sill, the neutral facade framework that most houses with vinyl siding provide, and shutters painted in a soft sage green with a quality, depth, and vibrancy that makes the color read as a deliberate, confident design choice rather than a factory default. Black decorative wall brackets are mounting the shutters to the white siding. Green foliage from an overhanging tree branch frames the top of the window, reflecting in the glass. The shutters in the image read as freshly painted, richly colored, and completely integrated with the window’s white frame and the tree-reflected green beyond the glass, the specific quality that correctly painted vinyl shutters produce when the preparation, primer, and paint specifications are all correct. These are not new shutters. These are vinyl shutters that have been painted correctly, and the result is indistinguishable from a shutter replacement at a fraction of the cost.
The shutters painting guide in this post follows the exact process that produces the image’s result on any vinyl shutter, in any color, on any house: the preparation that makes the vinyl surface receptive to paint bonding, the primer that creates the adhesion layer the paint requires, the specific exterior paint formulations rated for vinyl flexibility, the application technique that prevents the runs, brush marks, and drip patterns that untested shutter painting projects produce, and the drying and reassembly sequence that protects the paint film through its critical initial cure period. These shutter painting steps have been tested on vinyl, specifically not on wood, not on aluminum, and they produce results that last seven to twelve years with minimal maintenance, rather than the one-year failure that the discouraging online voices correctly attribute to the wrong preparation and the wrong paint.
The Shutters Blueprint
Step 1: Remove the Shutters and Assess Their Condition
The shutters painting project that produces the image’s quality result begins with a step that most casual DIY shutter painting guides recommend, but most casual shutter painters skip: removing the shutters from the house and painting them horizontally on a flat work surface rather than painting them in place on the facade. In-place shutter painting approaching the shutters with a brush while they are mounted on the wall produces three quality failures that horizontal painting eliminates: paint drips and runs that gravity pulls downward on the vertical surface and that are difficult to catch before they cure; brush strokes that follow the painter’s reach angle rather than the shutters’ grain direction; and inaccessible back surfaces and edge reveals that remain unpainted and deteriorate faster than the painted fronts, producing the specific edge-peeling failure that most in-place shutter painting projects show within two to three seasons.
Remove the shutters by unscrewing the mounting hardware at each shutter clip or bracket. Most vinyl shutters use a simple screw-in plastic clip system that can be removed with a Phillips screwdriver in under five minutes per shutter. Label each shutter’s position (top-left, bottom-right, etc.) with a piece of painter’s tape on the back before removing, so that reinstallation returns each shutter to its original mounting holes without refitting.
Once removed, assess each shutter for structural condition: look for cracked, broken, or warped louver sections that would make painting a wasted investment if the structural failure is severe enough to require replacement, regardless of paint condition. A shutter with minor sun-fading and chalking is the ideal painting candidate; a shutter with cracked or broken louvers should be evaluated for replacement rather than painting.
Step 2: Clean the Shutters Thoroughly Before Any Paint or Primer
Vinyl shutter surfaces accumulate a specific combination of organic material, mildew, algae, pollen, and the chalky degradation product of the original factory paint’s UV breakdown that is not removed by water alone and that prevents any primer or paint from bonding to the vinyl surface if left in place. The shutters cleaning step is not preparation for the painting step; it is a prerequisite for the primer bonding step, and the primer bonding is what makes the paint adhere. Clean shutters first is the rule that most failed shutter painting projects have violated.
Lay the shutters flat on sawhorses or a clean concrete surface and scrub all surfaces front, back, edges, and between the louvers with a solution of one cup of white vinegar per gallon of warm water and a medium-bristle scrub brush. The vinegar solution removes mildew and algae that soap alone does not address, and its mild acid action opens the vinyl’s surface pores slightly, improving the mechanical adhesion that the primer requires.
For shutters with significant chalking or oxidation (the powdery white residue that appears on old vinyl and faded paint), follow the vinegar scrub with a TSP (tri-sodium phosphate) solution. TSP is the specific cleaning agent that removes chalked paint residue and opens the vinyl surface to primer adhesion. Rinse thoroughly with clean water after all cleaning steps and allow the shutters to dry a minimum of four hours in warm, dry weather completely, or overnight in humid or cool conditions before proceeding to primer application.
Step 3: Apply the Correct Bonding Primer for Vinyl Shutters
The bonding primer is the shutters painting step that the discouraging online voices are omitting when they report that painted vinyl shutters peel within a year. They are reporting the result of paint applied directly to cleaned but unprimed vinyl, which does not produce adequate adhesion for exterior paint, regardless of the paint’s quality. Vinyl is a smooth, non-porous, slightly flexible surface that standard exterior primers do not bond to reliably; vinyl-bonding primers are specifically formulated with adhesion promoters that grip the vinyl surface’s molecular structure rather than simply sitting on top of it.
For vinyl shutters, use Rust-Oleum Clean Metal Primer, Zinsser Bulls Eye 1-2-3 in the spray formulation, or Krylon ColorMaster Primer Sealer; all three are formulated with the adhesion chemistry that vinyl surfaces require and are available in spray and brush-on formats. The spray format is the recommended primer application method for louvered vinyl shutters because it reaches between the louvers’ angled surfaces, where a brush cannot access without leaving runs, and where roller application is impractical. Apply the primer in a light, even coat from approximately 30cm distance, working from the shutter’s top to its bottom to allow any overspray to settle on the unprimed surface below rather than on already-primed surface above.
Allow the primer to cure for the full manufacturer’s specified drying time, typically one to two hours for spray primers in normal temperature conditions, before applying any paint. Primer applied in cool temperatures (below 10°C) or high humidity (above 70 percent relative humidity) may require significantly longer drying time; never rush the primer cure to proceed to the paint application step, as uncured primer does not provide the adhesion foundation that the paint coat requires.
Step 4: Choose the Correct Paint Formulation for Vinyl Shutters
The paint formulation for vinyl shutters requires two specific characteristics that most exterior paints do not possess: flexibility (the paint film must be able to flex with the vinyl’s thermal expansion and contraction without cracking or delaminating) and vinyl-rated pigment chemistry (some exterior paint colors, particularly those with high metallic pigment content, absorb sufficient heat on vinyl surfaces to cause the vinyl to warp a paint-caused structural failure called thermal blooming that limits which colors can be safely applied to vinyl).
For the sage green shutters in the image, the specific paint formulations that produce the quality, depth, and flexibility required are: Sherwin-Williams Duration Exterior in any color with a Light Reflectance Value (LRV) above 25 (the threshold below which very dark colors risk vinyl thermal blooming); Benjamin Moore Aura Exterior in Satin finish; or Rust-Oleum’s Painter’s Touch 2X exterior formulation in the color family that includes the sage green visible in the image Rust-Oleum Sage 285140 being one of the most frequently specified direct matches.
For the color temperature of the sage green shutters, specifically the cool, muted, gray-sage rather than a warm yellow-sage Sherwin-Williams Retreat SW 6207 or Benjamin Moore Cedar Grove (HC-130) in exterior satin provides the specific soft, muted quality the image demonstrates against the white vinyl siding.
Step 5: Apply the Paint to the Vinyl Shutters Correctly
The shutters paint application technique that produces the image’s quality requires two tools working together: a foam mini-roller (4-inch, 4mm nap) for the flat main surfaces of the shutter panels and between the louvers’ flat faces, and a 50mm synthetic angled brush for the louver edges, the frame members, and any areas where the roller cannot access without bridging from one surface to an adjacent surface.
Apply the first paint coat with the foam roller, working from the shutter’s top to its bottom in sections, rolling in the direction parallel to the louvers’ length rather than across them. Follow the roller pass immediately with the angled brush to remove the roller’s micro-texture from the paint surface while the paint is still wet. This “tip-off” technique, borrowed from furniture painting, produces a smoother final surface than rolling alone because it eliminates the slight orange-peel texture that rollers leave on smooth surfaces.
Allow the first coat to dry completely for a minimum of four hours minimum in normal conditions before applying the second coat. The second coat of shutters paint is applied in the same technique as the first, and should complete the opacity and depth of color that the one-coat application partially achieves. Assess the second coat in full sun before deciding whether a third coat is required. Some deeper sage greens require three coats over primer for the specific color depth the image demonstrates, and this is normal rather than an indication of inadequate preparation.
Step 6: Cure, Reinstall, and Maintain the Painted Shutters
The most damage to newly painted vinyl shutters occurs not during the painting process but during the period between paint application and full cure, the window of two to seven days (depending on temperature and humidity) during which the paint has dried to the touch but has not yet achieved its full hardness and adhesion strength. Paint that appears dry after four hours is not cured; it is film-dry, meaning the surface has formed, but the full cross-linking of the paint’s polymer chains that produces its hardness and adhesion is still completing. Mounting shutters against vinyl siding during this curing window can cause the paint surface to stick to the siding at contact points and peel when the shutter is later opened or removed.
Allow painted shutters to cure for a minimum of seven days in warm (above 20°C), dry conditions before reinstallation, or fourteen days in cool conditions. Stand the shutters vertically during the curing period without leaning them against any surface that the paint film could contact. When reinstalling, handle the shutters at the frame edges rather than the painted louver surfaces to prevent fingerprint impressions in the still-curing paint.
For shutters maintenance, inspect the painted surfaces annually for early-stage paint failure, micro-cracking, edge peeling, or any area where the paint has lost adhesion and address identified failures immediately with the original paint formulation applied over a light sand and spot-prime. Vinyl shutters painted with the correct primer and paint and maintained annually will retain their quality for seven to twelve years before requiring a full repaint.
Expert Secrets for Success
Pro-Tips for a Better Result
Paint vinyl shutters in the shade, never in direct sun. Vinyl surfaces heated by direct sun to temperatures above 35°C cause the applied paint to dry too quickly at the surface while the primer beneath has not sufficiently tacked, producing the intercoat adhesion failure that appears as paint that can be peeled cleanly from the primer surface. Paint vinyl shutters in the early morning or in the shade of the building, and avoid painting on days where the temperature is forecast to exceed 30°C.
Use a spray can of the same bonding primer for touch-up of any areas missed in the original primer application. After the first paint coat dries on the shutters, examine all surfaces in raking light for any areas where the paint has been absorbed unevenly, a sign that the primer did not cover adequately at that point, and that the vinyl surface is directly contacting the paint without the adhesion layer the primer provides. Spray a light primer touch-up at these points, allow to dry, and continue with the second paint coat rather than proceeding over an inadequately primed surface.
Apply a clear exterior topcoat over the finished shutters paint for additional UV protection. Quality exterior paints for vinyl include UV stabilizers in their formulation, but an additional clear exterior satin topcoat (such as Krylon Crystal Clear exterior aerosol or a brush-on clear exterior satin) applied over the fully cured shutters paint provides a sacrificial UV barrier that extends the color’s fade resistance by two to four years beyond the paint’s rated lifespan particularly valuable for south and west-facing shutters that receive maximum UV exposure.
Match the shutters’ paint color to the house’s existing door or accent trim color for the most cohesive exterior result. The image’s sage green shutters work against the white siding and white window trim because the sage green has been selected as an intentional accent color that relates to the green foliage visible in the window’s reflected glass. For houses without a strong foliage relationship, matching the shutters’ paint color to the front door’s color produces the most immediately cohesive exterior design result, using the shutters as a repetition of the door color that frames every window with the same accent tone that marks the primary entry.
Common Mistakes to Avoid
Don’t use latex wall paint as a shutters paint substitute. Interior or exterior latex wall paint lacks the flexibility rating required for vinyl shutters and will crack along the louver bends and at the frame corners within two seasons of thermal cycling. Always use paint specifically rated for exterior vinyl surfaces. The flexibility characteristic is listed on the paint’s technical data sheet as “vinyl flex” or “flexible film” and is the essential performance characteristic that distinguishes vinyl-appropriate shutters paint from all-purpose exterior latex.
Don’t skip the primer between cleaning and painting. The most consistent shutter painting failure reported by DIY painters who achieved clean surfaces and used quality exterior paint is peeling within six to twelve months, which occurs because the paint is adhering to the vinyl directly rather than to a bonding primer layer. The sequence is non-negotiable: clean, then prime, then paint. Any variation in this sequence that omits the priming step produces the one-year failure that the discouraging online voices correctly report.
Don’t reinstall the shutters within forty-eight hours of painting. The shutters’ paint’s surface may feel dry within four hours of application, but the film’s full hardness and flexibility, the properties that prevent it from being damaged during handling and installation, require a minimum of forty-eight hours in warm, dry conditions. Shutters mounted against the siding within this curing window risk paint damage at the contact points between the shutter and the siding, particularly on warm days when the vinyl siding is slightly soft under sun exposure and can impression-mold the still-curing paint.
Don’t use dark colors on vinyl shutters without checking the thermal expansion specification. Very dark shutters paint colors black, very deep navy, very dark green absorb significantly more solar heat than lighter colors and can cause vinyl shutters to warp, buckle, or develop surface distortion called “thermal blooming” when the absorbed heat exceeds the vinyl’s thermal tolerance. Most vinyl shutter manufacturers specify a maximum paint color LRV of 25 or above, meaning the paint color must reflect at least 25 percent of incident light to prevent thermal distortion. Confirm the specific paint color’s LRV before applying any dark paint color to vinyl shutters.
Why shutters Matter
Shutters matter to the home’s exterior and therefore to the home itself in a way that is disproportionate to their actual surface area. A set of freshly painted shutters on a white colonial, like the image above, transforms the entire facade’s appearance, not because the shutters cover much of the visible surface but because they are the facade’s primary color element, the element that all other surface colors are read against, and the element that most clearly communicates whether the house is tended or neglected. Faded, chalky shutters on an otherwise maintained house produce the specific visual quality of a face that has gone slightly wrong in one feature; the overall impression is undermined by the specific failure.
Research in curb appeal and residential psychology has consistently documented the relationship between shutter condition and perceived overall house maintenance quality, specifically, that house facades with freshly painted, richly colored shutters are rated as significantly better maintained and more valuable than equivalent facades with faded shutters, even when all other elements (landscaping, roof condition, driveway) are identical. This disproportionate impact of shutters on whole-facade perception is what makes the painting project so high-value per dollar of material cost: the paint and primer for two to four shutters typically costs $40 to $80, and the visual impact on the facade’s perceived maintenance quality is equivalent to spending five to ten times that on other maintenance items.
Easy Peasy Life Matters is built on the conviction that home maintenance done correctly with the right materials, the right preparation, and the right technique produces results that are both more durable and more satisfying than rushed or incorrect maintenance, and that the shutters painting project is among the most accessible and most visually rewarding of all exterior home improvement tasks. The sage green shutters against the white colonial window in the image are proof that vinyl shutters can be painted to a quality that is genuinely indistinguishable from new replacement shutters at a fraction of the cost, in a single day of preparation and painting, lasting a decade with annual inspection. These steps are the proof put into practice.
Frequently Asked Questions
Can all vinyl shutters be painted, or are some types not suitable?
Most vinyl shutters can be painted successfully with the correct preparation and materials. The vinyl-bonding primer and vinyl-rated exterior paint process described in this guide works for the standard hollow-bodied louvered vinyl shutters and solid raised-panel vinyl shutters found on most colonial and traditional-style homes. The shutters that are not suitable for painting are those with severe structural damage (cracked, warped, or broken louvers), shutters made of very thick or rigid vinyl that has become brittle with age and UV exposure, and shutters that are already coated with a peeling factory paint where the complete removal of the existing coating would require effort exceeding the cost of replacement.
What colors are safe to use on vinyl shutters?
Colors with a Light Reflectance Value (LRV) of 25 or above are in the safe range for vinyl shutters. This threshold ensures the color reflects enough solar radiation to prevent the heat absorption that causes vinyl thermal distortion. Most medium and light exterior paint colors fall safely above the LRV 25 threshold; very dark colors (black, very dark navy, very deep charcoal) fall below it. The sage green in the image has an approximate LRV of 30 to 40, well within the safe range. Check the specific paint color’s LRV on the manufacturer’s technical data sheet or product listing before purchasing, particularly for any shutters paint color that reads as dark or deeply saturated.
How long does painted vinyl shutters paint last?
Vinyl shutters painted with the correct bonding primer and a vinyl-rated exterior satin formulation typically last seven to twelve years before requiring full repaint, depending on the shutters’ orientation (south and west-facing shutters receive maximum UV exposure and tend toward the lower end of the range), the climate (high-UV, high-temperature climates accelerate paint breakdown), and the quality of the annual maintenance inspection routine (shutters with promptly touched-up early-stage failures last significantly longer than shutters whose failures are allowed to progress without intervention).
Do I need to remove shutters from the house to paint them?
Removing shutters is strongly recommended but not strictly required. In-place painting is possible with careful masking of the surrounding siding and window trim, but it consistently produces lower-quality results than horizontal painting on a flat surface. The gravity-run risk, the limited access to the shutter’s back and edges, and the application-angle constraint all produce finish quality that is visibly inferior to the results from removed shutters. For shutters with simple screw-in clip mounting systems (the most common vinyl shutter mounting approach), the removal and reinstallation process adds approximately thirty minutes per shutter pair to the project time, a small investment that substantially improves the project’s outcome.
How do I match new shutter paint to existing shutters that have already been painted?
If some shutters on the house have been previously painted and need to match newly painted shutters, the most reliable match approach is to bring a painted shutter (or a chip of the existing paint removed from a shutter’s inconspicuous edge) to a paint retailer with a spectrophotometer color-matching service. Benjamin Moore and Sherwin-Williams stores both offer this service at no charge. The spectrophotometer reads the existing paint’s exact color composition and produces a formula match in any paint formulation you specify. Note that if the existing painted shutters have faded from their original color due to UV exposure, the spectrophotometer will match the faded color rather than the original, which may or may not be the desired outcome, depending on whether the goal is matching the existing color or restoring the original.