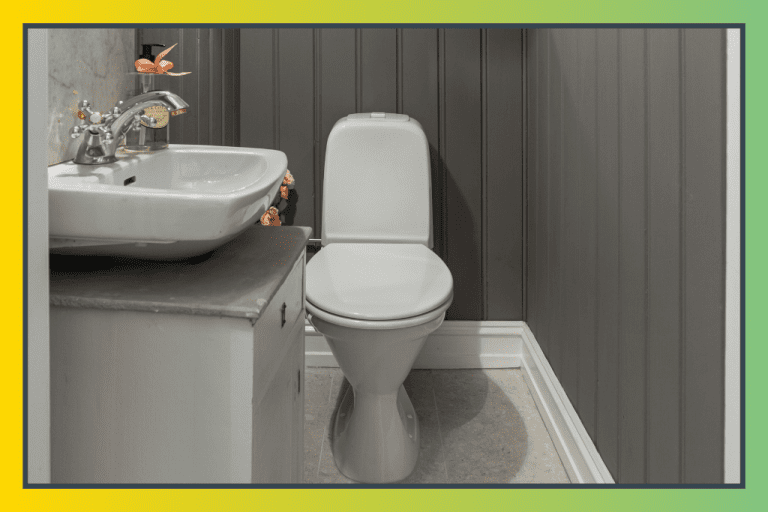
You spent three weekends on this bathroom. New paint on the walls, a clean, warm white that finally feels right. A honey oak vanity that makes the whole room feel designed rather than assembled. A matte black faucet that you spotted in a bathroom mirror ideas post at midnight and ordered the next morning without second-guessing it. You stood in the doorway when it was all done and felt the specific satisfaction of a room that had been genuinely improved. And then you looked at the mirror. The same flat, frameless, builder-grade rectangle that was there when you moved in. No edge, no finish, no frame, no relationship to any of the intentional decisions surrounding it. Every bathroom mirror idea you had considered, you had deferred. The mirror was still waiting, and now it was the only thing the room was asking about.
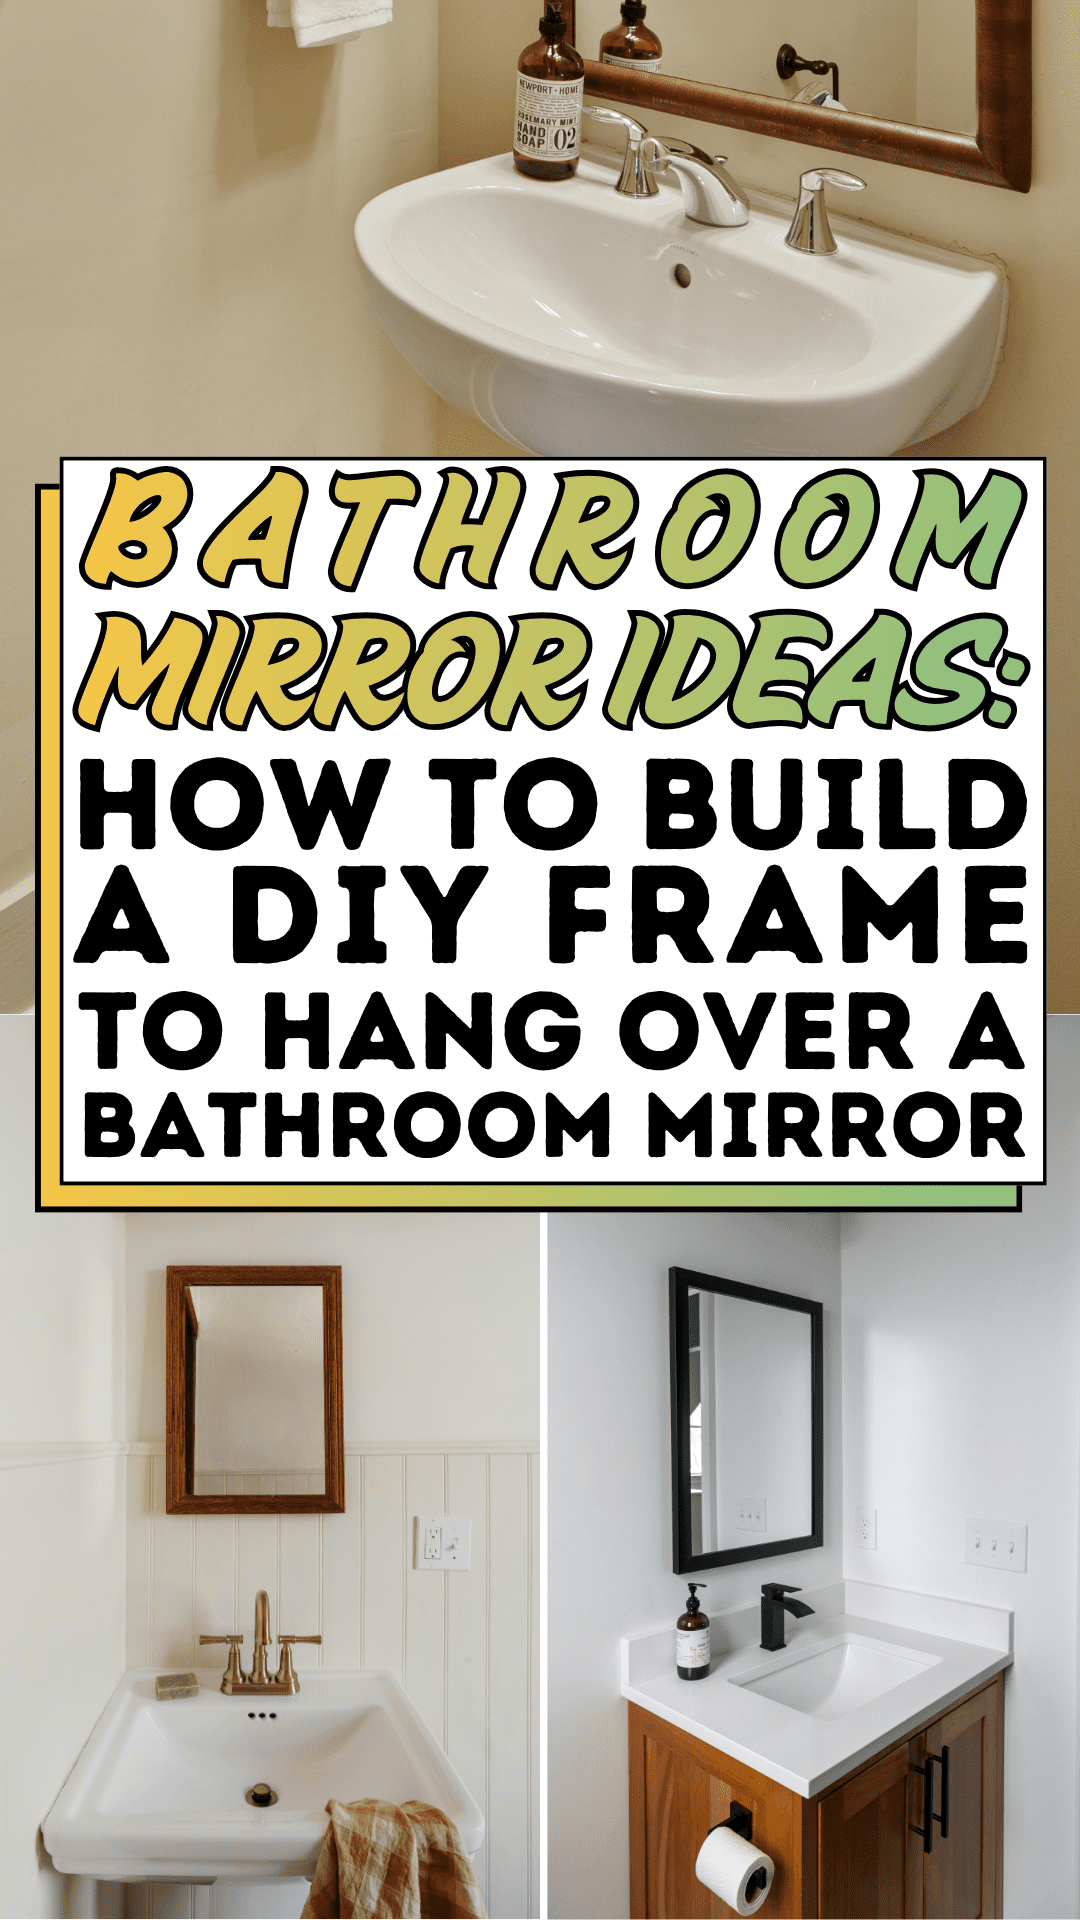
The good news is that the best bathroom mirror ideas for exactly this situation do not require you to remove the existing mirror, replumb anything, or spend $400 on a replacement. The bathroom in the image above demonstrates the most practical and most impactful of all DIY bathroom mirror ideas: a custom-built frame installed directly over the existing plate glass, using mirror-safe adhesive and lumber from any home improvement center. The matte black frame in the image does not just improve the mirror; it organizes the entire room. The two black globe light fixtures above it, the matte black faucet below it, and the black toilet paper holder to the side, all of them were already there, but the frame is what connects them into a palette. That is the specific power of well-executed bathroom mirror ideas: a single framing decision that makes every other hardware choice in the room look like it was planned from the beginning. This guide is how you build it.
When people search for bathroom mirror ideas, they are usually looking for one of two things: inspiration or instruction. Most bathroom mirror ideas posts give them the first and stop there. This guide gives you both the design logic that makes the framed mirror in the image work, and the step-by-step construction and installation process that lets you replicate it in your own bathroom over a single weekend. If you have been collecting bathroom mirror ideas for longer than you care to admit and have not acted on any of them, this is the post that changes that. The frame is simpler than it looks. The result is better than you expect. Let’s build it.
The Bathroom Mirror Ideas Blueprint
Step 1: Measure the Mirror and Define Your Frame Dimensions
Every one of the bathroom mirror ideas in this guide begins at the same place: a tape measure and a notepad. Before any lumber is purchased or any frame profile is chosen, you need precise measurements of the existing mirror and not just its height and width. The measurements that determine whether your bathroom mirror idea succeeds or fails at the installation stage are the clearance measurements: the distance from the mirror’s edge to the adjacent walls on each side, the distance from the mirror’s bottom edge to the vanity countertop, and the distance from the mirror’s top edge to any light fixtures or ceiling elements above.
These clearances define the maximum frame width your bathroom mirror idea can use without creating contact conflicts. A mirror sitting 25mm from a side wall limits the frame projection on that side to 25mm or less. A mirror sitting 15mm above the countertop requires a frame profile thin enough to clear that gap. Identify these limits before choosing a frame profile, and build the design to work within them rather than discovering the constraints after materials are cut.
The frame overlaps the amount by which the frame’s inner edge sits on top of the mirror’s face, rather than stopping at the mirror’s edge is the installation detail that holds the frame in position without wall anchors. A 15mm to 25mm overlap on each side is the standard for DIY bathroom mirror ideas of this type. For a mirror measuring 90cm × 60cm with a 20mm overlap, the frame’s inner dimension is 86cm × 56cm. Calculate outer dimensions by adding twice the frame member width to each inner dimension. Write every number down before moving to the next step. Bathroom mirror ideas that start with imprecise measurements end with imprecise results.
Step 2: Choose a Frame Profile and Finish That Unifies the Bathroom’s Hardware Story
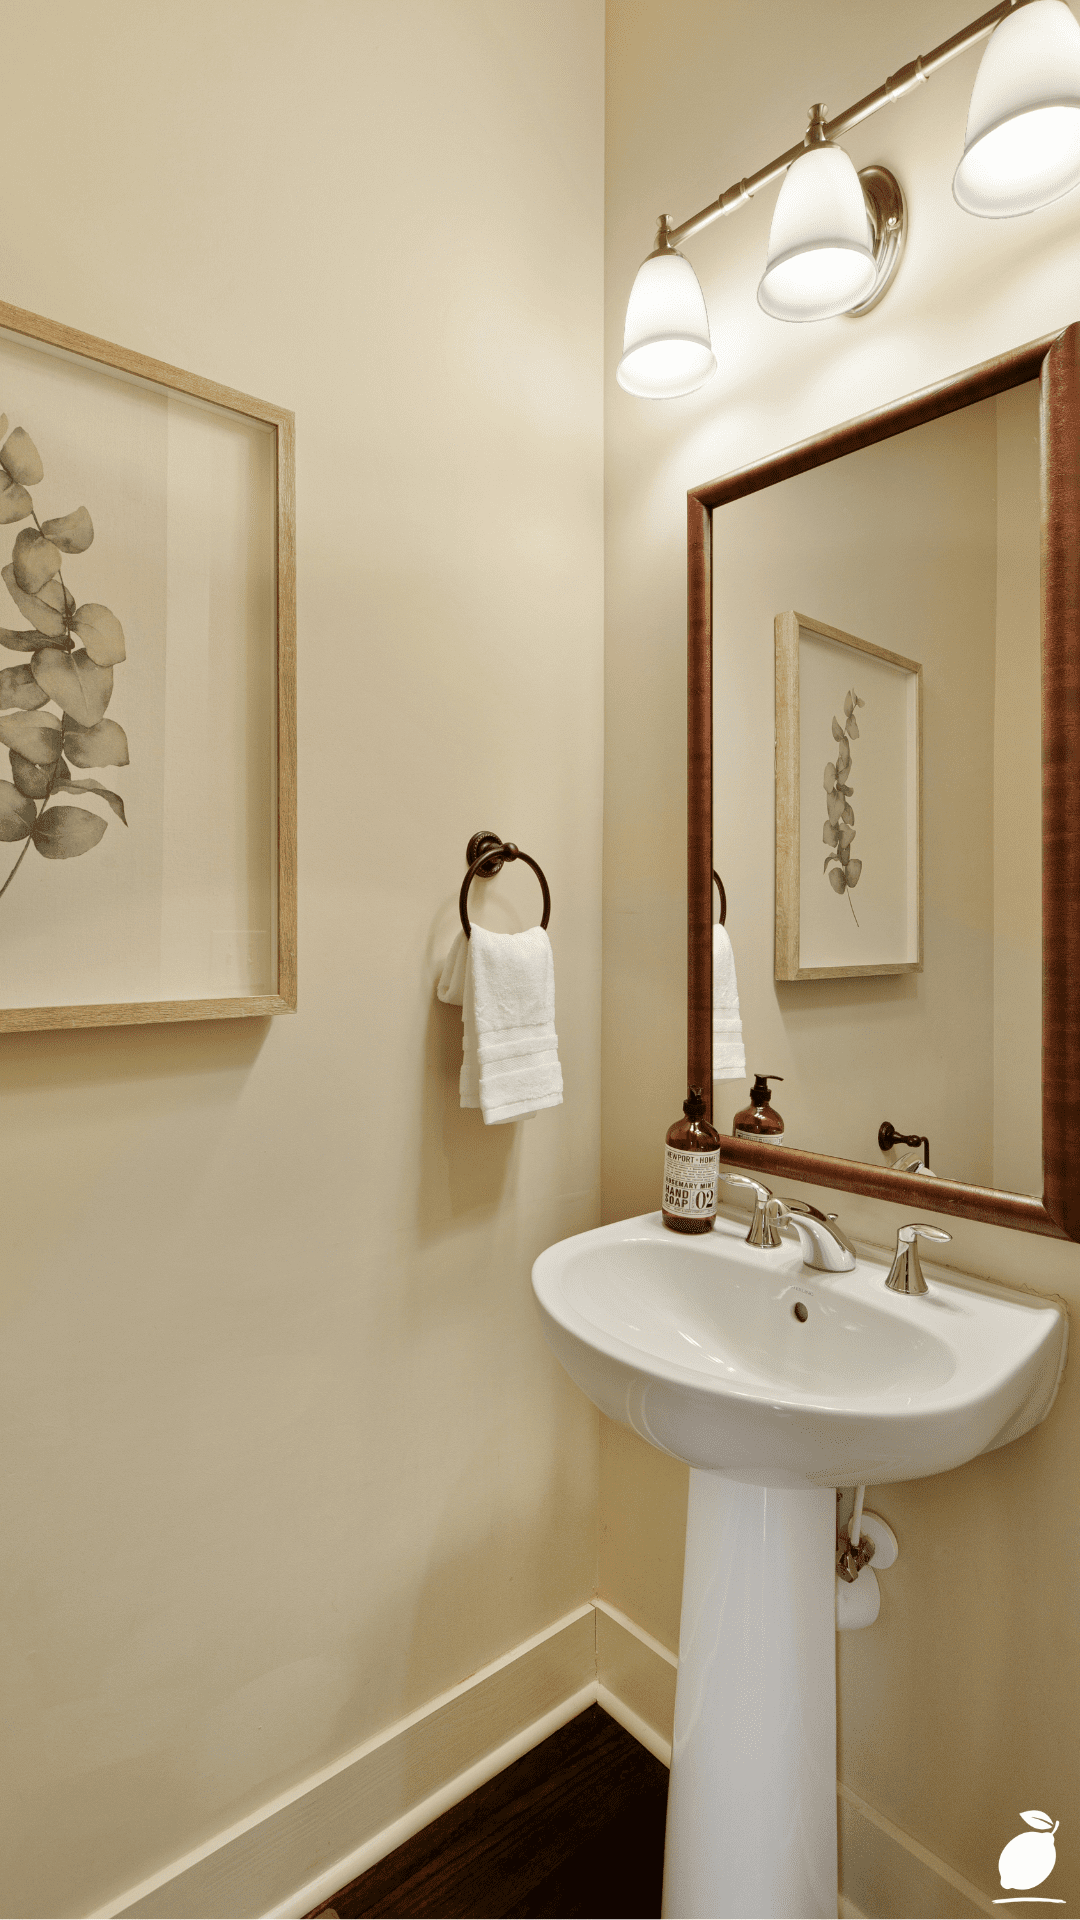
Of all the bathroom mirror ideas available to a homeowner with an existing plate glass mirror, the DIY frame is the one with the highest design leverage because the frame finish you choose becomes the palette anchor for every other hardware element in the room. This is the design principle the image demonstrates so clearly: the matte black frame does not just dress the mirror, it retroactively organizes the faucet, the light fixtures, and the accessories into a coherent set. The frame is the decision that makes all the other decisions look intentional.
Before selecting a finish for your bathroom mirror idea, walk through the bathroom and inventory the existing hardware finishes. Write down the finish of every metal element: faucet, light fixture, towel bar, toilet paper holder, cabinet pulls, and drain cover. Count how many elements share each finish. The finish with the most representation in the room is your frame finish target; matching it creates the organizing palette effect that the image demonstrates. If your hardware is predominantly matte black, your bathroom mirror idea frame is matte black. If it is brushed nickel, your frame targets that register. If the hardware is mixed with no dominant finish, matte black is the most versatile default choice for contemporary bathroom mirror ideas because it reads as a deliberate accent against white walls and works with warm wood, cool stone, and white ceramic equally well.
For frame lumber, 50mm × 25mm poplar or pine strikes the right balance for most bathroom mirror ideas: wide enough to read as a design element at normal viewing distance, shallow enough to sit neatly against the mirror face. Deeper profiles 50mm × 38mm or 50mm × 50mm suit larger mirrors above 100cm in width, where a narrower frame would look undersized. MDF is a viable alternative for painted bathroom mirror ideas where maximum surface smoothness is the priority; seal all MDF edges and faces before installation to prevent moisture infiltration in the bathroom’s humid environment.
Step 3: Cut Miter Joints With the Precision the Project Deserves
The visual difference between a DIY bathroom mirror idea that looks store-bought and one that looks handmade comes down almost entirely to the quality of the miter joints at the frame’s four corners. A precisely cut miter joint, both faces meeting at exactly 45 degrees with no gap across the full joint face, is invisible in the finished frame. The two members appear to flow continuously around the corner, exactly as they do in the purchased framed mirror in the image. An imprecise miter joint produces a gap at the corner that is visible at the viewing distance of a bathroom mirror, which is face level, daily, for the lifetime of the installation.
Before cutting any frame lumber, calibrate your miter saw. Set the blade to 45 degrees, cut a test piece from scrap lumber, and check the resulting angle with a digital angle finder. Miter saws drift from their calibrated settings over time; a half-degree error produces a visible corner gap on a frame that you will look at every morning. Adjust until the test cut reads exactly 45.0 degrees.
Cut the top and bottom frame members first, long point to long point, equal to the frame’s outer width. Dry-fit these two members together and check the miter faces for gap-free contact before proceeding. Confirming the first pair tells you that both your saw calibration and your dimension calculations are correct for this specific bathroom mirror idea. Cut the side members from long point to long point equal to the outer height only after the first pair passes the dry-fit test. Dry-fit all four members together before committing to assembly. The time spent on precision cutting is the single investment that most determines the quality of every bathroom mirror idea that involves a DIY frame.
Step 4: Assemble the Frame Square, Tight, and Ready to Finish
Assembly of a bathroom mirror idea frame is a two-part process that should happen quickly and in sequence: adhesive bonding for long-term joint strength, and mechanical fastening for immediate hold while the adhesive cures. Apply a thin, even bead of wood glue across the full face of each miter joint. Coat one face only per joint to prevent squeeze-out from obscuring the joint line. Bring each joint together with firm hand pressure before driving a 23-gauge pin nail or 18-gauge brad nail through the face of one member into the end grain of the adjacent member. Repeat at all four corners.
Immediately after fastening all four corners, check the frame for square by measuring both diagonals, corner to corner, in both directions. Equal diagonal measurements confirm a square frame ready for installation. Unequal measurements mean the frame has racked slightly during assembly and will hang visibly crooked against your bathroom wall. Correct racking while the glue is still uncured by applying diagonal hand pressure at the longer-diagonal corners until the measurements equalize, then hold or clamp in position for ten minutes.
Fill all brad nail holes and any minor joint imperfections with lightweight wood filler. Allow to dry fully, then sand the entire frame with 150-grit sandpaper. Follow with 220-grit on all visible faces. The sanded surface is the foundation on which the paint finish sits. A rough or incompletely filled surface at this stage produces a rough paint result regardless of paint quality. For bathroom mirror ideas aiming at a professional-grade finish, surface preparation is where that standard is set or abandoned.
Step 5: Prime, Paint, and Seal for Bathroom-Humidity Durability
A bathroom mirror idea executed in wood lives in a demanding environment: daily temperature cycling, elevated humidity from shower steam, cleaning spray contact, and occasional direct water splash. A frame that was not properly sealed against these conditions will show it within eighteen months peeling paint at the edges, swelling at the joints, and discoloration at the bottom member closest to the countertop splash zone. Proper priming and sealing is not a finishing detail; it is the structural investment that makes a bathroom mirror idea permanent rather than temporary.
Apply one full coat of shellac-based primer or high-adhesion oil-based primer to every surface of the assembled frame: all four visible faces, all four edges, and the back face. Shellac-based primer seals wood fibers against moisture absorption, prevents tannin bleed-through from pine, and provides the adhesion base that water-based topcoat paints need to bond reliably in humid environments. Allow to dry per the manufacturer’s instructions before the topcoat.
Apply two coats of trim-grade latex paint in the chosen finish color: matte, eggshell, or semi-gloss, based on the desired sheen. Trim-grade formulations cure significantly harder than wall paint and resist the repeated cleaning contact that bathroom surfaces receive. Sand lightly with 220-grit between coats and wipe with a tack cloth. After the final coat cures for a full 48 hours, apply one coat of water-based polycrylic in matte or satin finish as the final humidity-resistant sealer. This last step is what separates bathroom mirror ideas that hold up for a decade from ones that look tired in two years. Do not skip it.
Step 6: Install the Frame Over the Existing Mirror
Installation day for this bathroom mirror idea is the shortest day of the project and the one where the result becomes real. Two conditions must be met before adhesive touches the frame: the mirror surface must be clean, and the adhesive must be mirror-safe.
Clean the entire mirror face, not just the edge zone where the frame will contact it, but the full surface with isopropyl alcohol on a lint-free cloth. Work in overlapping passes from top to bottom. Soap film, hard water deposits, and skin oils left on the mirror surface dramatically reduce adhesive bond strength, and the areas where contamination remains are the areas where the frame will eventually separate. Allow the isopropyl alcohol to evaporate completely before proceeding.
Apply mirror-safe construction adhesive specifically formulated without the solvents that attack mirror silvering in a zig-zag pattern across the back face of the frame within the contact zone. Keep the adhesive 5mm from the inner edge to prevent squeeze-out onto the reflective surface. With a helper, position the frame over the mirror, center the overlap on all four sides, and press firmly for sixty seconds. Apply painter’s tape across the top and sides to brace the frame against the mirror surface while the adhesive achieves initial set. Leave the tape in place for 24 hours. When the tape comes off, you will have a bathroom mirror idea result that looks purchased, performs permanently, and costs a fraction of what the mirror in the image would have cost as a replacement unit.
Expert Secrets for Success
Pro-Tips for a Better Result
Test frame width with cardboard before cutting lumber. Cut strips of cardboard to your planned frame width and hold them against the mirror edges in your actual bathroom before purchasing any wood. Bathroom mirror ideas that look proportionally perfect in inspiration images sometimes read as too narrow or too wide against a specific mirror size in a specific bathroom. This five-minute cardboard test is the most reliable way to validate a bathroom mirror idea proportion before materials are committed, and it costs nothing.
Count hardware finish repetitions before choosing frame color. The frame color decision in a bathroom mirror idea is most effective when it reinforces the bathroom’s existing dominant hardware finish rather than introducing a new one. Walk through the bathroom and physically count how many elements share each metallic finish: faucet, light fixture, towel bar, cabinet pulls, and drain. The finish with the most repetitions is your frame target. Three or more matching elements are the threshold at which the frame becomes a palette organizer rather than just another object.
Apply painter’s tape to the mirror surface before positioning the frame. Run a strip of painter’s tape along the inner perimeter of the mirror face, the zone just inside where the frame overlaps will sit, before applying adhesive to the frame. Any adhesive that squeezes through the inner edge gap during installation will land on the tape rather than the reflective mirror surface, and the tape can be removed cleanly after the adhesive has skinned but before it has fully cured. This bathroom mirror idea protection step takes three minutes and prevents a problem that is otherwise very difficult to fix.
Coordinate frame finish with light fixture finish before both are purchased. The image’s bathroom mirror idea works as well as it does because the frame finish and the light fixture finish are identical, both matte black, both with the same surface quality. If you are replacing the light fixture as part of the same bathroom refresh, select the frame finish and fixture finish together rather than sequentially. A frame and fixture chosen in isolation from each other often appear as near-matches rather than exact matches, which produces a result that is noticeably less resolved than the image above.
Common Mistakes to Avoid
Don’t use standard construction adhesive on a mirror. This is the most consequential mistake in any bathroom mirror idea involving installation over an existing mirror, and it is made frequently because the packaging of standard and mirror-safe construction adhesives looks nearly identical in the home improvement center aisle. Standard construction adhesive solvents migrate through the contact interface and attack the metallic silvering on the back face of the mirror, producing irreversible black-edge deterioration that spreads inward from the contact points and cannot be reversed. Mirror-safe adhesive is the same price and available in the same aisle. Read the label before purchasing this single distinction: the difference between a bathroom mirror idea that lasts and one that damages your existing mirror permanently.
Don’t install a painted frame before the paint has fully cured. Fresh latex paint feels dry to the touch within hours and appears surface-dry within a day, but its internal cure, the process by which the paint film cross-links into a hard, cohesive layer, continues for 7 to 30 days, depending on formulation, humidity, and temperature. Installing a bathroom mirror idea frame with construction adhesive before the paint has achieved meaningful hardness risks the adhesive bonding to the soft paint film rather than the wood substrate, producing a frame that delaminates at the paint layer rather than holding to the mirror. Paint the frame, wait a minimum of 48 hours in normal bathroom conditions, and then install.
Don’t let the frame’s outer dimension exceed the mirror’s outer dimension. The outer edge of a bathroom mirror’s frame must be equal to or smaller than the mirror’s outer edge on every side. A frame that projects beyond the mirror’s edge onto the bare wall creates a step between the frame’s back face and the wall surface, prevents flat contact between the frame and the mirror, and produces a visible gap between the frame’s outer edge and the wall that makes the entire bathroom mirror installation look dimensionally incorrect. Verify the outer frame dimensions against the mirror dimensions at the planning stage, and confirm once more before cutting any lumber.
Don’t skip sealing the frame’s back face and cut edges. The visible faces of a bathroom mirror idea frame receive primer, paint, and polycrylic sealer as a matter of course. The back face and cut edges are invisible in the installed result and are therefore frequently left bare or under-sealed. In a high-humidity bathroom environment, bare or under-sealed wood at the back face and edges absorbs and releases moisture cyclically, causing dimensional changes that progressively stress the adhesive bond and can eventually cause the frame to separate from the mirror surface. Seal all surfaces, including the back face and every cut edge, before installation.
Why Bathroom Mirror Ideas Matter
The bathroom mirror is the most intimate reflective surface in the home, the one you face before the day has made any claims on you, before the world has offered any feedback, before you have made any decisions about who you are presenting yourself as today. What surrounds that reflection is not neutral. The environment that holds the mirror shapes the quality of the daily encounter with it, and a frameless builder-grade mirror in an otherwise intentional bathroom creates a specific kind of visual friction, the low-grade, perpetual awareness that something in the room was never resolved. Bathroom mirror ideas that address that friction do something more than improve a surface. They complete a room, and completing a room changes the daily quality of being in it.
The DIY bathroom mirror idea in this guide carries a specific kind of value beyond its aesthetic result. Behavioral research in environmental psychology consistently finds that personal effort invested in a living environment, the act of building, choosing, and installing rather than simply purchasing, produces a stronger attachment to the space and a higher satisfaction with the home overall. A frame you built and hung yourself produces a bathroom mirror idea result that looks identical to a purchased frame from the doorway and reads as fundamentally different every morning when you use it, because it carries the specific satisfaction of a problem you understood and solved. That satisfaction is not trivial. It is the kind of daily positive reinforcement that compounds in a household that takes its own spaces seriously.
Easy Peasy Life Matters is built on the conviction that the most meaningful home improvements are not always the most expensive ones; they are the most precisely targeted ones. The bathroom mirror idea in the image above is a perfect expression of that conviction. One afternoon. One trip to the lumber yard. One carefully executed frame. The bathroom that was almost finished became, finally, unmistakably, yours. These are the bathroom mirror ideas that make the difference. And that difference, seen every morning in a mirror that finally looks like it belongs, is worth every careful miter cut that produced it.
Frequently Asked Questions
What are the best bathroom mirror ideas for updating a builder-grade mirror without replacing it?
The most impactful bathroom mirror idea for an existing plate glass mirror is a DIY frame built from painted lumber and adhered over the mirror’s face with mirror-safe construction adhesive. This approach adds the visual definition of a framed mirror, a finished perimeter that relates to the bathroom’s hardware palette without removing the existing mirror, touching the wall behind it, or incurring the cost of a replacement unit. Other accessible bathroom mirror ideas for the same scenario include adhesive mirror frame kits available at home improvement centers, decorative molding strips applied with mirror-safe adhesive, and framed mirror overlays in standard sizes designed for this specific application.
How do I choose the right frame width for my bathroom mirror idea?
As a starting proportion, frame member width should equal approximately 5 to 7 percent of the mirror’s longer dimension. For a 90cm wide mirror, a frame width of 45mm to 63mm sits in the right visual range. Narrower frames under 40mm on a standard vanity mirror read as trim rather than framing, and lack the visual weight to anchor the bathroom mirror idea at normal viewing distance. Wider frames over 75mm on mirrors under 100cm can overwhelm the reflective area and make the mirror feel smaller than it is. The cardboard strip test described in the Pro-Tips section is the most reliable way to validate proportion in your specific bathroom before cutting any lumber.
Can bathroom mirror ideas involving a DIY framework work in a rental apartment?
Yes, and the over-frame installation approach is particularly well-suited to rental contexts because it requires no wall anchors, no removal of the existing mirror, and no permanent modification of any surface. Mirror-safe construction adhesive bonds to the mirror face and is removable at the end of a tenancy by carefully sliding dental floss or fishing line behind the frame to break the adhesive bond, followed by adhesive residue removal with isopropyl alcohol. The existing mirror is undamaged, the wall behind it is undisturbed, and the bathroom mirror idea result has been enjoyed for the duration of the lease. Always confirm with your landlord before proceeding, as adhesive application policies vary by tenancy agreement.
What tools do I need to execute bathroom mirror ideas involving a DIY frame?
The essential tool for a DIY bathroom mirror idea frame is a miter saw capable of accurate 45-degree cuts, either a dedicated compound miter saw or a circular saw with a miter guide. Miter saws are available for rent at most home improvement centers for under $30 per day. Beyond the saw, you need a tape measure, a carpenter’s square, a brad nailer or hammer, and finish nails, 150-grit and 220-grit sandpaper, a paintbrush or small foam roller, and a caulk gun for the adhesive application. No specialized tools, no plumbing, no electrical work. Bathroom mirror ideas at this construction level are accessible to anyone comfortable making careful measurements and using a saw.
How do I maintain a DIY bathroom mirror idea frame over time?
Clean the frame surface with a damp cloth and mild soap the same cleaning approach appropriate for any painted wood surface in a bathroom environment. Avoid abrasive cleaners or scouring pads that scratch the paint or polycrylic sealer surface. Inspect the inner edge of the frame annually for any sign of adhesive gap development, a very thin crack of light between the frame back face and the mirror surface, indicating the beginning of adhesive bond stress. If a gap begins developing, apply a thin bead of mirror-safe silicone sealant along the inner edge of the frame where it meets the mirror surface; this re-seals the gap and prevents moisture from infiltrating the contact zone. A well-maintained bathroom mirror frame requires nothing more than this level of occasional attention to remain solid and clean for the lifespan of the bathroom renovation around it.