There is a particular Saturday afternoon that most parents of school-age children know intimately: the one where the screen time limit has been reached, the outdoor option has been rejected by weather or temperament, and the question “what can we do?” arrives with the specific weight of a child who is genuinely bored and is not going to resolve it independently. The options that feel achievable a board game, a puzzle aren’t landing. The options that feel worthwhile a baking project, a proper craft feel like they require preparation you haven’t done. The afternoon threatens to dissolve into the specific domestic low-grade misery of everyone in the same space doing separate unsatisfying things.
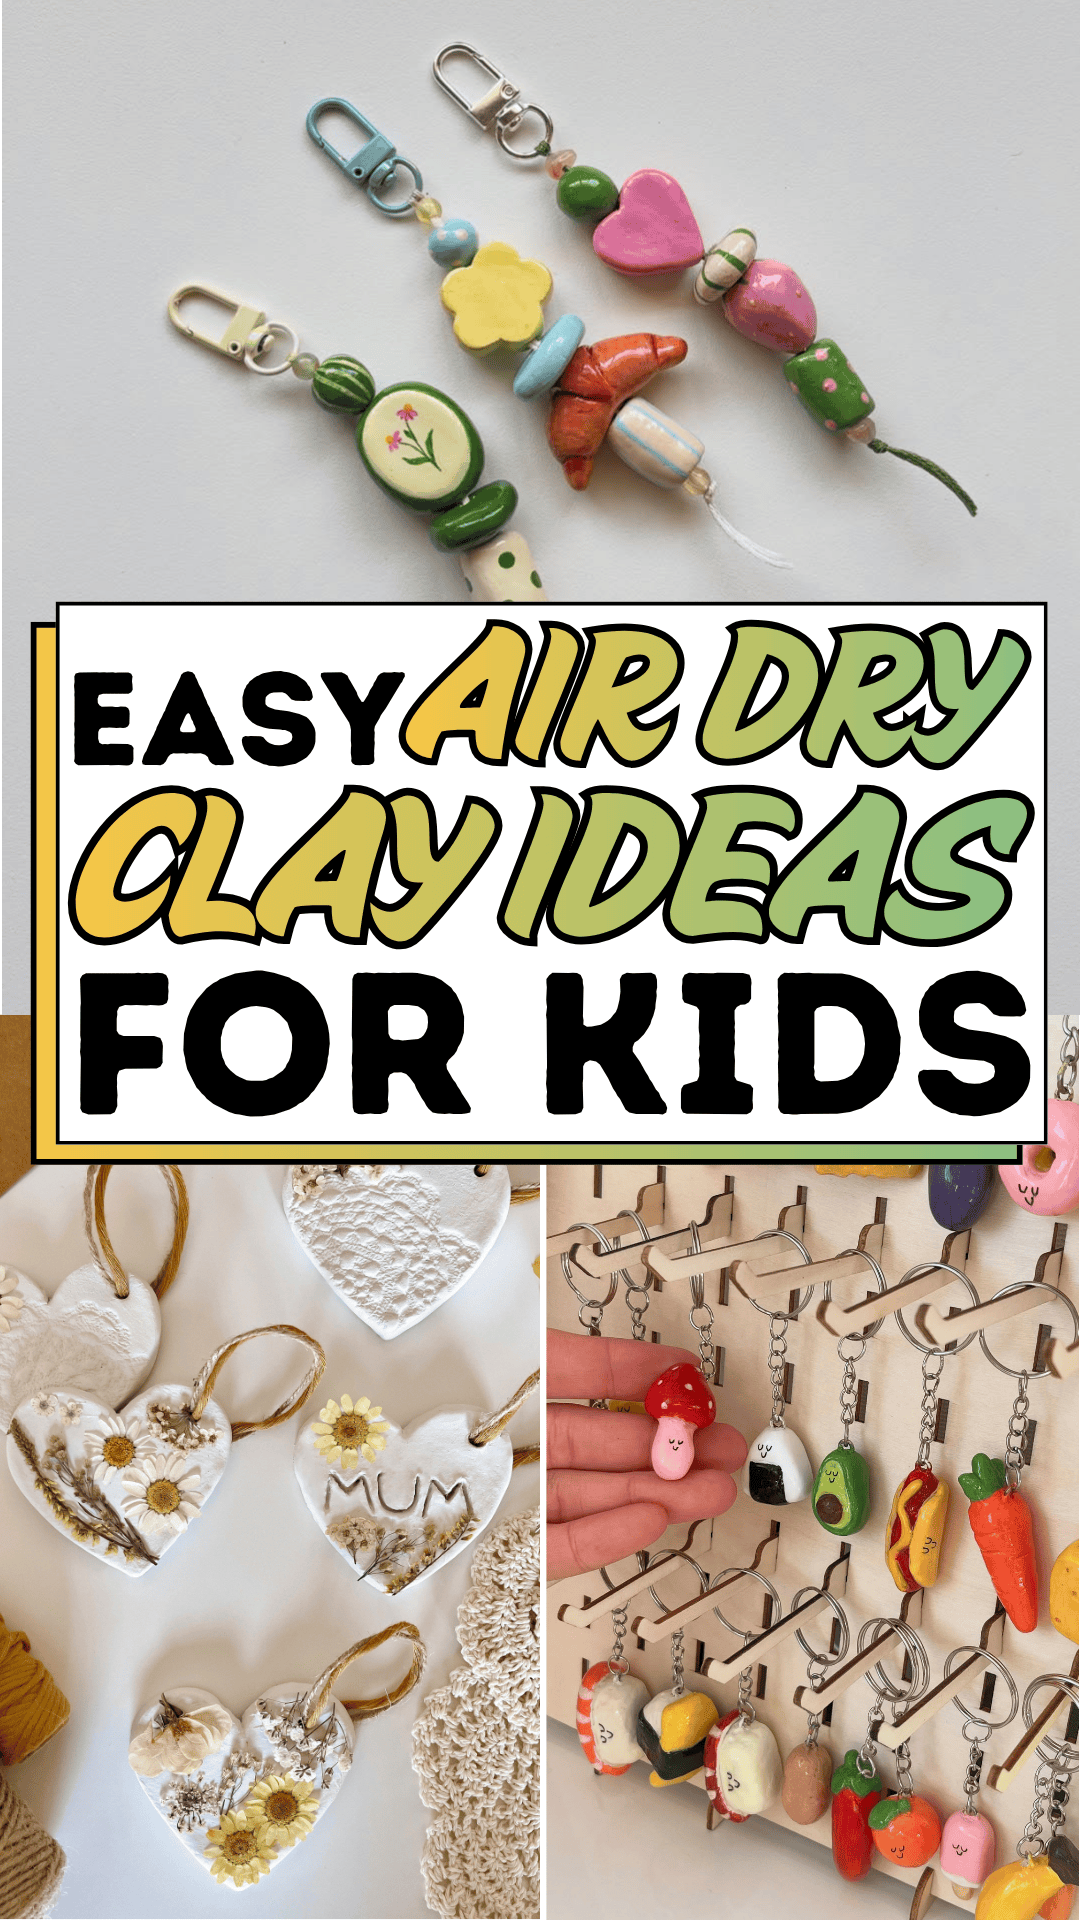
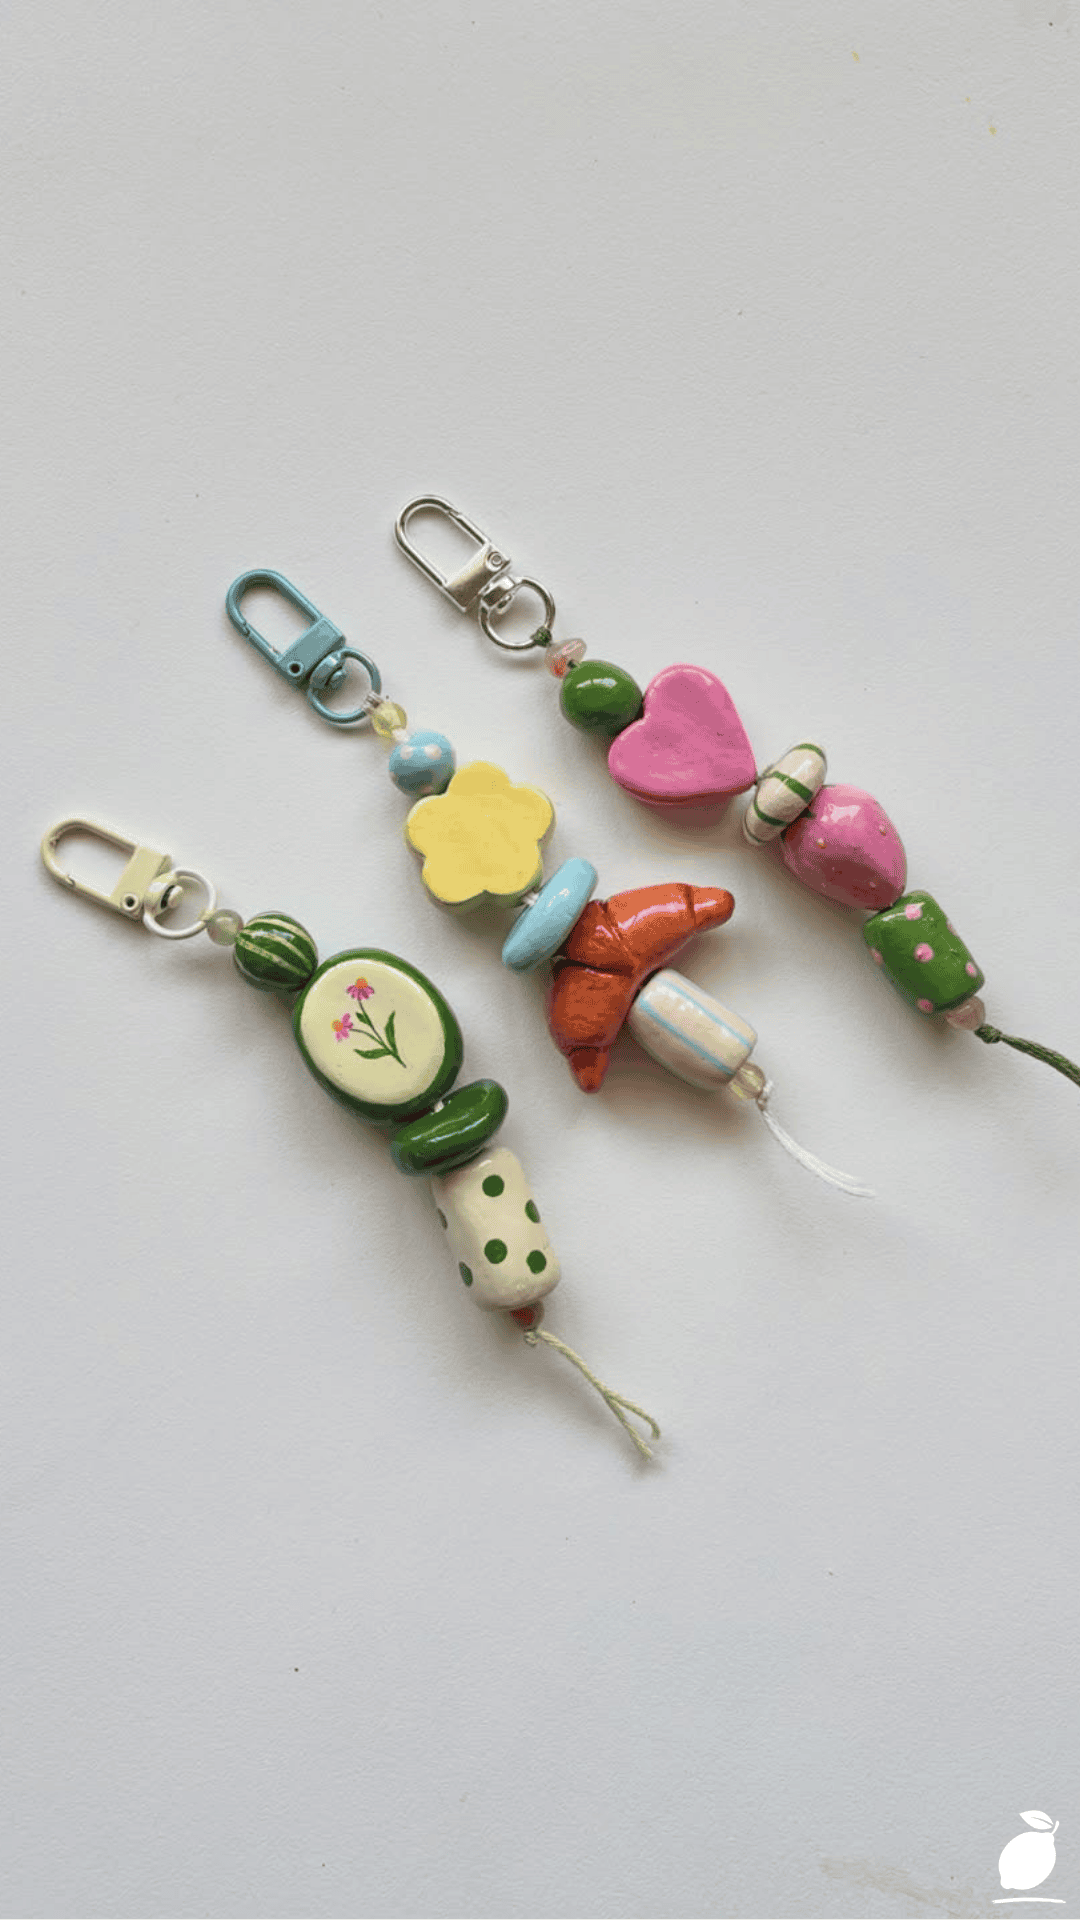
Air dry clay is the answer to this afternoon that almost no parent thinks of first and almost every parent who tries it thinks of thereafter. The three handmade keychains in the image above a green bead charm with painted flowers, a whimsical croissant and carrot set, and a pink heart and strawberry collection are the output of a clay session that required no kiln, no specialist tools, and no preparation beyond a pack of clay and a few basic supplies. Each keychain is individual, cheerful, and genuinely skilled-looking despite being made by hand without specialist knowledge. And the process of making them the shaping, the texturing, the painting, the assembling keeps a child engaged for the kind of sustained, focused period that screen time provides without any of the aftermath.
Air dry clay ideas for kids succeed where many craft activities fail because the material itself is forgiving and satisfying in equal measure: it responds to touch, holds the shape the child gives it, dries without any additional equipment, and accepts paint in a way that transforms simple shapes into finished objects of genuine pride. This guide gives you the complete framework for an air dry clay keychain project from workspace preparation through to the final assembled charm that produces results as appealing as the image above for children aged six and up, with minimal adult intervention and maximum creative independence.
The Air Dry Clay Blueprint
Step 1: Prepare the Air Dry Clay Workspace
Air dry clay projects succeed most reliably when the workspace is set up before the child sits down; the same preparation principle that applies to all children’s craft sessions but is particularly important for air dry clay, where a child left to manage both workspace setup and creative making simultaneously tends to invest more energy in the setup than in the project.
Cover the work surface with a silicone craft mat, a large sheet of baking parchment, or a cutting board; air-dry clay does not adhere to these surfaces and dries cleanly away from them at the end of the session. A surface that air dry clay adheres to (bare wood, fabric, paper without a silicone coating) produces the specific frustration of work stuck to the table, which disrupts the creative session and damages the finished pieces when they are pulled free.
Set out the air dry clay in the colors or in a single white block depending on the session’s design approach. For the keychain project in the featured image, a single block of white air dry clay with acrylic paints for coloring after drying produces the cleanest and most versatile result. The air dry clay shapes are formed in white, allowed to dry completely, and painted with the specific colors and details visible in the featured charms. This sequence allows more precise color placement and fine detail work than colored air dry clay, which mixes and muddies at the join points when different colors are worked together.
Additional supplies for the air dry clay keychain project: wooden toothpicks and a blunt tool for texture work, a small rolling pin or smooth jar for flattening, plastic wrap to cover unused air dry clay between handling sessions (air dry clay dries quickly when exposed to air and must be kept covered), small metal keychain rings or clasps, and thin-gauge craft wire or jewellery thread for stringing the beads.
Step 2: Design the Air Dry Clay Keychain Elements
Before the air dry clay is opened, spend five minutes looking at the featured image or other reference images with the child and deciding which elements each keychain will include. The design conversation “what shapes will go on yours?” is one of the most important moments in the air dry clay session because it gives the child a creative brief to work toward rather than an open-ended making prompt that can produce decision paralysis.
Effective air dry clay keychain elements for children aged six to ten include: simple bead shapes (sphere, oval, cylinder, disc), simple food charms (the croissant, the carrot, and the strawberry in the featured image are all achievable by rolling and shaping a small piece of air dry clay), and symbolic shapes (hearts, stars, flowers, leaves). All of these shapes are achievable by rolling, pinching, and shaping small amounts of air dry clay without specialist tools.
Each air dry clay element needs a threading hole created before the clay dries using a wooden toothpick to pierce through the center of each bead or through the top of each charm before the clay begins to firm up. Make the hole slightly larger than the threading wire or cord to account for any minor shrinkage that occurs as the air dry clay dries. A hole created after drying requires drilling and risks cracking the piece.
Design the keychain’s three to five elements before making any of them. A simple pencil sketch or a verbal list of “I want a heart, a strawberry, and two round beads” gives both the child and the adult facilitator a clear production plan that makes the making session efficient and prevents the half-finished design problem where a child loses track of what they were making partway through.
Step 3: Form the Air Dry Clay Elements
With the design defined and the workspace prepared, the air dry clay making begins. Guide children through the basic forming techniques before they work independently: rolling a smooth ball (the foundation of sphere beads and round charms), rolling a sausage shape (the foundation of cylindrical beads and carrot shapes), and pinching a flat disc (the foundation of flower petals and flat charms) are the three techniques that produce every element in the featured image’s keychains.
Sphere beads: Roll a pea-sized amount of air dry clay between the palms of both hands in a circular motion until a smooth sphere forms. Pierce through the center with a toothpick immediately, rotating the toothpick to create a clean, even hole rather than dragging clay to one side.
Cylindrical beads: Roll a pea-sized amount of air dry clay on the work surface under one finger until a short cylinder forms. Flatten the ends slightly by pressing on a flat surface. Pierce through the center length of the cylinder with a toothpick.
Carrot charm (as in the featured image): Roll a small piece of air dry clay into a cone shape, fat at the top, tapered to a point at the base. Use a toothpick to draw horizontal lines around the cone’s circumference to create the carrot’s segment texture. Pierce a hole through the fat end for threading.
Croissant charm: Roll a small cylinder of air dry clay, then curve it gently into a crescent shape. Press the curved sides lightly against the work surface to create the slightly flattened sides of a croissant. Use a toothpick to draw three to four parallel lines along the curved surface for the croissant’s layered texture detail. Pierce a hole through one tip for threading.
Heart charm: Pinch two small balls of air dry clay together at the top and shape the base into a point. Smooth the join between the two balls at the top with a fingertip. Pierce a hole through the top of the heart for threading.
Strawberry charm: Roll a small cone. Use a toothpick to dimple the surface with small dots to create the strawberry’s seed texture. Roll three tiny flat leaf shapes from a separate piece of air dry clay and press them onto the fat end of the cone as leaves. Pierce a hole through the leaves for threading.
Step 4: Dry the Air Dry Clay Elements Completely
Once all air dry clay elements are formed, place them on a piece of parchment paper or a wire cooling rack and leave to dry at room temperature. Standard air dry clay dries in 24 to 48 hours depending on the thickness of the pieces; thicker pieces take longer and benefit from being turned halfway through the drying period to prevent the underside from remaining soft and losing its shape.
Do not attempt to accelerate air dry clay drying in an oven unless the specific clay product is rated for oven use; most air dry clay cracks when subjected to oven heat and will lose the detailed texture work that makes the charms beautiful. Patience through the drying period is the step that most reliably separates successful air dry clay projects from frustrated ones.
Check each piece is fully dry before painting by pressing gently at the thickest point; dry air dry clay feels firm throughout with no give. Soft or cool spots indicate residual moisture that will cause paint to bubble or crack if applied before the piece is fully cured.
Step 5: Paint and Finish the Air Dry Clay Elements
Once fully dry, the air dry clay pieces are ready for painting. Acrylic craft paint is the most widely available and most effective paint for air dry clay; it adheres readily to the clay’s slightly porous surface, dries quickly, and is available in the full range of pastel and bright colors visible in the featured image.
Paint the base color of each piece first, the overall color of the bead or charm, and allow it to dry completely before adding any detail work. For the strawberry charm: red for the body, green for the leaves. For the croissant: warm golden-brown with a slightly darker brown along the texture lines. For the carrot: orange for the body, green for the leaves. For the polka-dot cylindrical bead: paint the base color first, then add polka dots with a round-tipped toothpick dipped in the contrasting paint color.
Allow all paint to dry thoroughly, then apply a coat of clear PVA glue or a dedicated air dry clay sealant to all pieces. This seals the paint against chipping, gives the pieces the slight sheen visible on the heart and strawberry in the featured image, and significantly extends the durability of the finished keychain in daily use.
Step 6: Assemble the Air Dry Clay Keychains
With all pieces painted, sealed, and fully dry, assemble the keychains by threading the elements onto thin craft wire or jewellery cord in the planned sequence. Thread from the bottom of the sequence to the top, adding the furthest-from-clasp element first, and secure the bottom element with a small crimp bead or a tight knot in the cord.
Attach the completed element strand to a keychain clasp ring using a jump ring (a small open metal loop available from craft and jewellery supply shops). Open the jump ring sideways (never straight, which distorts the circle), thread the element strand and the clasp ring, and close the jump ring. The assembled keychain is now complete and ready for use.
Expert Secrets for Success
Pro-Tips for a Better Result
Condition the air dry clay before use. Air dry clay that has been in a package for several weeks becomes stiffer and less pliable than freshly opened clay. Knead the air dry clay in your hands for two to three minutes before giving it to a child. The warmth of the hands softens the clay and restores its workability, which makes the forming process smoother and the finished shapes more precise. This is particularly important for detailed charm work where children need the clay to hold fine shapes.
Use texture tools from the kitchen for more interesting surface effects. The ribbed surfaces on the beads in the featured image are achievable with a piece of window screen mesh pressed against the surface of a sphere bead. A fabric with visible texture, a piece of lace, or a section of the textured side of a kitchen sponge pressed against an air dry clay surface before the element dries creates a professional-quality surface texture that painted polka dots and hand-drawn lines can’t replicate. Collect a small toolkit of texture-producing household items before the air dry clay session begins.
Seal painted air dry clay pieces before threading. Unprotected acrylic paint on air dry clay scuffs and chips at the thread holes when the keychain is in regular use. Applying a clear sealant, PVA glue thinned 50:50 with water, a coat of clear nail varnish, or a dedicated air dry clay varnish before threading the beads ensures the paint holds through the handling a keychain receives daily. Seal after all paint layers are fully dry and before the assembly step.
Common Mistakes to Avoid
Don’t make pieces too thick. Air dry clay pieces thicker than approximately 8mm take significantly longer to dry than thin pieces and are prone to cracking during the drying process as the outer surface dries faster than the interior. For keychain beads, aim for a maximum diameter of 8 to 10 mm; this dries completely within 24 hours and produces the compact, neat bead size visible in the featured image. Larger decorative pieces should be built with a hollow center to reduce the thickness of the clay wall and accelerate drying.
Don’t skip the threading hole before drying. The most common air dry clay beginner mistake is forgetting to create the threading hole before the clay is fully dry. A dry air dry clay bead cannot be pierced with a toothpick without cracking; the compression the clay needs for piercing collapses the dried bead. Pierce every element immediately after forming, before any drying begins, and check each hole before placing the piece on the drying rack.
Don’t paint air dry clay that is still damp. Paint applied to air dry clay before it is fully dry produces a surface that bubbles, peels, and traps moisture in the clay interior that continues to cause structural problems after the visible surface appears normal. A fully cured air dry clay piece feels firm throughout and sounds slightly hollow when tapped; these are the tests for paint-readiness. When in doubt, allow an extra day of drying before painting rather than risking the bubbling and peeling that marks the most common air dry clay project failures.
Why Air Dry Clay Matters
There is a specific quality to the engagement that air dry clay produces in children that is genuinely different from most other craft activities, and the difference is tactile. Air dry clay is worked with the hands, shaped by pressure and warmth, formed by a physical understanding of what the material will do when pushed and pulled in different ways. This hands-in-material quality of engagement is among the most beneficial for child development: it builds fine motor skills that translate directly to handwriting, drawing, and musical instrument learning, and it builds the spatial reasoning that underpins mathematics and science understanding in ways that two-dimensional craft activities cannot.
For parents and children making air dry clay keychains together, the project has a specific collaborative quality that screen-adjacent activities don’t provide: both people are doing something with their hands, both are looking at the same material, both are engaged in the small decisions of color and shape and assembly that the project requires. The conversation that happens in this shared physical engagement the casual, unhurried kind that feels impossible to engineer and happens naturally when both people are focused on a common task is the specific conversational texture of a parent-child relationship that is genuinely close. Air dry clay doesn’t create these conversations. It creates the conditions for them.
Easy Peasy Life Matters is built on the belief that the best family afternoon is not the most expensive or the most elaborate one it is the one where everyone in the household is genuinely engaged in making something together, where the output is something a child is proud to carry in their pocket or give to a friend, and where the Saturday afternoon that threatened to be a difficult one becomes instead one of the ones they mention weeks later with specific and affectionate detail. Air dry clay keychains are that afternoon. Simple to start, satisfying to complete, and genuinely charming to use.
Frequently Asked Questions
How long does air dry clay take to dry completely?
Standard air dry clay pieces of standard bead size 6 to 10mm diameter dry completely in 24 to 48 hours at room temperature. Thicker pieces require additional time: pieces up to 15mm diameter may require 48 to 72 hours; pieces above 15mm in any dimension should be allowed 72 hours or more before testing for complete dryness. Turn pieces halfway through the drying period to expose all surfaces to air. Do not attempt to dry air dry clay in an oven unless the specific product specifies oven compatibility; most air dry clay cracks under oven heat.
What paint works best on air dry clay?
Acrylic craft paint is the most reliable and most widely available paint for air dry clay. It adheres to the clay’s surface without requiring primer, dries quickly between coats, is available in a full range of colors, and is non-toxic when dry, making it safe for children’s projects. Apply two thin coats rather than one thick coat for the most even and most durable result. Watercolor paint can be used on air dry clay for a softer, more translucent effect but provides less coverage and less durability than acrylic. Always seal with a clear varnish or PVA glue after painting to protect the finish.
Can air dry clay projects be made waterproof?
Air dry clay is not inherently waterproof; it will soften and lose its shape if submerged in water for extended periods. Painted and sealed air dry clay projects can tolerate brief exposure to moisture (rain, damp hands) when sealed with a waterproof varnish such as a dedicated air dry clay sealant, clear spray varnish, or multiple coats of clear nail varnish. For keychains and bag charms that will be used in daily life but not submerged in water, a good sealant provides adequate protection. For air dry clay items that will be used in genuinely wet environments, consider polymer clay (oven-baked) as a more inherently durable alternative.
What age is appropriate for air dry clay projects?
Air dry clay projects are appropriate for children from approximately age four upward, with the complexity of the project adjusted to the child’s developmental stage. Children aged four to six can roll balls and cylinders and create simple bead shapes with adult guidance. Children aged six to nine can form the more complex charm shapes (hearts, croissants, strawberries) with the toothpick texture techniques described in the Blueprint steps. Children aged ten and above can work independently through the full keychain project from forming through to assembly. The greatest adjustment for younger children is in the threading and assembly steps, which require the fine motor precision of a steady-handed adult or older child.