The porch has been on the list for three years. Not because it is broken, the concrete is structurally sound, the steps are safe, the roof keeps the rain off, but because every time you approach the front door, you are reminded that the entrance to your home looks exactly like the entrance to a utilitarian storage building rather than a place where people live and gather. The bare concrete, grey and featureless, undercuts everything else the house offers: the carefully chosen front door color, the shrubs you pruned last weekend, the hanging basket that looks magnificent for exactly six weeks a year. The porch floor is the detail that no amount of potted plants or a new doormat fully resolves, because the problem is structural rather than decorative.
The concrete replacement calculation never quite works out in favor of action. Ripping out and repaving in natural stone or period-appropriate brick requires a contractor, a skip, structural work, and a budget that keeps getting deferred to next year. Covering it with composite decking feels like hiding a problem rather than solving it. Painting it in a porch-floor paint is an afternoon project that looks better for approximately one season before the traffic patterns reveal themselves in worn patches that no second coat entirely corrects. The porch floor sits in a category of home problems that are too significant to ignore and too involved to resolve on a whim until someone explains that laying brick directly over an existing concrete porch floor is a project achievable in a single weekend with modest materials and a sequence that any patient DIYer can execute.
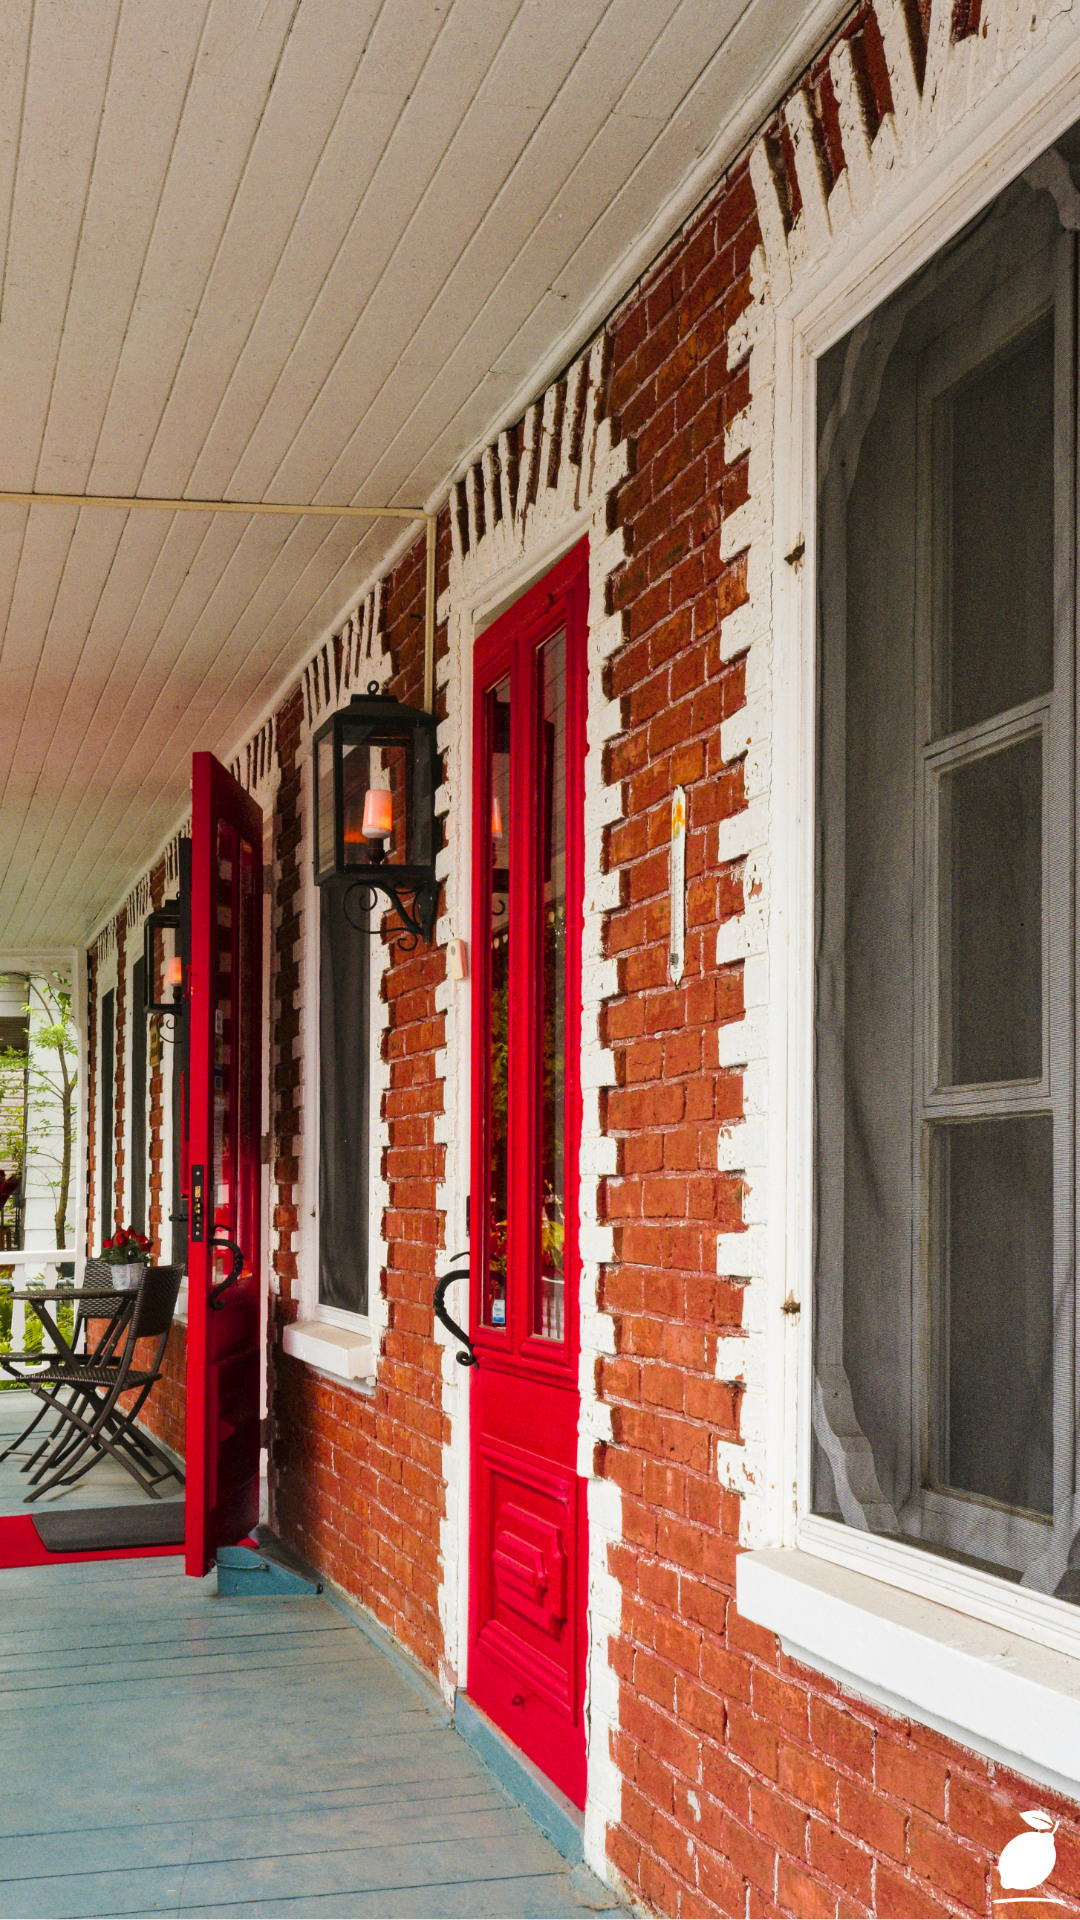
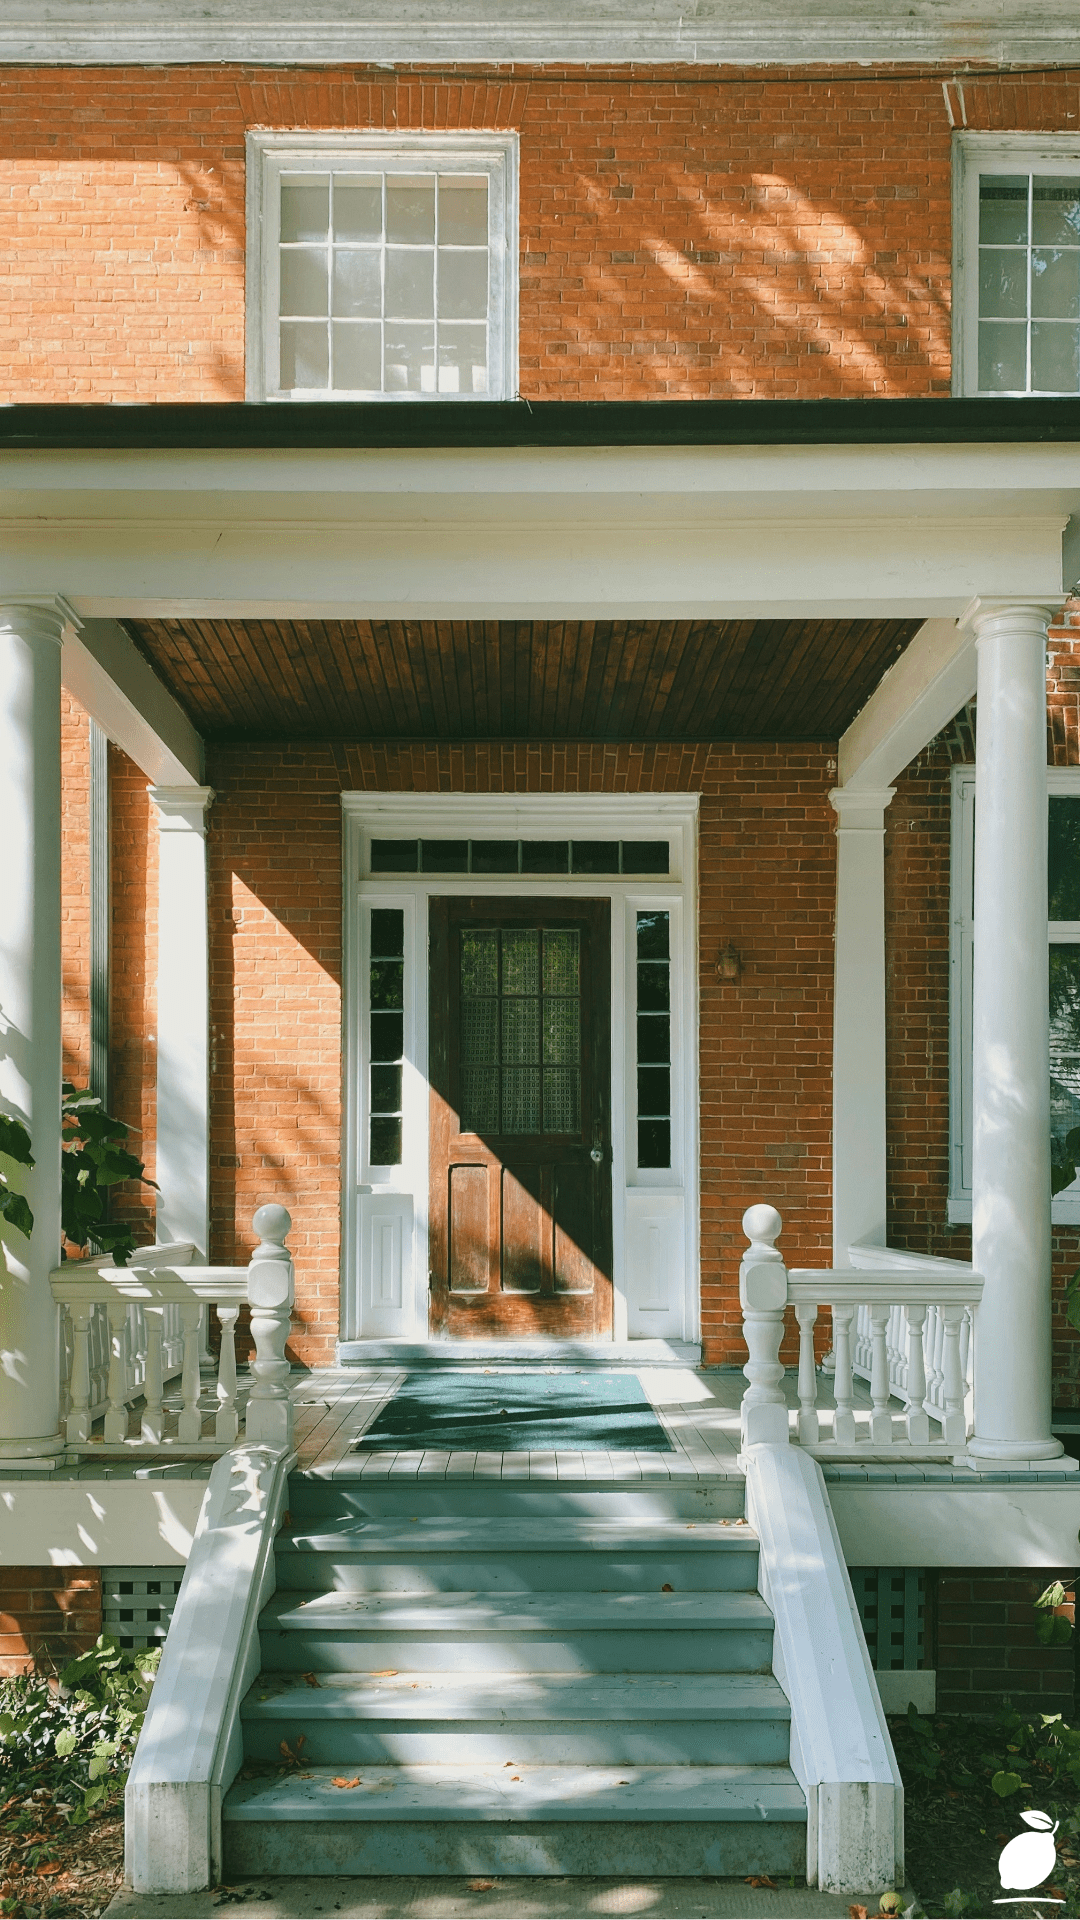
That Victorian porch in the image, with white columns, a dark green door, classical balusters, and a porch floor that reads as deliberate and composed against the red-orange brick of the house walls, is the arrival experience that a brick porch floor creates. It does not look like a project. It looks like a decision made once, correctly, that has required nothing further since. Brick laid on concrete transforms a porch floor from a liability to an asset, adding the texture, color, and period character that concrete never provides. Here is exactly how to do it.
The Porch Floor Blueprint
Installing brick on a concrete porch floor is a structured project with a clear sequence. The quality of the result depends almost entirely on the quality of the preparation. Follow these steps in order, and the finished porch floor will be stable, beautiful, and durable for decades.
Step 1: Assess and Prepare the Existing Concrete Porch Floor
The concrete porch floor is the substrate on which every subsequent step depends. Before purchasing materials or planning patterns, assess the existing slab for the conditions that determine whether a brick overlay is structurally viable.
Check for cracks wider than 3mm. Surface hairline cracks are not a concern, but structural cracks that shift under load indicate movement that will eventually crack the brick overlay above them. Fill stable surface cracks with a concrete repair compound and allow it to cure fully. Check that the existing porch floor is level; a variation of more than 10mm across the porch surface needs to be corrected with a self-leveling compound before brick laying begins.
Check the height relationship between the existing porch floor level and the door threshold and step nosings: adding brick thickness (typically 65mm for a standard brick laid flat) plus mortar bed (typically 10-15mm) raises the finished porch floor level by 75-80mm. Confirm this additional height does not create a conflict with the door swing or step riser height that would require adjustments beyond the scope of the porch floor project.
Sweep and clean the existing concrete porch floor thoroughly, remove any paint, sealant, or loose material that would prevent a mechanical bond between the mortar and the slab, and prime the concrete surface with a bonding agent SBR (styrene butadiene rubber) diluted 1:1 with water, applied by brush across the entire surface, and allow to dry before the mortar is mixed.
Step 2: Choose Your Brick and Lay Out Your Pattern
Brick selection for a porch floor is not the same decision as brick selection for a garden path. A porch floor brick must be rated for pedestrian foot traffic, resistant to freeze-thaw cycling, and thin enough or the existing porch floor level low enough to accommodate the additional height without conflicting with the door threshold.
Reclaimed thin brick slips, genuine fired clay brick cut to 20-25mm thickness, provide the most authentic period character for a Victorian or traditional porch floor and add far less height than a full-depth brick. Purpose-made clay paving bricks in a matching tone to the house brick are the next most appropriate choice. For a more contemporary porch floor, smooth-faced engineering bricks offer a clean, durable surface. Avoid standard house bricks for porch floor use; they are too porous for ground-contact applications and will absorb water, expand in frost, and spall within a few seasons.
Lay your chosen brick out dry on the porch floor before mixing any mortar. This is the step that determines the finished appearance of the entire project. Test your chosen pattern: running bond (bricks offset by half in each course), herringbone (bricks at 45 degrees in an interlocking V formation), or basketweave (pairs of bricks alternating horizontal and vertical). Mark the starting centerline of the porch floor so the pattern reads symmetrically from the front approach. Identify where cut bricks will be required at the perimeter edges and around any posts, and plan these before work begins.
Step 3: Mix the Mortar and Prepare the Bed
The mortar bed for a brick porch floor overlay is a slightly stiffer mix than wall mortar, typically 4 parts sharp sand to 1 part cement by volume, with enough water added to produce a firm but workable consistency that holds its shape when squeezed in the fist without releasing water. Too wet a mortar bed produces a spongy base that allows bricks to shift during laying. Too dry a mortar cannot be screeded to a consistent level.
Mix in manageable batches no more than can be placed and bricked over in 45 minutes to prevent the mortar from skinning before the bricks are embedded. Add a small amount of SBR bonding agent to the mortar mix, approximately one part SBR to ten parts water, substituted for some of the mixing water, which improves adhesion between the mortar bed and the primed concrete porch floor slab beneath.
Screed the mortar bed to a consistent depth of 10-15mm across a manageable working section, approximately 1 square meter at a time, using two lengths of timber at the target depth as screed guides. Draw a straight-edged timber or screed board across the guides to produce a flat, even mortar surface ready for brick placement.
Step 4: Lay the Bricks
Working from the center of the porch floor outward toward the edges, place each brick firmly into the mortar bed with a pressing and slight rocking motion to ensure full contact between brick and mortar. Air pockets beneath bricks create hollow spots that crack under foot traffic. Use a rubber mallet to tap each brick to its final level, checking frequently with a spirit level that each brick is level with its neighbors in both directions.
Maintain consistent joint width between bricks using plastic tile spacers or timber offcuts of consistent thickness as spacing guides. Standard porch floor brick joints run 8-10mm wide enough to be visible and to provide the mortar mass needed for durability, narrow enough to look intentional rather than imprecise. Do not walk on recently laid sections of the porch floor. Protect the work area at the end of each session with boards spanning from the existing concrete onto the freshly laid brick perimeter to allow work to continue without loading the fresh mortar.
Step 5: Cut the Edge Bricks
Edge bricks, the cut pieces that fill the perimeter of the porch floor between the last full brick and the edge of the slab, step risers, or column bases are measured and cut individually. Use a diamond-blade angle grinder or a brick splitter for clean, consistent cuts. Score the cut line with a bolster chisel before cutting to prevent chipping. Lay cut bricks with their cut faces against the perimeter edge where they will be least visible, or against a strip of edging that conceals the cut face entirely.
A brick soldier course of bricks laid on their edge around the perimeter of the porch floor, creating a continuous border that meets the porch floor surface, concealing edge cuts, and giving the installation its finished, architectural appearance. Bed the soldier course in a continuous mortar haunch and allow it to cure for 24 hours before the final joints across the main porch floor surface are pointed.
Step 6: Point the Joints and Seal the Finished Surface
Allow the mortar bed to cure for a minimum of 24 hours, 48 hours in cool or damp weather, before pointing the joints. Prepare a slightly stiffer pointing mortar (3 parts sand to 1 part cement, colored to complement the brick if desired) and press it into the joints using a pointing trowel, filling each joint fully and finishing flush or with a slightly recessed profile.
Remove mortar smears from the brick face before they fully set using a stiff brush and clean water. Acid washing with a diluted masonry cleaner removes stubborn mortar residue after full cure, restoring the brick’s natural color and surface character.
Once the porch floor is fully cured, a minimum of seven days, apply a penetrating masonry sealer across the entire surface. A quality sealer reduces water absorption, protects against freeze-thaw spalling, and makes the porch floor significantly easier to clean and maintain. Reapply every three to five years. The sealed porch floor is the finished result: textured, period-appropriate, and structurally sound for the life of the house.
Expert Secrets for Success
Pro-Tips for a Better Result
- Dry-lay the entire porch floor before mixing mortar. A full dry layout of every brick, including cut pieces at the perimeter, confirms that the pattern reads correctly, that the cuts fall in the least visible positions, and that the material quantity is accurate. Adjusting dry bricks takes seconds. Adjusting mortared bricks takes significantly longer and leaves marks in the mortar bed that require reworking. The dry layout is the design sign-off that every subsequent step is built on.
- Prime the concrete slab the evening before laying. Bonding agent (SBR) applied the evening before allows it to reach a tacky, partially set state by morning, the condition at which it provides maximum adhesion between the mortar and the existing porch floor concrete. Applied immediately before mortar placement, it is too wet to be effective. Applied and left too long, it skins completely and loses adhesive properties. The overnight prime achieves the correct intermediate state reliably.
- Use a colored mortar that complements the brick. Standard grey cement mortar creates joints that contrast visually with warm-toned brick and make the porch floor look tile-like rather than traditional. A buff or warm grey mortar achieved by substituting buff cement for standard grey, or by adding a proprietary mortar pigment, produces joints that read as part of the porch floor composition rather than as a grid overlaid on it. Mix a small test batch and compare it against a dry brick before committing to the full quantity.
- Slope the porch floor surface away from the house. Every horizontal outdoor surface needs a fall a slight slope that directs rainfall away from the building rather than allowing it to pond against the house wall or threshold. The existing concrete porch floor should already have this fall built in; when screeding the mortar bed, maintain it rather than correcting it to level. A fall of 1 in 60, approximately 16mm per meter, is sufficient to drain the porch floor effectively without being perceptible underfoot.
- Seal the joint between the brick overlay and the house wall or column bases. The joint between the brick porch floor surface and the vertical building elements, it meets house wall, column bases, and step risers, should be filled with a flexible pointing compound or exterior-grade silicone rather than standard mortar. This joint experiences differential movement between the porch floor slab and the building structure, and a rigid mortar joint will crack repeatedly. A flexible seal accommodates the movement without opening a gap that allows water to track behind the brick overlay.
Common Mistakes to Avoid
- Laying brick on a structurally cracked or actively moving slab. A brick overlay cannot span active structural movement in the slab beneath it. Cracks that shift, open seasonally, or show differential settlement between either side of the crack will reflect through the brick and mortar overlay within one to three years, producing cracked and loose bricks directly above the slab crack. Have active structural cracks assessed and stabilized, or accept that a brick overlay is not the correct solution for a porch floor slab with ongoing movement.
- Adding too much height without checking the door threshold. A brick-on-concrete porch floor overlay typically adds 75-85mm to the finished floor level. This height addition may conflict with the door bottom clearance, require adjustment of the door threshold, or change the step riser heights to dimensions outside the comfortable and safe range (typically 150-180mm). Check all height relationships before committing to the project. Discovering a door clearance problem after the brick is laid requires either adjusting the door straightforwardly with some door types, complex with others, or cutting the mortar bed thinner than is structurally sound.
- Skipping the bonding agent on the concrete slab. A mortar bed placed directly onto an unprimed concrete slab without a bonding agent can delaminate from the slab within a few years, particularly in outdoor conditions where freeze-thaw cycles stress the interface between the mortar and the substrate. The bonding agent is the step that makes the brick overlay genuinely permanent rather than temporarily adherent. It costs almost nothing, takes fifteen minutes to apply, and prevents the most expensive possible failure mode of the entire project.
- Using standard house bricks rather than purpose-rated paving bricks. Standard building bricks have high water absorption and are not rated for repeated freeze-thaw cycling in a ground-contact application. Porch floor bricks must be either clay pavers, engineering bricks, or reclaimed bricks with a proven history of outdoor use. A standard brick overlay on a porch floor will begin to spall the face layer, flaking away within three to five winters in any climate where temperatures drop below freezing.
- Skipping the dry joint stage and pointing immediately after laying. Bricks bedded in fresh mortar need the mortar to achieve initial set, typically 24 hours before the joints are pointed. Pointing over fresh mortar disturbs the bed and can cause bricks to move fractionally out of level in sections already laid. The patience to wait before pointing is the discipline that produces clean, consistent joints in the finished porch floor surface.
Why Porch Floor Matters
The porch floor is the first surface every visitor, every delivery, and every returning family member steps onto when approaching your home. It is the transition between outside and inside the surface that contextualizes the front door, the house facade, and the arrival experience in a way that nothing behind it can fully compensate for if it is wrong. A porch floor that reads as considered and well-made tells everyone who steps onto it that the same standard applies to everything inside. A porch floor that reads as incomplete or neglected creates a first impression that the most beautiful interior cannot fully correct, because it is felt before anyone opens the door.
For families, the porch floor upgrade is the home improvement that changes daily life at the moment it matters most, the transition points of the day, when people leave and return. Children coming home from school stepping onto a porch floor that is beautiful and stable rather than worn and apologetic. Guests arriving for the first time experience an entrance that feels finished and welcoming. The small but genuine pleasure of a front step that looks exactly right against the color of the house wall and the shade of the front door. These are not dramatic changes to the quality of life; they are the quiet accumulation of details done correctly that make a home feel genuinely cared for rather than managed.
And for the homeowner who plans and installs it, a brick porch floor project delivers the particular satisfaction of a transformation that is visible, permanent, and immediately meaningful. Unlike a room repaint that improves something already functional, a brick porch floor replaces something that was not working aesthetically or characterfully with something that performs on every level the original was failing. The weekend it takes to complete is disproportionately rewarding in its result: a porch floor that will outlast every other maintenance task scheduled for this year, and most of those scheduled for the decade that follows. That is the kind of DIY investment that justifies the effort completely, every day, from the first morning you step onto it.
Frequently Asked Questions
Can I lay brick directly on any existing concrete porch floor?
You can lay brick over most structurally sound concrete porch floors, with three conditions: the concrete must be free of active structural cracking or movement; the existing porch floor level must be low enough to accommodate the added height of the brick and mortar bed without conflicting with the door threshold or step riser heights; and the surface must be clean, sound, and properly primed before the mortar bed is placed. A porch floor concrete that is crumbling, heaved by tree roots, or showing differential settlement is not an appropriate substrate for a brick overlay; it needs repair or replacement before any overlay is considered.
What is the best brick pattern for a small porch floor?
Running bond bricks offset by half in each course is the most forgiving pattern for small porch floors because it requires the fewest cut bricks at the perimeter edges and is straightforward to lay accurately without specialist tools. Herringbone provides the most visually interesting result and the greatest structural interlocking of the brick surface, but requires 45-degree cuts at every perimeter edge and is more demanding in layout precision. For a Victorian or classical porch floor like the one in the image, a simple running bond in a warm buff or red brick, complementing the house brick, is almost always the most architecturally appropriate choice.
How long should I stay off the brick porch floor after installation?
Do not walk on the newly laid porch floor for a minimum of 24 hours after laying the mortar; this time is needed to achieve sufficient initial set to resist foot traffic without disturbing brick positions. With light foot traffic, a single person can be permitted after 24 hours in normal temperatures. Normal household foot traffic should not begin until 48 to 72 hours after completion, and heavy loads or furniture replacement should wait the full seven-day cure period before the surface is considered fully load-bearing.
How do I maintain a brick porch floor once it is installed?
A properly installed and sealed brick porch floor requires minimal ongoing maintenance. Sweep regularly to remove debris that accumulates in the joints and retains moisture against the brick face. Wash annually with a stiff brush and a diluted masonry cleaner to remove moss, algae, and atmospheric staining. Reapply penetrating sealer every three to five years. The surface is due for resealing when water no longer beads on the brick face and instead is absorbed immediately. Inspect the joint between the porch floor and the house wall or column bases annually and replace any cracked or missing flexible sealant before water has the opportunity to track behind the brick overlay.