The walk-in closet had a door that was better kept closed. Not because anything inside was dangerous exactly, but because the state of what was inside was the kind of thing that accelerated the morning in the wrong direction: a bag that needed to be moved to reach the shoes, a pile of folded things that stopped being folded sometime around February, the belts in a heap on the shelf below the ones they actually belonged to. The walk-in closet storage situation was not dramatically bad. It was chronically inadequate. There was a system in theory and chaos in practice, and the gap between those two things expressed itself in the specific way that small, daily frustrations accumulate: quietly, persistently, and without any single moment that justifies addressing it until you open the door one morning and genuinely cannot find what you came in for.

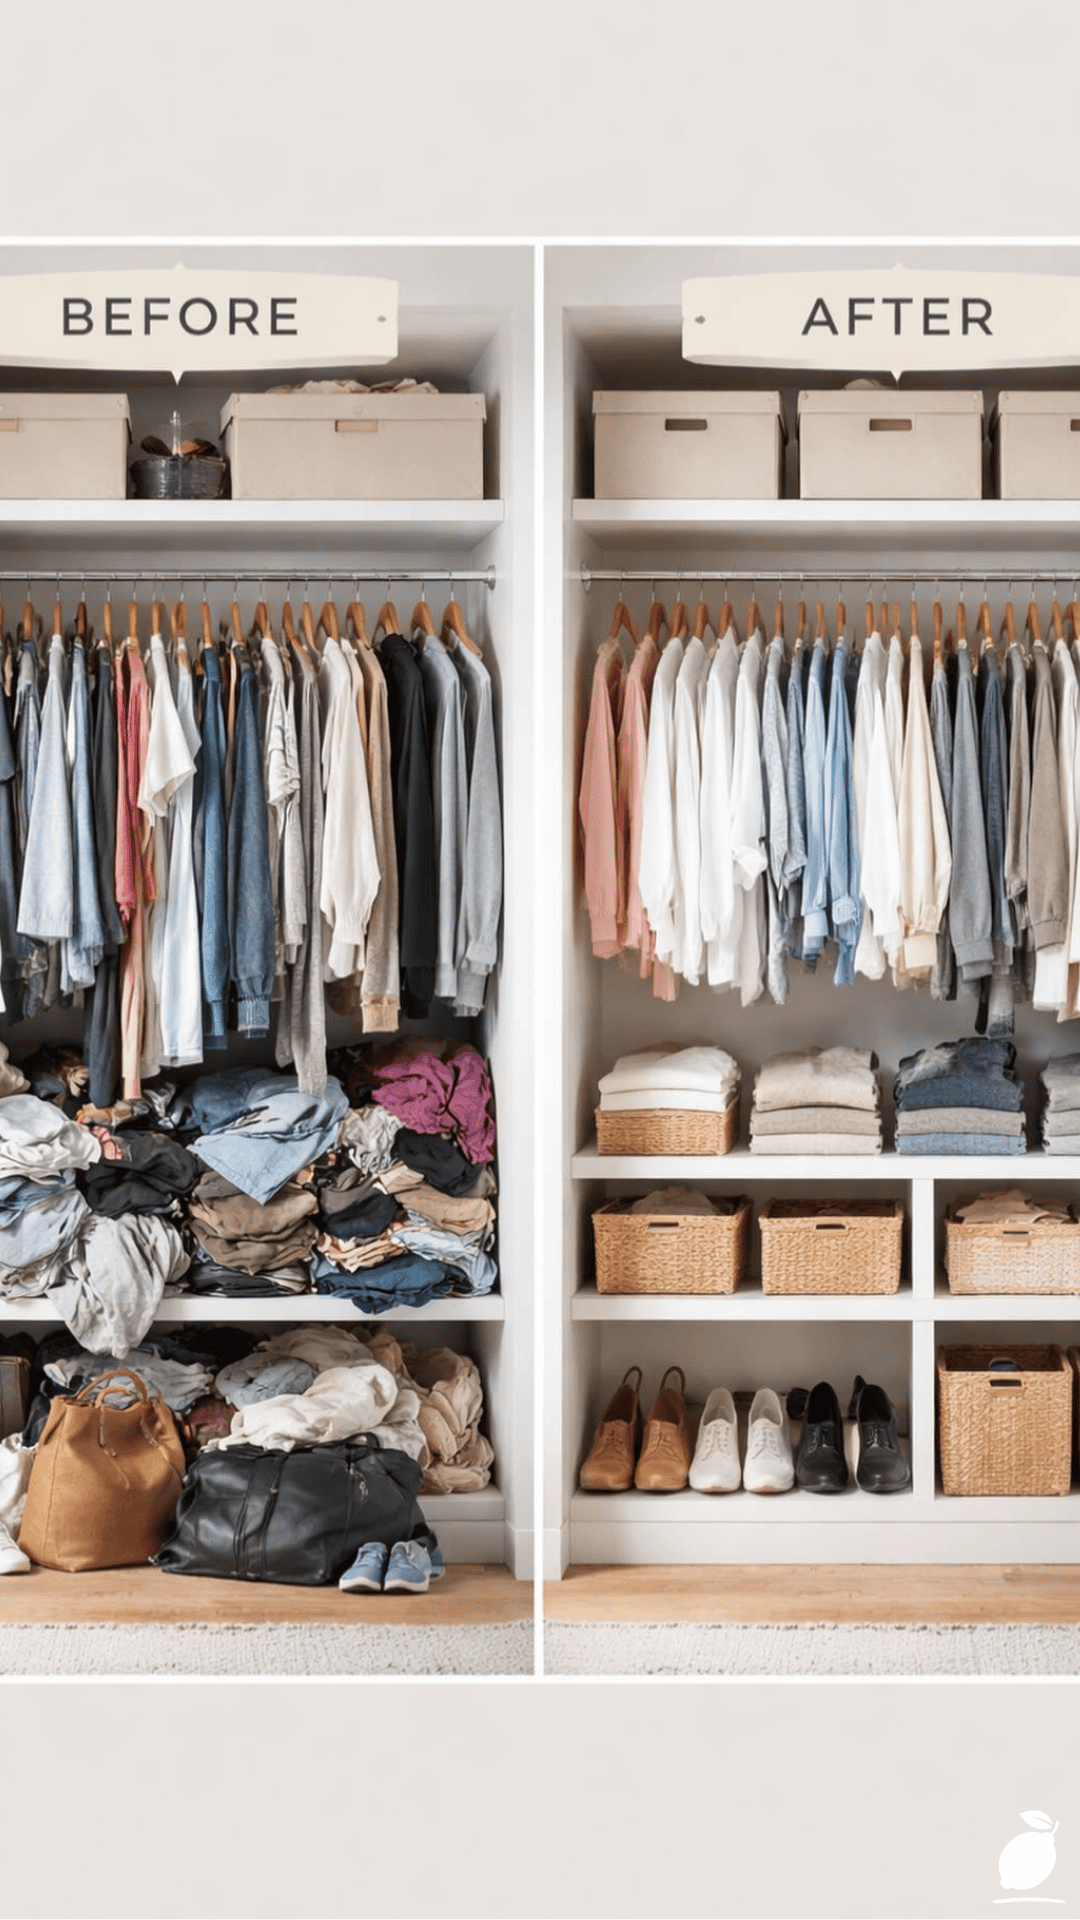
The walk-in closet storage problem in most homes is not a space problem; it is a system problem. The space exists, the clothes exist, the shoes exist, the bags exist, and the square footage of the walk-in closet would be sufficient to contain all of them if the storage were designed around how they are actually used rather than around how they were deposited when time was short. The before side of the image is honest and familiar: a mix of hanging clothes, displaced shoes, and bags occupying whatever available surface presented itself at the moment of return. The after side of the same closet is the same square footage, the same volume of possessions, and an entirely different relationship between them: clothes on hangers in sequence, folded items in stacks on shelves, shoes in baskets, storage boxes at the top, a rug on the floor. No square footage was added. A system was.
The after image is not aspirational. It is achievable in a weekend with the right sequence of decisions and a modest investment in storage hardware that does not require a contractor or a custom wardrobe company. The walk-in closet storage hacks that produce that transformation are not complicated; they are specific, and specificity is what most walk-in closet storage guidance lacks. Here is the blueprint that produces the after rather than the before.
The Walk-In Closet Storage Blueprint
Walk-in closet storage transformation is a project with a clear sequence. The decisions are made in a specific order because each one determines what the next can accomplish. Follow these steps and the walk-in closet storage system you build will hold its organization through daily use.
Step 1: Complete Empty-Out and Category Sort
The walk-in closet storage transformation begins outside the closet. Everything comes out: every hanger, every folded item, every shoe, every bag, every storage box from the top shelf, every item from the floor. Everything out, placed on the bed or the floor of the adjacent room, and sorted into categories before a single item goes back in.
The categories are: hanging clothes (further sorted by type: work, casual, occasion, outerwear), folded items (further sorted by type: knitwear, t-shirts, jeans, activewear), shoes (sorted by season: current-season and off-season), bags and accessories, and storage items (linens, seasonal clothing, rarely used items). The sort is also the declutter: any item that is not worn, does not fit, is beyond repair, or belongs to a category already well-represented exits the walk-in closet storage plan entirely. A walk-in closet storage system built around too many possessions collapses faster than one built around a curated collection.
Most people discover during this stage that their walk-in closet storage problem is partly a volume problem more possessions than the space can reasonably organize and partly a system problem. The volume problem is addressed by the declutter. The system problem is addressed by the remaining steps.
Step 2: Measure and Map the Walk-In Closet
With the walk-in closet empty, measure the full interior: the width and height of each wall, the existing hanging rail positions and their heights, the existing shelf depths, and any fixed elements (light fixtures, door swing, electrical outlets) that constrain storage placement. Record these measurements and sketch a simple floor plan with wall elevations.
Use the measurements and the category sort results together to map the new walk-in closet storage layout. The categories with the highest daily access frequency current-season work and casual hanging clothes, everyday shoes occupy the most accessible positions (at entry level, at arm-reach height, on the wall immediately visible from the door). Categories with lower access frequency occasion wear, off-season items, storage boxes occupy the least accessible positions (the top shelf, the back wall, the floor behind a shoe rack). This frequency-access mapping is the single most important walk-in closet storage decision for producing a system that is used daily rather than bypassed in favor of the floor.
Step 3: Install or Optimize the Hanging System
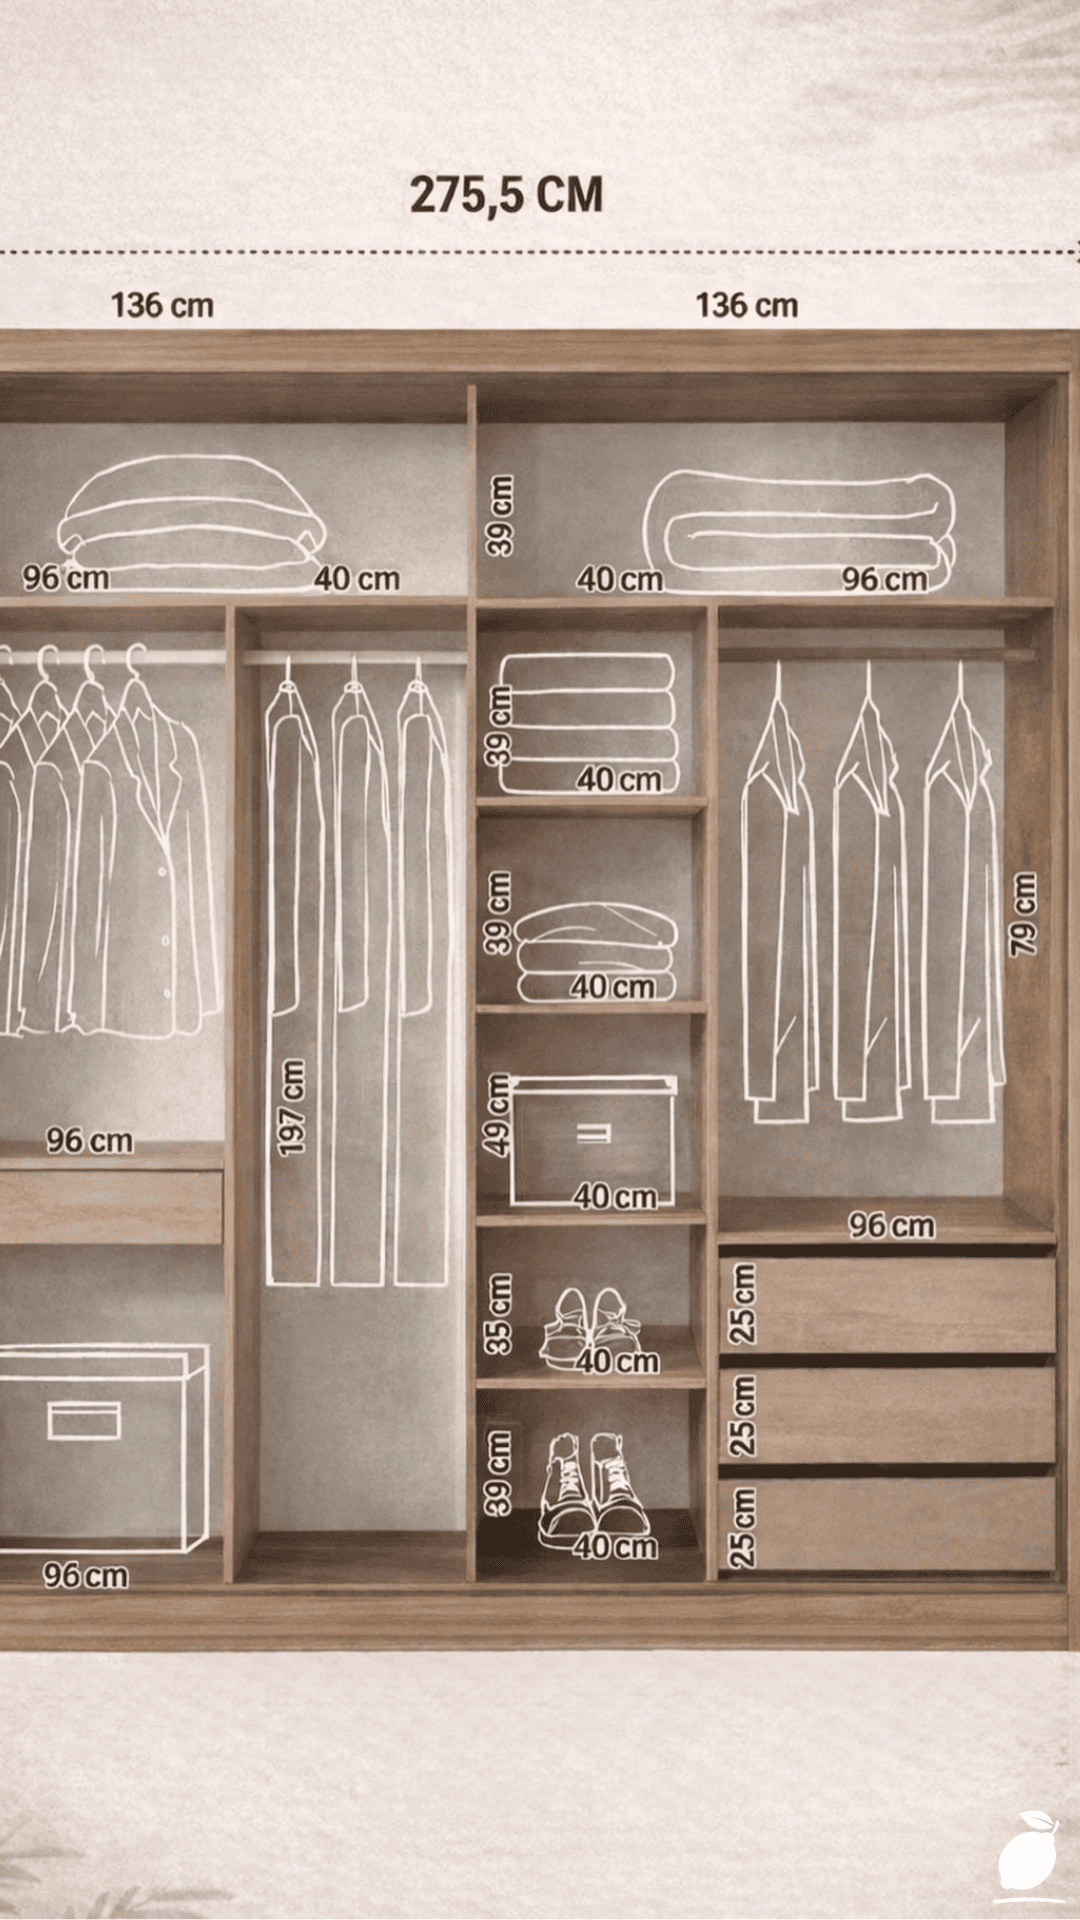
The hanging rail is the primary walk-in closet storage element for most wardrobes, and its configuration determines how much of the walk-in closet’s height is productively used versus wasted. A single hanging rail running the full height of the space is the least efficient walk-in closet storage configuration because it dedicates the full wall height to a single rail at 1.6 to 1.8 meters, leaving significant space above and below.
The most space-efficient walk-in closet storage for the hanging section uses a double-rail configuration where the clothing category allows it: two rails stacked vertically at 80 to 90cm and 160 to 170cm height suit shirts, jackets, folded trousers, and short dresses, doubling the hanging capacity of the same wall section. A single high rail (at 170 to 180cm) is reserved for full-length dresses, coats, and long garments that cannot be double-stacked.
If the existing hanging rails are fixed at positions that are not optimally configured, adjustable bracket rail systems (widely available from IKEA PAX, ELFA, and equivalent brands) allow rail height customization without professional installation. For a rental property where structural rail modification is not permitted, over-door and wall-tension hanging solutions provide additional rail positions without requiring screws into walls or ceilings.
Step 4: Install Shelf Storage for Folded Items and Shoes
The shelf system is the walk-in closet storage element most directly responsible for the transformation visible in the image: the neatly stacked folded items and the organized shoe baskets that convert the right side of the before-image chaos into the right side of the after-image order. Shelving in a walk-in closet should be at two depths: a standard depth of 30 to 35cm for folded clothing items and an additional deep shelf section (40 to 50cm) if shoes are to be stored on shelves rather than in baskets.
Folded items stack most cleanly when shelves are spaced at 30 to 35cm vertically, with enough height for a stack of four to six folded items without cramming. Position the folded item shelves at a comfortable standing viewing height (80 to 150cm from the floor) for daily-access items. Position deeper shelves at lower or higher positions for shoe baskets and storage boxes respectively.
Adjustable shelving systems including the IKEA PAX insert units, Elfa shelving, or equivalent modular systems allow shelf heights to be reconfigured as the wardrobe’s contents change seasonally, which is the primary advantage of adjustable over fixed-height walk-in closet storage.
Step 5: Add Baskets for Shoes and Grouped Small Items
The shoe baskets visible in the after image are the walk-in closet storage hack with the highest transformation-per-dollar-spent ratio: matching wicker, rattan, or fabric baskets that group shoes by category in a visually consistent, easily browsable format. Each basket holds two to three pairs of shoes, is labeled or positioned by type (work shoes, casual trainers, weekend shoes), and can be pulled from the shelf and carried to the dressing area without requiring individual shoe retrieval.
Choose baskets that are consistent in size, material, and color for the visual uniformity that distinguishes an organized walk-in closet storage system from a tidy version of the original disorder. Wicker baskets in a natural tone suit the aesthetic visible in the image. Clear-sided fabric bins allow visual identification of contents without a label. Solid-color fabric bins provide a cleaner visual profile when the walk-in closet door is open.
Apply the same basket approach to other small-item categories: a single basket for bags, a single basket for belts and scarves, a single basket for gym accessories. The basket discipline one category per basket, one basket per category is the mechanism by which small items remain organized without individual storage decisions being required at the end of every day.
Step 6: Use the Top Shelf for Long-Term and Seasonal Storage
The top shelf of a walk-in closet is the walk-in closet storage position with the lowest daily access frequency and therefore the correct home for seasonal items, archived clothing, spare bedding, and anything that is kept but not regularly used. The storage boxes visible at the top of the after image are the standard solution lidded boxes in a consistent size and color, each labeled on the front face that is visible from the floor.
Use uniform-sized storage boxes rather than mixed containers, which stack consistently and communicate a system rather than a collection of individual storage decisions. Label boxes clearly on the front-facing narrow edge that is visible without pulling the box from the shelf. Position a step stool within or adjacent to the walk-in closet for safe top-shelf access. Top-shelf walk-in closet storage that requires improvised climbing to access is top-shelf storage that stops being used within the first month.
Expert Secrets for Success
Pro-Tips for a Better Result
- Declutter by category, not by location. Decluttering “the closet” without also addressing the clothes in the bedroom chair, the shoes in the hallway, and the bags in the spare room produces a walk-in closet storage system that is organized in isolation and quickly overwhelmed by the possessions that were excluded from the purge. Bring every item of every category into one place before sorting, so the walk-in closet storage system is sized to the actual total collection.
- Use slim velvet hangers throughout. Standard plastic hangers consume approximately 5cm of rail space each. Slim velvet hangers (sometimes called flocked hangers) consume 1.5 to 2cm of rail space and prevent clothes from slipping, which is the most common cause of fallen-clothes disorder in a walk-in closet storage system. Converting from standard plastic to slim velvet hangers typically increases hanging rail capacity by 30 to 50%, which is walk-in closet storage extra space that requires no structural change and costs approximately $15 to $25 for a full wardrobe quantity.
- Face all hangers in the same direction initially, then turn used items after wearing. Turning each hanger to face the opposite direction after an item is worn and returned reveals, after 90 days, which items have not been worn at all, all items still facing the original direction. This visual audit is the most reliable walk-in closet storage declutter tool for a wardrobe that is used daily, and it produces the seasonal declutter that prevents walk-in closet storage from gradually reaccumulating the volume of clothing that caused the original problem.
- Add an LED strip light if the walk-in closet lacks adequate lighting. A walk-in closet storage system that is organized but poorly lit is functionally equivalent to one that has disorganized items at the back of shelves, shoes in baskets, and hanging clothes toward the back of rails, all of which are invisible in inadequate lighting. A battery-operated LED strip light adhered to the underside of the top shelf or the top edge of the hanging rail costs approximately $10 to $20 and transforms the visual accessibility of the walk-in closet storage system without requiring electrical work.
- Place a small rug at the entry point of the walk-in closet. The rug visible on the floor of the after image is not decorative; it is functional. It defines the standing position in the walk-in closet (where you stand to use it), provides a soft surface for barefoot dressing, and signals visually that the walk-in closet is a room rather than a storage cupboard. The rug costs almost nothing and contributes to the sense of the walk-in closet as an organized, intentional space.
Common Mistakes to Avoid
- Buying storage products before the sort and measure. The most expensive walk-in closet storage mistake is purchasing baskets, boxes, dividers, and drawer inserts before the sort has determined what needs to be stored and the measure has determined what dimensions will fit. Storage products purchased speculatively for a walk-in closet storage project frequently turn out to be the wrong size, the wrong quantity, or the wrong format for the actual contents and space, producing a second-purchase round that doubles the cost of the project.
- Creating a walk-in closet storage system that requires sustained effort to maintain. A walk-in closet storage system that requires folding each item perfectly before it can be returned is not a system that will be maintained under the daily pressure of real household life. Build the system to the standard that is actually sustainable: folding to “good enough” rather than “display perfect,” returning shoes to their basket rather than to their individual paired position, and accepting that a system used at 80% standard is more effective than a system used at 100% standard on installation day and abandoned within a month.
- Using hanging storage for items that do not benefit from hanging. Hanging space is the most limited resource in a walk-in closet storage system and should be reserved for items that genuinely benefit from hanging, such as items that crease when folded (blazers, structured shirts, dresses) or that are too bulky to fold efficiently (coats, padded jackets). Hanging t-shirts, knitwear, and denim on individual hangers consumes hanging rail space at a rate that would be better served by a single folded shelf stack. Audit the hanging rail during the initial sort for items that would be better stored folded.
- Neglecting the back of the door as walk-in closet storage real estate. The inside face of the walk-in closet door is often the most underutilized surface in the entire space. An over-door organizer with clear pockets, a series of hooks for belts and bags, or a mounted full-length mirror all convert the back of the door into productive walk-in closet storage without consuming any floor or shelf space inside the closet.
- Skipping the labeling step. A walk-in closet storage system without labels is a walk-in closet storage system that makes sense to the person who built it and is confusing to everyone else, including the same person in three months when the mental map of where things are has faded. Label baskets, storage boxes, and shelf zones at the minimum. The label is not about distrust of memory; it is about the cognitive ease of a system where no decision is required to return an item to its place.
Why Walk-In Closet Storage Matters
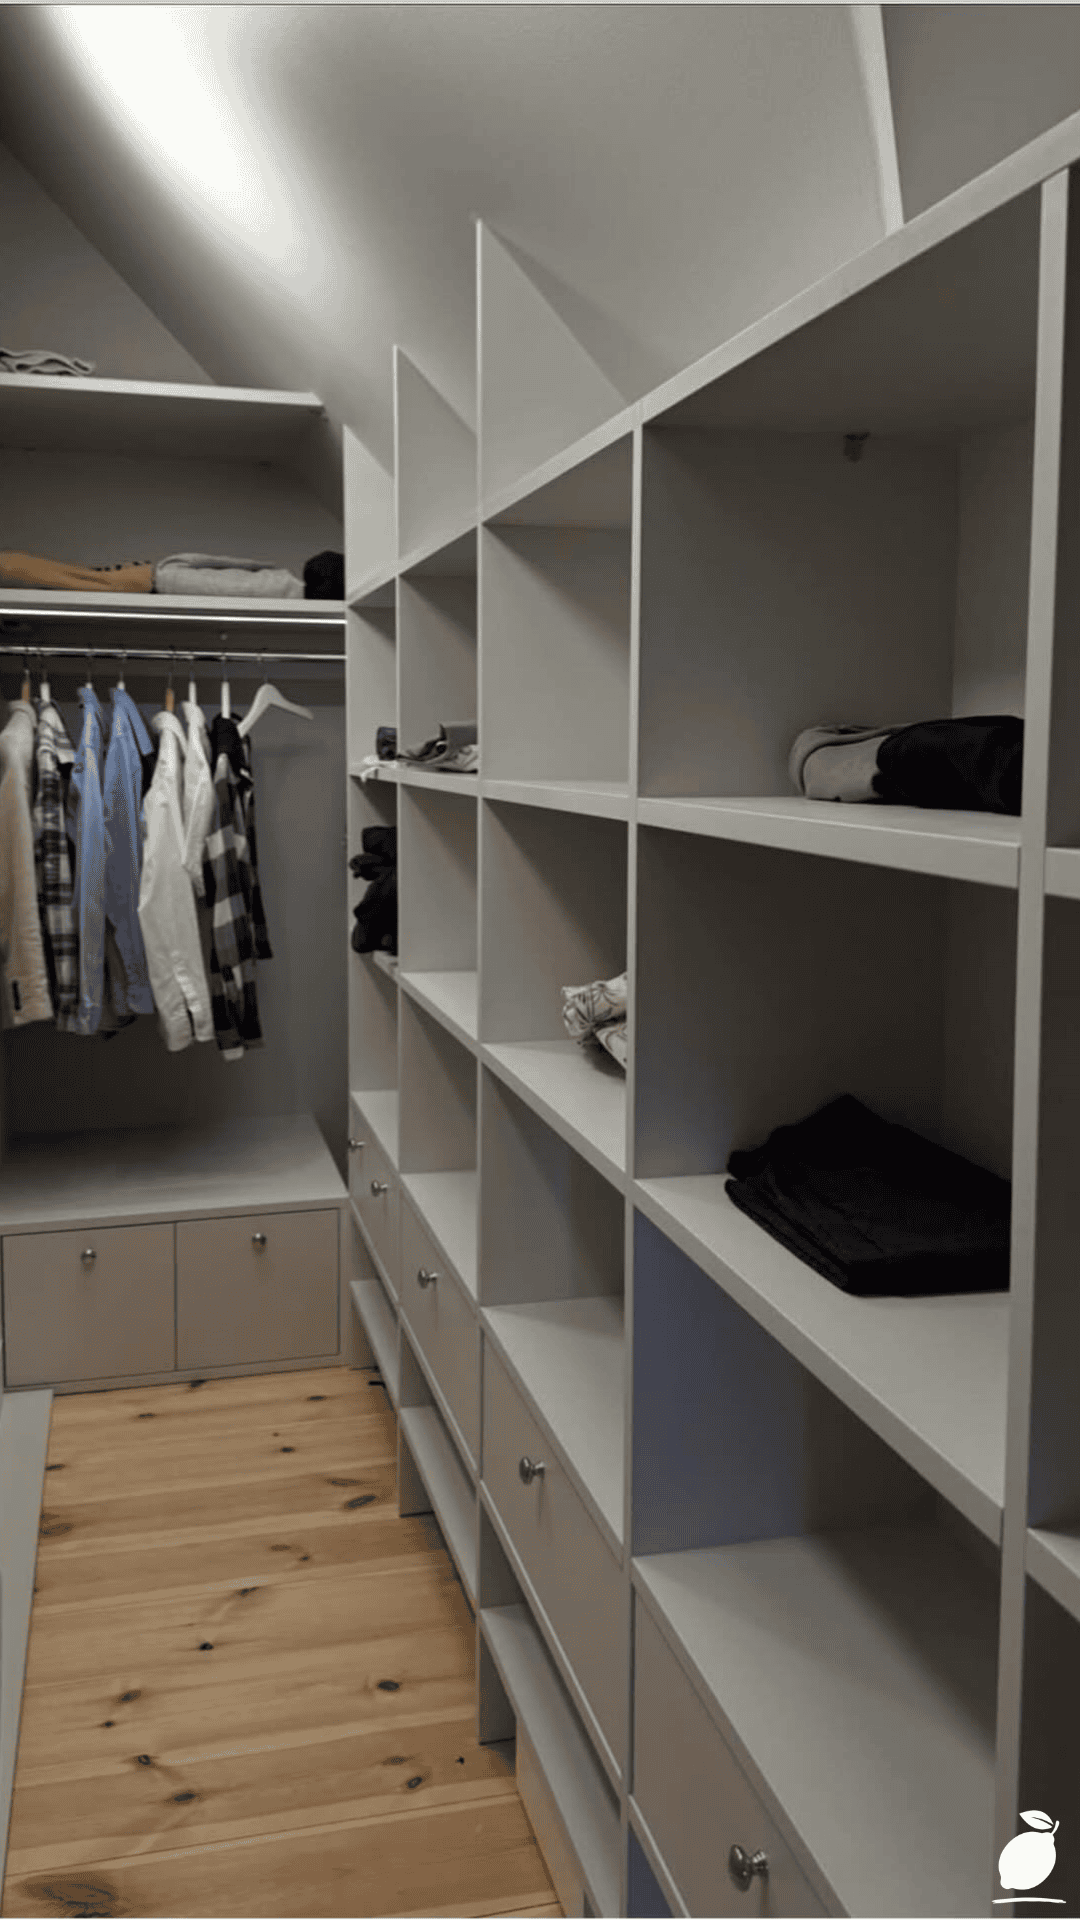
A well-organized walk-in closet storage system is one of the most intimate home improvements available because its primary beneficiary is the person who uses it first thing in the morning and last thing at night. The morning quality of a household its ease or its friction, its calm or its scramble is determined more by the accessibility of the wardrobe than by almost any other domestic factor. A walk-in closet storage system that allows a person to locate, retrieve, and return clothing in under ninety seconds produces mornings with a different quality from one that requires searching, excavating, and improvised management before the day has properly begun.
For couples who share a walk-in closet, the storage system is a shared infrastructure that either supports or complicates cohabitation on a daily basis. A walk-in closet storage system in which both people’s possessions have specific, designated positions and in which both people can independently navigate and maintain the system reduces one of the most consistent sources of domestic friction without requiring a difficult conversation. The organized walk-in closet is not a relationship hack. It is the removal of a small, daily irritant that, removed, makes room for something more useful than irritation.
And for the person who spends a weekend clearing, sorting, measuring, installing, and organizing, who makes the decisions that produce the after image rather than the before one, the completed walk-in closet storage system is one of the most reliably satisfying domestic projects available because its return begins immediately. The first morning after the walk-in closet storage transformation is different from the morning before it: the clothes are there, the shoes are in their basket, the morning proceeds without archaeology. That difference, multiplied across every morning and evening of every week for as long as the system holds, is the return on the weekend’s investment.
Frequently Asked Questions
How do I maximize walk-in closet storage in a small walk-in closet?
The three highest-impact walk-in closet storage improvements for small spaces are: converting to slim velvet hangers (increases hanging capacity by 30 to 50% with no structural change), installing a double-rail configuration where the clothing type allows (doubles hanging capacity on the same wall), and adding an over-door organizer to the back of the door (adds storage on an otherwise unused surface). Together, these three changes can increase the functional storage capacity of a small walk-in closet by 60 to 80% without any structural modification.
What is the best way to store shoes in a walk-in closet?
Matching wicker or fabric baskets organized by shoe type (work, casual, seasonal) provide the most practical walk-in closet storage for shoes because they allow retrieval by category rather than individual pair, maintain visual consistency on shelves, and can be carried to the dressing area when needed. For shoes that benefit from individual display (heeled shoes, special occasion footwear), clear-sided shoe boxes stacked on shelving allow visual identification without opening each box. Avoid storing shoes in their original boxes on walk-in closet shelves; the opaque boxes require opening to identify their contents, which defeats the accessibility that walk-in closet storage is supposed to provide.
How often should a walk-in closet storage system be reviewed and reset?
A walk-in closet storage system benefits from a seasonal review four times per year, approximately 30 to 60 minutes per session in which seasonal clothes are rotated between primary hanging/shelf positions and top-shelf storage boxes, any items that have not been worn in the previous season are assessed for removal, and any drift from the organized state is corrected before it has time to accumulate into the disorder that prompted the original organization project. A monthly five-minute walk-in closet storage reset, returning displaced items to their designated positions, pulling empty hangers to one end of the rail, and straightening basket contents, maintains the system between seasonal reviews.