The small room problem rarely announces itself with a single dramatic failure. It builds quietly, item by item, until one morning you stand in the doorway of your spare room, study, or attic space and realize you are not looking at a room anymore, you are looking at a collection of things that happen to share a floor. The furniture that seemed reasonably sized in the showroom has divided the floor plan into tight, navigable corridors. The ceiling feels lower than it measured. The two windows that looked adequate on the floor plan are doing their best against walls that absorb rather than reflect what little light enters. You’ve tried reorganizing. You’ve tried decluttering. The room is cleaner, but it still feels small, a different kind of constraint than square footage alone can explain.
The feeling of smallness in a room is not purely a function of dimensions. It is a perception, and perceptions can be managed. Every element in a room, the color of its walls, the scale of its furniture, the height at which its storage is placed, the direction its flooring runs, the quality of its lighting, either contributes to the sense of spaciousness or works against it. A room filled with the wrong choices feels smaller than its measurements. A small room filled with the right ones feels larger than they are. The difference between the two is entirely a matter of design knowledge applied deliberately, not square footage added expensively.
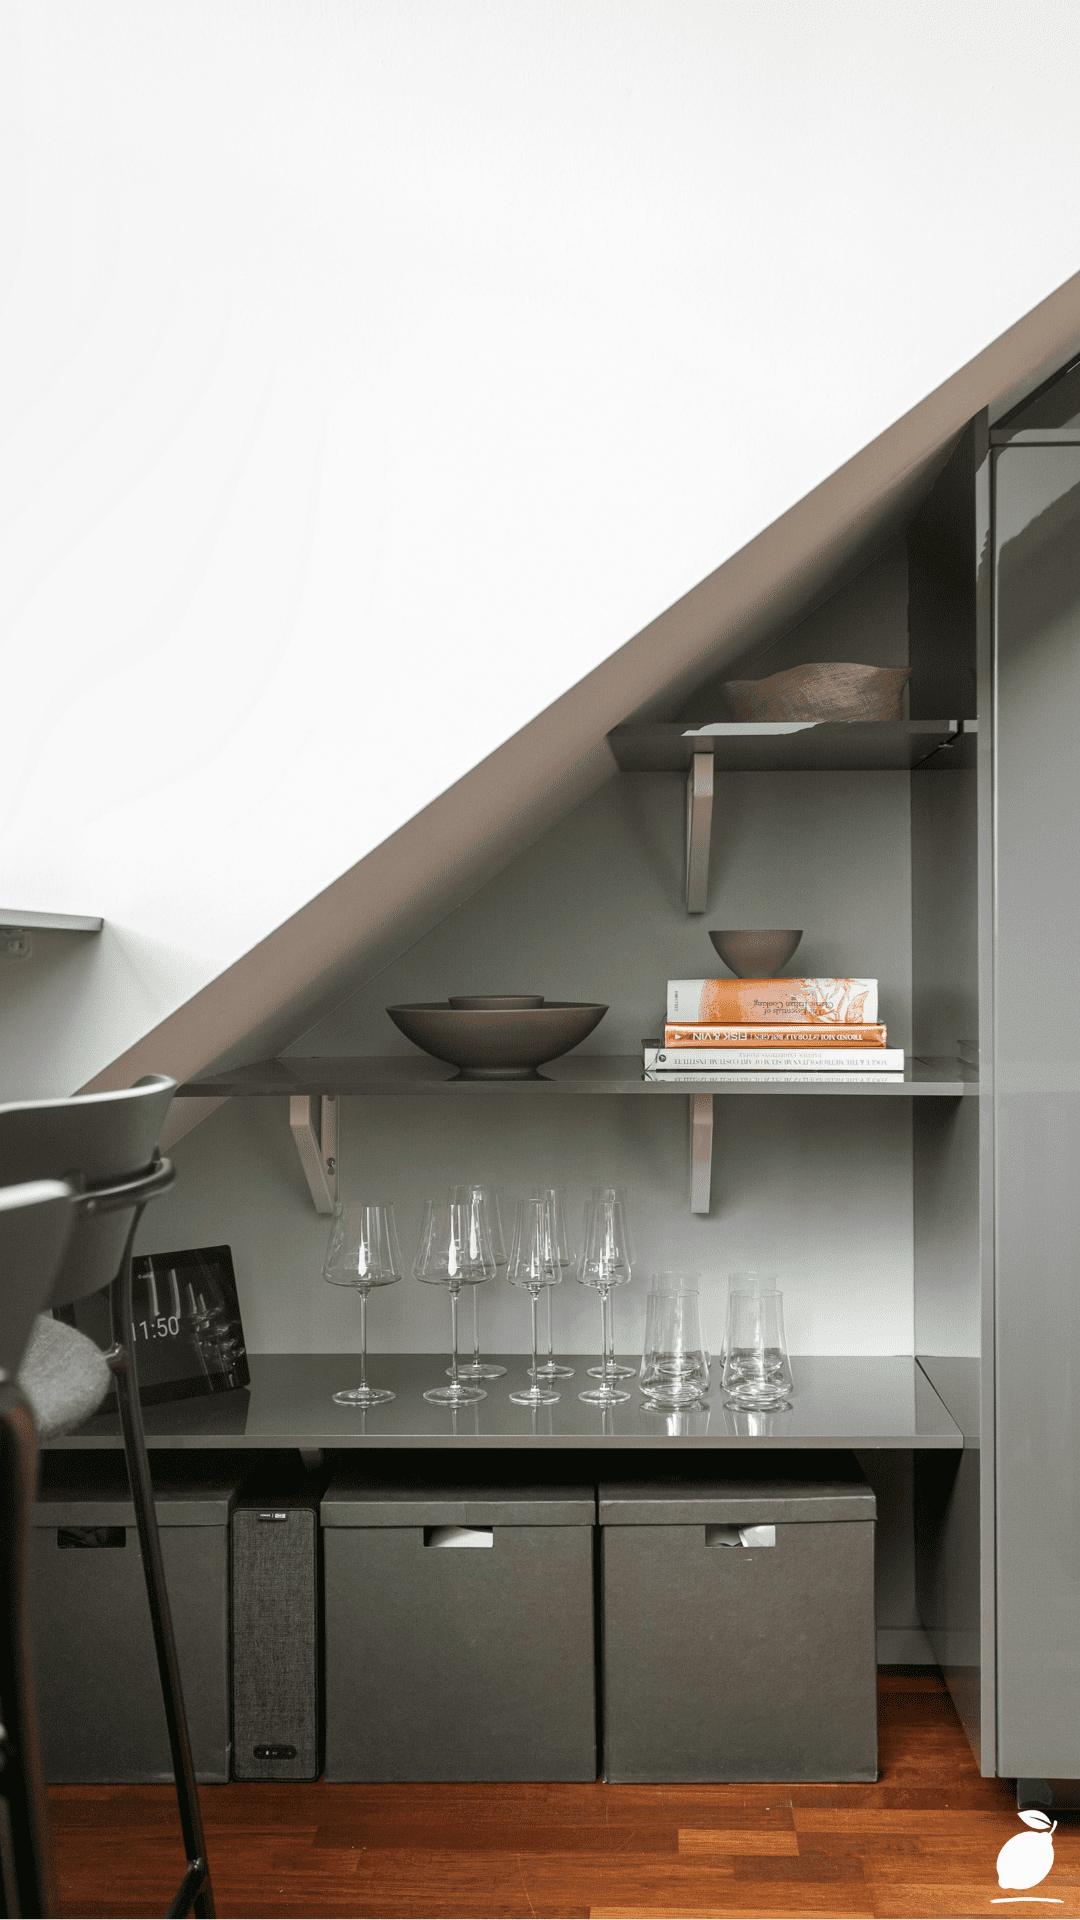
The image above is one of the most compelling demonstrations of small room transformation in any residential context: a storage space under a sloped attic ceiling, architecturally one of the most challenging small room configurations available, made to feel clean, sophisticated, and genuinely spacious through a precise set of design decisions. A sleek grey cabinet system with a black granite countertop that runs to the wall. Three floating shelves at staggered heights above it. Polished warm hardwood flooring reflecting light upward. A monochromatic grey, black, and white palette that unifies every surface. The room’s awkwardly angled ceiling has become the space’s defining feature rather than its limitation. This guide gives you the specific tricks, step by step, to apply that same transformation to your own small room.
The Small Room Blueprint
Step 1: Clear the Small Room of Its Structural Bones
Before any design intervention will work, the small room needs to be emptied and assessed in its bare state. This is not a decluttering instruction; it is a diagnostic step. A small room full of furniture and objects cannot be accurately assessed for proportion, light quality, or visual flow. Remove everything that is not architecturally fixed: furniture, textiles, artwork, accessories, storage units, and freestanding lighting. Photograph each wall from the corner opposite it. Stand in every corner and look across the room. Note where natural light enters, how far it penetrates, which walls it reaches, and which walls remain in shadow regardless of time of day.
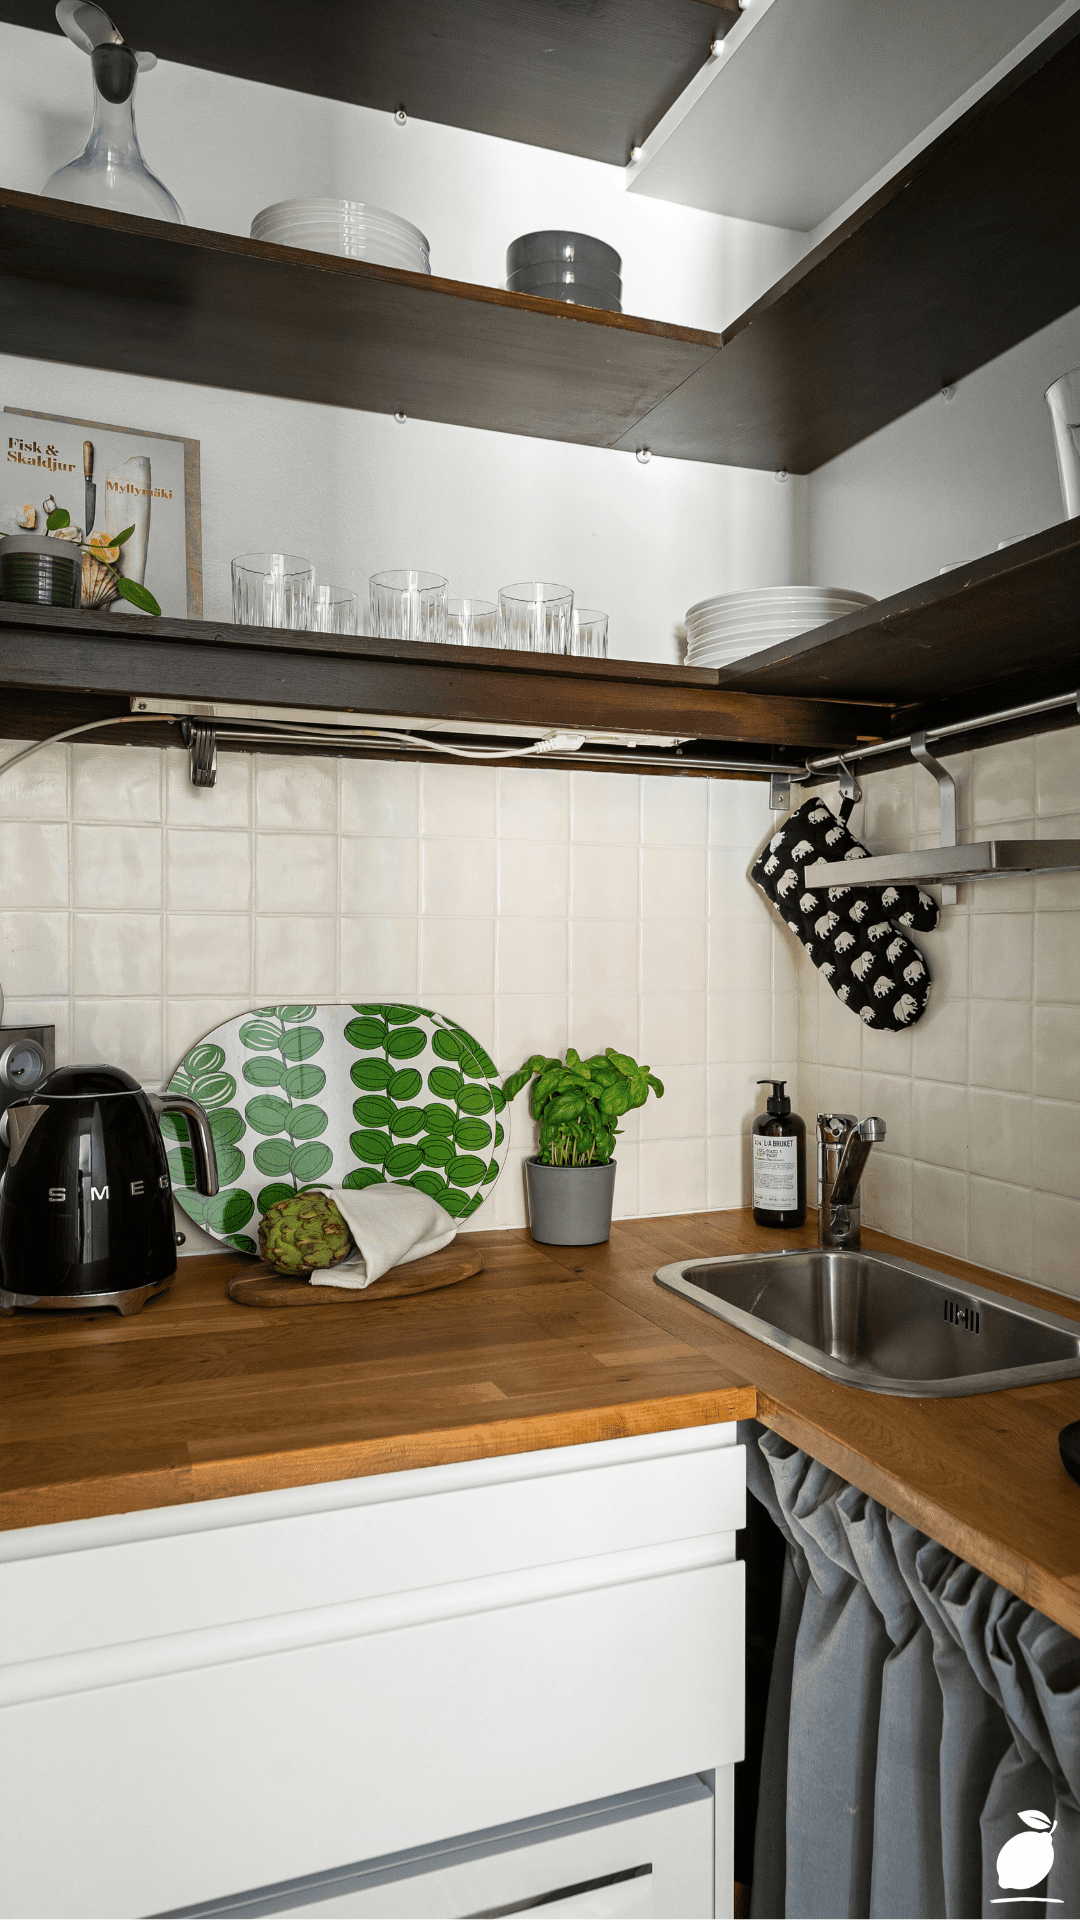
This bare-state assessment reveals the small room’s actual challenges: the wall that compresses the space visually, the corner where two pieces of furniture create an impassable pocket, and the ceiling slope that has been managed around rather than designed with. The featured image’s attic small room works precisely because its sloped ceiling was treated as a design feature rather than a limitation. The cabinet system follows the wall angle rather than fighting it, and the floating shelves above it draw the eye upward along the slope rather than into a corner. That approach begins with seeing the space clearly.
Step 2: Choose a Light, Unified Color Palette
Color is the fastest and most powerful tool for making a small room look bigger, and it works through two specific mechanisms: light reflectance and visual continuity. Light colors with high LRV (Light Reflectance Value) bounce light around the small room rather than absorbing it, which increases the perceived brightness of the space, and perceived brightness is directly linked to perceived spaciousness in the brain’s spatial processing. Visual continuity using the same color or closely related tones across walls, ceiling, and major furniture removes the visual boundaries that make a small room feel segmented and confined.
The grey-black-white palette in the featured attic small room achieves both effects simultaneously. The grey cabinet walls and white ceiling read as closely related enough that the eye travels smoothly from surface to surface without interruption. The absence of contrasting accent colors prevents any single wall from advancing visually toward the viewer. For your own small room, apply the same principle: choose a palette of two to three closely related tones from the same color family rather than contrasting colors on different surfaces. Soft whites, warm greiges, pale sage greens, and light stone tones all provide the high LRV and visual continuity that make small rooms feel larger.
For maximum effect, paint the ceiling the same color as the walls or one shade lighter within the same tone. The standard white ceiling against colored walls creates a hard visual boundary that emphasizes the ceiling as a lid, exactly the perception a room needs to eliminate. A tonal ceiling painted in the wall color dissolves that boundary and makes the room feel taller than its measurements.
Step 3: Install Storage That Uses Full Vertical Height
The most common waste of potential in a small room is the space between the top of standard furniture and the ceiling, the 40 to 80cm of vertical volume that is left empty in most rooms and used productively in very few. In a room, vertical space is the primary expansion resource. Floor area is fixed. Ceiling height is architectural. But the use of the height between standard furniture-top level and the ceiling determines whether a small room feels like it has room to breathe or like it has run out of space at eye level.
The featured attic small room exploits vertical space with precision: floor-level drawers for heavy items and concealed storage, a countertop surface at working height, and three floating shelves at progressively higher positions, each contributing to the visual journey of the eye upward along the angled wall. This vertical stratification is the principle. In your own small room, apply it by extending storage to full ceiling height, mounting floating shelves above eye level for display or accessible storage, and keeping the floor area as clear as possible. Every item lifted from the floor and placed on a wall-mounted shelf returns floor area that makes the room feel more spacious, even when the physical footprint hasn’t changed.
Built-in cabinetry that runs from floor to ceiling, as in the featured image, creates a further expansion effect: it eliminates the visual gaps between furniture tops and ceiling that make standard freestanding units look undersized in a small room and draws the eye in a smooth vertical line from floor to ceiling that emphasizes height rather than interrupting it.
Step 4: Select Furniture Scaled and Styled for the Small Room
The furniture scale is among the most consistently impactful tricks to make a small room look bigger and among the most frequently misapplied. The intuitive response to a room is to choose smaller furniture. This is correct only up to a point. Furniture that is too small relative to the room reads as fragile and out of proportion, which paradoxically makes the room feel smaller rather than larger. The correct principle is to choose fewer pieces of appropriately scaled furniture rather than many small pieces.
In a small room, a single sofa of the right scale reads as a deliberate design choice. Six small chairs arranged to fill the same space read as a compromise. Choose one large statement piece over multiple small ones, then give it room. Scale each remaining furniture piece to create a clear, unobstructed floor area between them. The visible floor area is what creates the perception of spaciousness, and it requires furniture restraint to preserve it.
Furniture with exposed legs visible floor beneath sofas, chairs, and side tables creates the impression of more floor area in a small room by allowing the eye to see the floor surface continuing under and beyond each piece. Furniture that sits directly on the floor with no visible gap reads as heavier and more space-consuming. The black bar stool in the featured image demonstrates this: its simple, elevated profile disappears rather than occupies, contributing to the small room’s sense of openness.
Step 5: Use Mirrors and Reflective Surfaces Strategically
Mirrors are the most well-known trick to make a small room look bigger, but their strategic use matters as much as their presence. A mirror placed on a wall reflects the view from the opposite wall, which means its impact depends entirely on what it reflects. A mirror reflecting a blank wall doubles the perceived wall space but adds no spatial depth. A mirror reflecting a window, a well-lit corner, or an attractive view creates the impression of an opening or extension in the wall, the most powerful small room expansion effect available without structural work.
In a small room, position mirrors to reflect the best available light source or the most attractive visual element in the room. Large mirrors with minimal framing, thin black frames, like those in the featured image’s adjacent rooms, maximize the reflective surface and minimize the visual weight of the frame itself. Full-length or floor-to-ceiling mirrors on a small room’s shortest wall visually extend that dimension and create the impression of a room continuation beyond the boundary.
Beyond mirrors, incorporate reflective surfaces wherever small room design allows: polished hardwood flooring that reflects light upward, as in the featured image; glassware displayed on open shelves that multiply light across their surfaces; metallic hardware and accessories that catch and redistribute ambient light. The cumulative effect of multiple reflective surfaces in a small room is significantly greater than any single mirror in isolation.
Step 6: Control Light Sources and Quality
Light quality, its color temperature, direction, and layering, is the least discussed but most immediately impactful trick to make a small room look bigger. A small room with inadequate or poorly distributed light feels smaller than it is, regardless of how well every other design decision has been executed. A small room with abundant, well-layered light feels larger regardless of its dimensions.
Maximize natural light by keeping window treatments as minimal as structural privacy allows sheer curtains that diffuse without blocking, or no curtains at all in non-overlooked windows. Hang curtain rods at ceiling height rather than window height, and extend the curtain rod beyond the window frame so that the fabric hangs outside the window opening when open. This makes the window appear significantly larger and allows all available natural light to enter unobstructed.
Layer artificial light at multiple heights: overhead ambient lighting, under-cabinet or shelf lighting, and a floor or table lamp at seated eye level. The featured attic small room’s under-shelf lighting illuminates the countertop and the objects on it from above, creating depth and visual interest that a single overhead source cannot achieve. In a small room, lighting at varied heights makes the space feel three-dimensional and experiential rather than flat and functional.
Step 7: Manage Visual Clutter and the Floor-to-Ceiling Line
The final and most sustainable trick to make a small room look bigger is the management of visual complexity, specifically, the number of distinct colors, patterns, materials, and object sizes visible simultaneously from the room’s entrance. Every additional distinct visual element reduces the eye’s ability to rest and increases the cognitive processing load that makes small rooms feel mentally crowded even when they’re physically organized.
In the featured attic small room, every object on the floating shelves is deliberate: a single large ceramic bowl, a single coral book, a single white container, each with sufficient visual space around it to read individually against the grey wall. Nothing is grouped so densely that it reads as mass rather than as a composed arrangement. Apply this discipline to every surface in your small room: edit displayed objects to the minimum that creates a sense of composition rather than accumulation, and maintain a clear visual path from the floor to the ceiling that allows the room’s full height to be perceived without interruption.
Expert Secrets for Success
Pro-Tips for a Better Result
Run flooring in the longest dimension. The direction of floor planks or tiles has a measurable effect on perceived room dimensions. Running planks in the direction of the room’s longest dimension, parallel to the longest wall, visually extends the floor and makes the small room feel longer. The warm hardwood planks in the featured attic small room run horizontally across the image’s base, extending the visual depth of the space. Running flooring perpendicular to the longest wall, or in a diagonal, creates a different visual dynamic. Diagonals specifically create the impression of more floor area, but can feel energetic rather than restful in a small room intended as a calm space.
Use a single continuous flooring material throughout. Breaking the floor area of a small room into zones with different flooring materials, such as a rug over hardwood, tiles transitioning to carpet, creates boundaries that divide the floor area into smaller-feeling sections. A single continuous flooring material running uninterrupted to every wall reads as a single, whole floor area rather than a collection of zones. In rooms where rugs are desired, choose one large rug that covers most of the floor area rather than multiple smaller ones. A large rug visually expands the small room while multiple small rugs fragment it.
Mount décor at varying heights rather than in rows. The three floating shelves in the featured small room are mounted at genuinely different heights, not in a uniform horizontal line. Staggered shelf heights create a visual rhythm that draws the eye upward and sideways simultaneously, activating more of the wall surface and making the small room feel more spatially complex without adding any physical volume. Apply this principle to artwork hanging, shelf placement, and plant arrangement in any small room where vertical walls are a significant proportion of the visual field.
Add a large-scale architectural element. One counterintuitive trick to make a small room look bigger is introducing a single large-scale element, a full-height cabinet system, a floor-to-ceiling bookcase, or a large-format mirror that provides the room with an anchor of visual scale. Small rooms furnished exclusively with small-scale elements feel proportionally unresolved; a single large-scale element establishes a clear hierarchy of scale that makes the room’s proportions readable and settled.
Common Mistakes to Avoid
Don’t hang artwork too low. Artwork hung at or below standard eye level in a small room reinforces the perception of limited height and draws the eye downward rather than upward. In any small room where ceiling height is a challenge, hang artwork higher than feels conventional, the top of frames at or above 200cm from floor level, and ensure the visual path from artwork to ceiling is relatively clear. High-hung art in a small room activates the upper wall zone and makes the ceiling feel farther away than it is.
Don’t choose curtains that fall short of the ceiling height. Curtains hung at window-top height in a small room terminate the visual line exactly where you don’t want it, at the midpoint of the wall, making the ceiling appear lower, and the window appear smaller simultaneously. Always hang curtains at or near ceiling height, even if the window itself sits significantly lower. The vertical drop of fabric from ceiling to floor is one of the most effective and least expensive tricks to make a small room look bigger available.
Don’t fill every surface with objects. The instinct to fill available surfaces in a small room with meaningful or attractive objects is natural and produces the one result that most consistently makes small rooms feel smaller: visual clutter. Every surface in a small room that holds objects reduces the visual breathing room that makes the space feel open. Edit relentlessly. Leave surfaces empty or near-empty as a design choice. The grey countertop in the featured image holds only neatly grouped wine glasses, a single, organized element that takes up a fraction of the available surface and leaves the rest open and reflective.
Don’t neglect the ceiling. The ceiling is the most neglected surface in any small room and the one with the most potential for spatial expansion. A ceiling painted the same tone as the walls, a ceiling with integrated lighting that eliminates the overhead fixture that draws attention to its height, a ceiling with a subtle tonal texture that makes it feel active rather than absent, any of these ceiling treatments transforms how the small room’s volume is perceived. Treat the ceiling as the fifth wall in a small room, and give it the same design attention as the four surrounding it.
Why Small Room Matters
The small rooms in our homes carry disproportionate psychological weight. They are often the first spaces guests experience: the hallway, the powder room, the compact guest bedroom, and they frequently house the activities most important to personal wellbeing: the home office where work gets done, the study corner where children learn, the small bedroom where someone begins and ends every day. When these spaces feel compressed and cluttered, the activities conducted in them feel compressed too. The quality of the environment is not a neutral backdrop; it shapes the quality of the experience, and nowhere is that more immediate than in a small room where every design decision is felt at close range.
Research in environmental psychology consistently identifies perceived spaciousness as a significant predictor of stress levels in residential environments. A small room that feels larger than it is through the application of light, proportion, color, and the specific design tricks in this guide genuinely delivers lower ambient stress than the same square footage managed without those principles. This is not a cosmetic outcome. It is a measurable change in daily psychological comfort, accumulated through hundreds of hours spent in spaces that feel open rather than confined.
Easy Peasy Life Matters is built on the conviction that intentional design decisions compound into lives that feel genuinely better to live. The tricks to make your small room look bigger in this guide are investments that pay in daily comfort, in family ease, in the specific quality of a home where every room feels considered rather than merely occupied. The attic, a small room in the featured image, is beautiful not because it is large but because it is thoughtfully designed. Your small room has the same potential. These tricks are how you reach it.
Frequently Asked Questions
What color makes a small room look bigger?
Soft whites with warm undertones, Benjamin Moore White Dove, Farrow & Ball Strong White, Sherwin-Williams Alabaster consistently produce the greatest perceived expansion in small rooms because they combine the highest LRV (light reflectance) with enough warmth to prevent the room from feeling clinical or cold. For small rooms where pure white feels too stark, very pale greige tones (Pale Oak, Agreeable Gray at 50% strength) and barely-there sage greens (Sea Salt, Crocodile Tears diluted) provide the same spatial expansion with more character. The consistent principle across all options is warmth. High reflectance cool whites with blue undertones tend to make small rooms feel more confined rather than more open.
How do mirrors make a small room look bigger?
Mirrors expand a small room’s perceived size through two mechanisms: reflection of light, which increases the brightness of the space and therefore the perceived volume, and reflection of depth, the view they reflect creates the visual impression of an additional space or opening beyond the mirror’s surface. The most effective mirror placement in a small room reflects a window or other light source, creating the impression of a second window. Full-length or large-format mirrors on the smallest wall are the most impactful single-mirror placement for a small room because they address the dimension the room is most deficient in. Mirrored furniture and reflective surfaces multiply these effects across the whole room without requiring additional mirror installations.
Does dark paint always make a small room feel smaller?
Not always, and this is one of the most important nuances in small room design. Dark paint makes a small room feel smaller when the room has limited natural light and when the dark color is used on all four walls and the ceiling simultaneously, creating a fully enclosed dark volume. Dark paint can make a small room feel dramatically larger, or more precisely, more immersive and atmospheric in a way that transcends the perception of smallness when used as an accent on a single wall in a room with good natural light, or in a small room where the goal is intimacy and enclosure rather than visual expansion. The question for a dark-painted small room is not “is it smaller?” but “does it feel wrong, or does it feel like a deliberate and beautiful cave?” The latter is a valid and often excellent design outcome.
How do I make a small room with a sloped ceiling feel bigger?
The sloped ceiling is among the most challenging architectural features in a small room and among the most rewarding when addressed correctly. The core principle is the same as the featured attic small room demonstrates: treat the slope as a feature rather than a limitation. Run storage along the sloped wall rather than against the flat walls. This uses the awkward geometry productively and draws the eye along the slope rather than into the corner where the ceiling meets the wall at its lowest point. Paint the sloped ceiling the same color as the walls to dissolve the boundary between them. Hang lighting from the highest available point and allow it to illuminate the full height of the slope. Position the primary furniture pieces under the highest section of the ceiling so the tallest items in the room have room above them.
What furniture should I avoid in a small room?
In a small room, avoid furniture with the following characteristics: bulky, fully upholstered pieces that go to the floor on all sides with no leg clearance; tall, closed-front storage units that terminate below ceiling height and leave a visually heavy gap above; multiple pieces of furniture in the same scale range rather than a varied mix of heights; and furniture in dark, high-contrast colors against light walls that create heavy focal points rather than visual continuity. More broadly, avoid the impulse to fill available space with furniture simply because it fits. The most effective room furnishing decisions are always about restraint, and the most impactful trick to make a room look bigger is almost always removing a piece of furniture rather than adding one.