The kitchen windowsill had become a graveyard. Three terracotta pots of basil, mint, and something that had once been parsley sat shrivelled and defeated on the ledge, proof of my fourth consecutive failed attempt at growing herbs indoors. The basil went woody within two weeks. The mint took over everything and then somehow still died. The parsley never even got started. Meanwhile, I kept buying fresh herb bunches from the supermarket, using a handful of leaves, watching the rest go yellow in the fridge, and throwing away more than I ever used. It felt wasteful, it felt expensive, and every time I walked past that windowsill, it felt like a small, recurring reminder that I could not keep a plant alive to save myself.
What I had not understood and what changed everything when I finally looked into it properly was that the problem was not me. It was the setup. Individual pots on a flat surface compete for light, dry out unevenly, and are almost impossible to water consistently when life is busy. The solution I kept seeing in the homes I admired was different: a vertical herb garden mounted against a wall, with containers stacked on a frame, each plant getting equivalent light exposure, the whole system visible enough that you actually remember to tend it. A vertical herb garden does not just solve the practical problem of growing herbs in a small space. It turns the wall itself into something worth looking at.
This guide documents exactly what I learned building and maintaining my own this kind from choosing the right frame and containers to selecting the herbs that actually thrive in an indoor stacked system. Whether you are working with a kitchen wall, a bright hallway, or a living room corner with good natural light, the steps here apply directly. A vertical herb garden is one of the most rewarding projects a home can hold: it grows, it feeds you, and it looks genuinely beautiful doing both.
The Vertical Herb Garden Blueprint
A vertical herb garden rewards careful planning at each stage. Rush the setup, and the plants underperform; take the time to do it right, and the system almost runs itself. Follow these steps in sequence.
Step 1: Choose the Right Wall and Light Source
A vertical herb garden lives or dies by its light situation. Most culinary herbs need a minimum of four to six hours of direct or bright indirect light per day. Before buying a single piece of kit, spend two days observing which wall in your home receives the most consistent natural light. South-facing and west-facing walls are usually the strongest candidates. If your home has limited natural light, the system can absolutely succeed under supplemental grow lights, but build that into your planning from the start rather than adding it as an afterthought when the herbs begin to struggle.
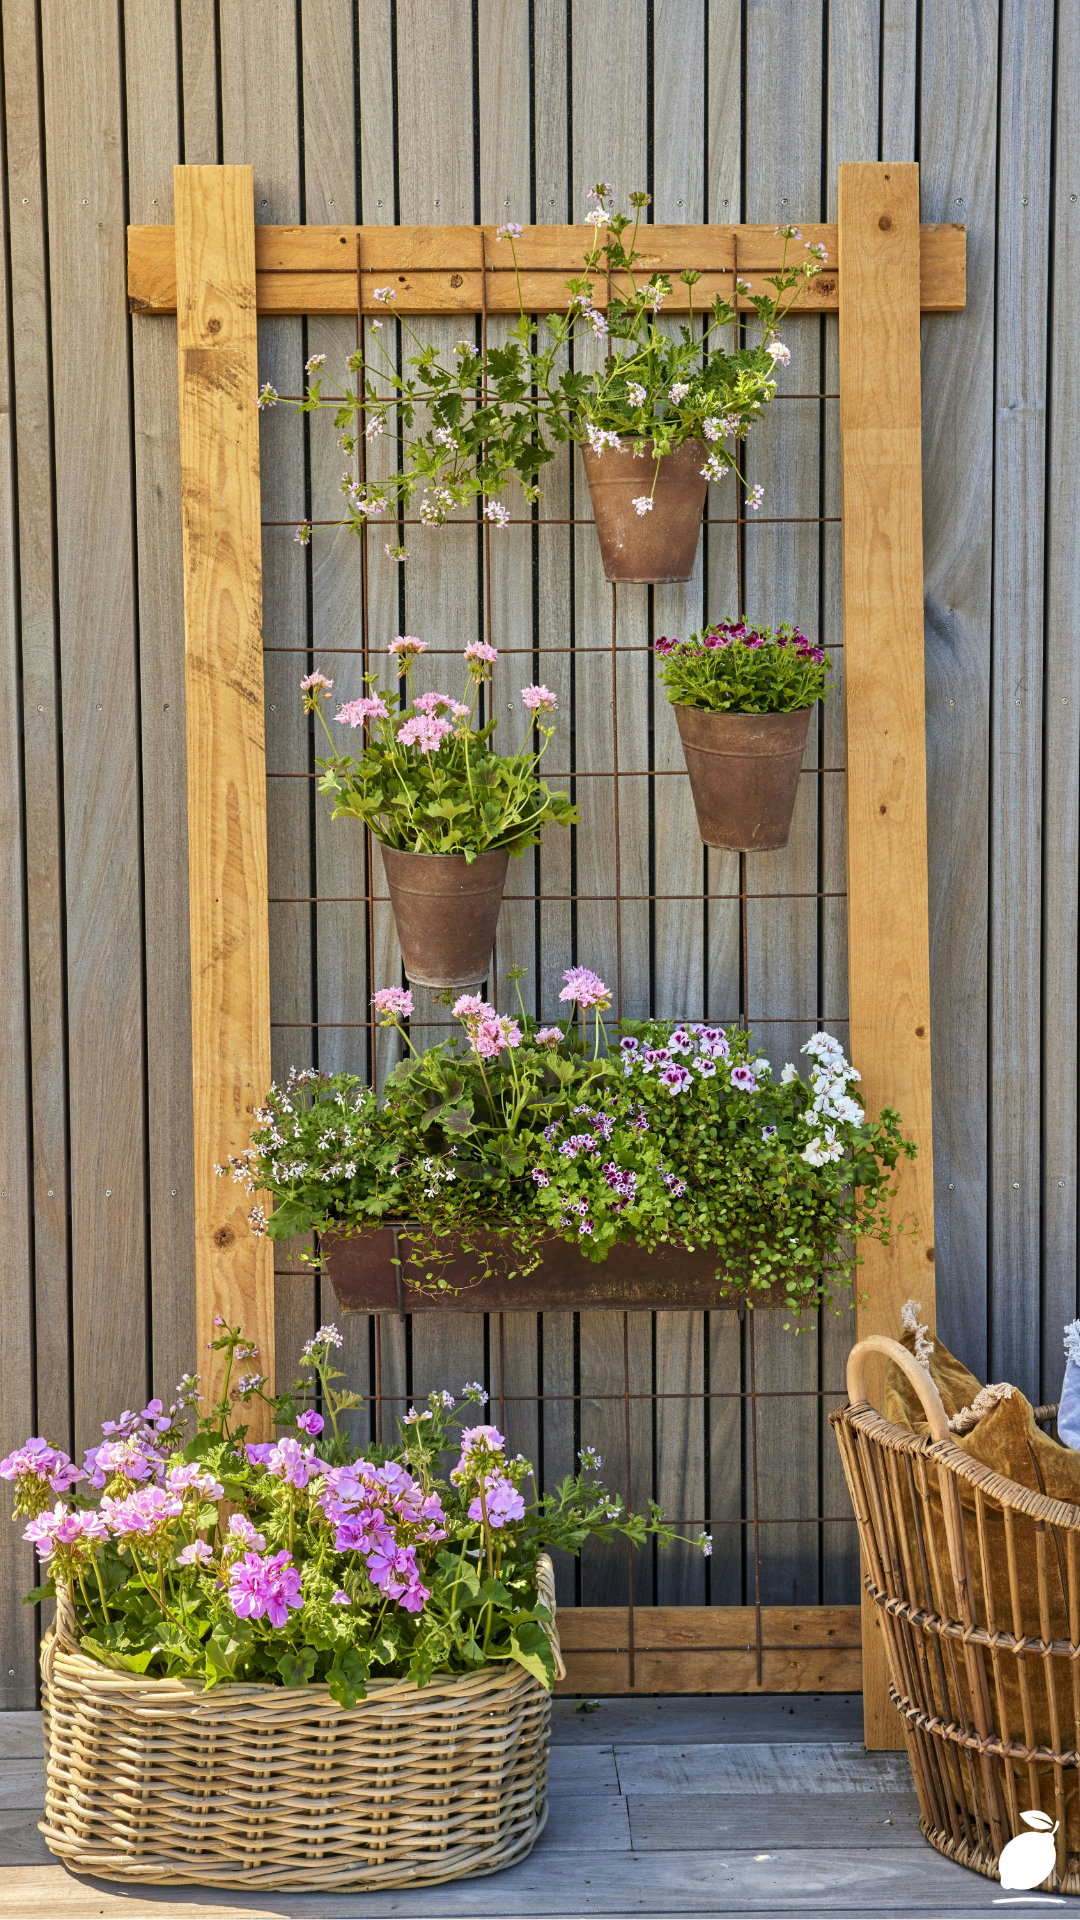
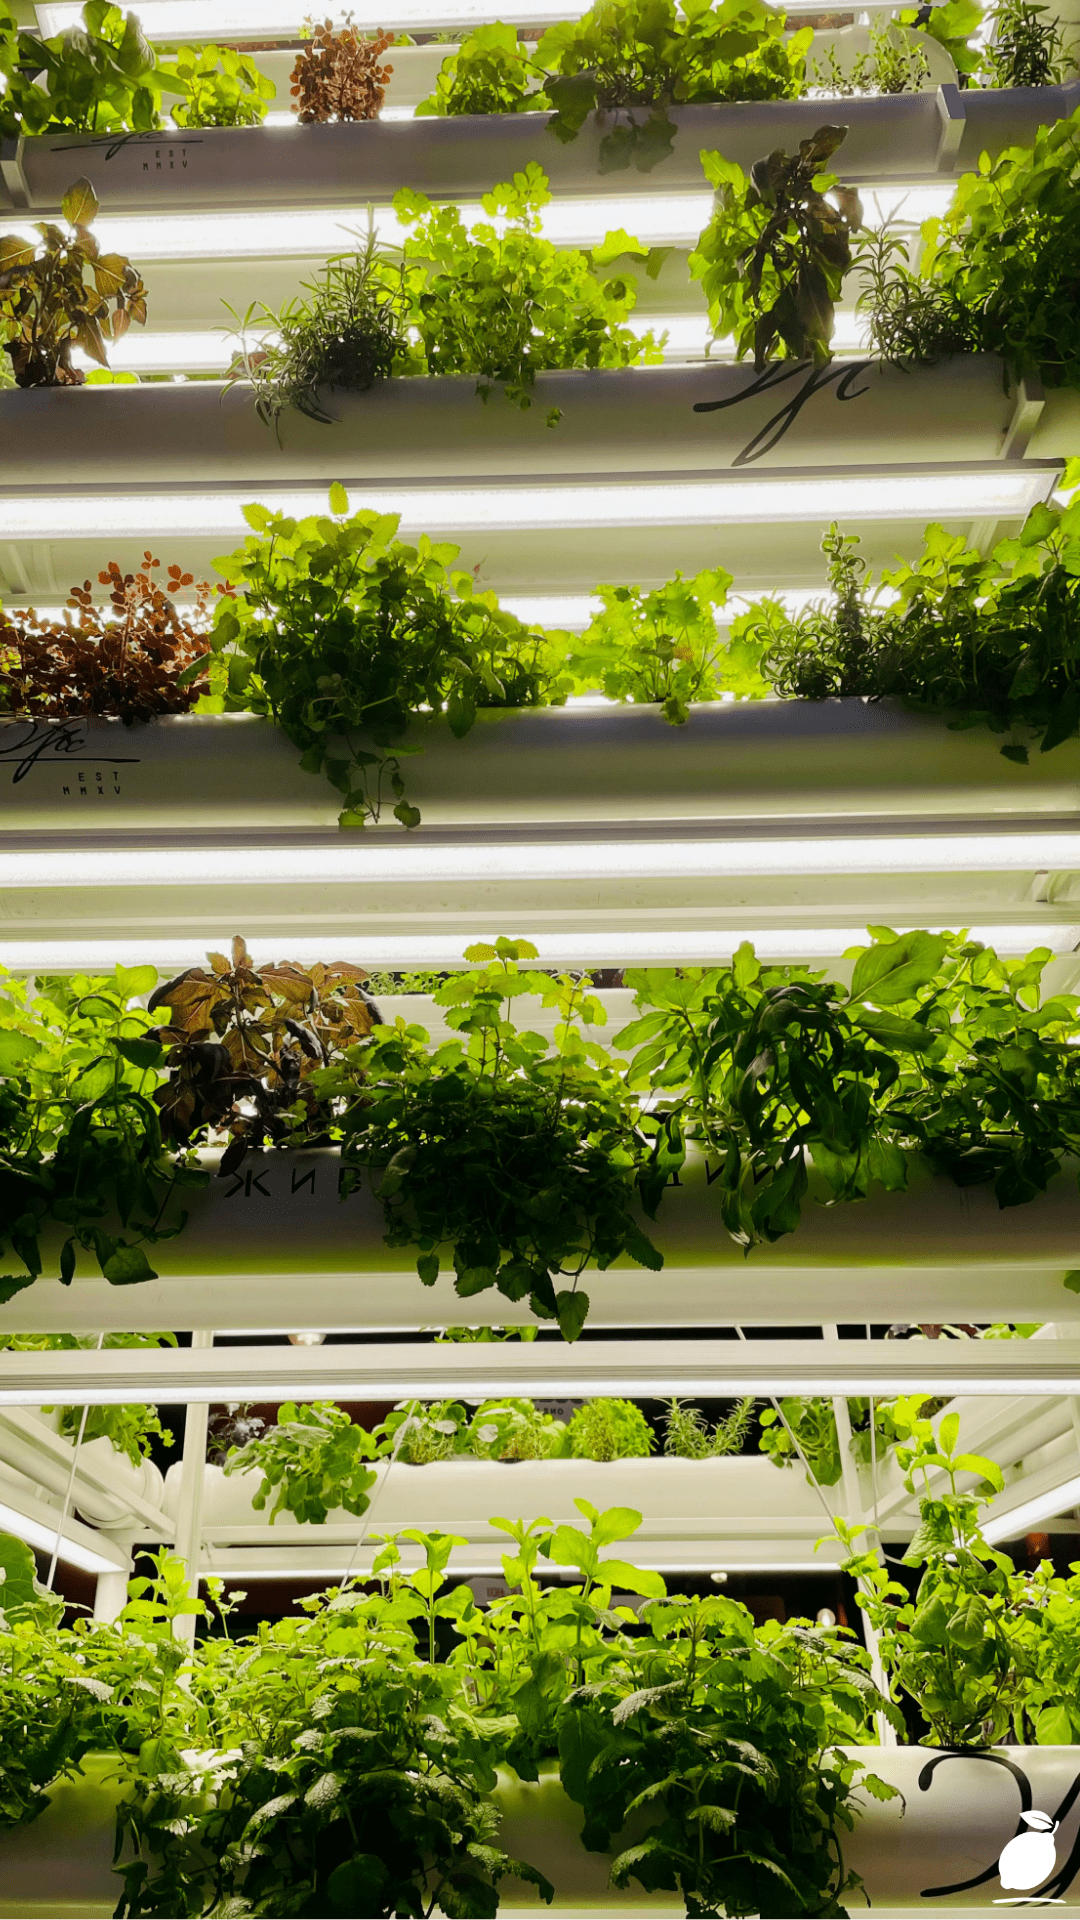
Step 2: Select Your Frame System
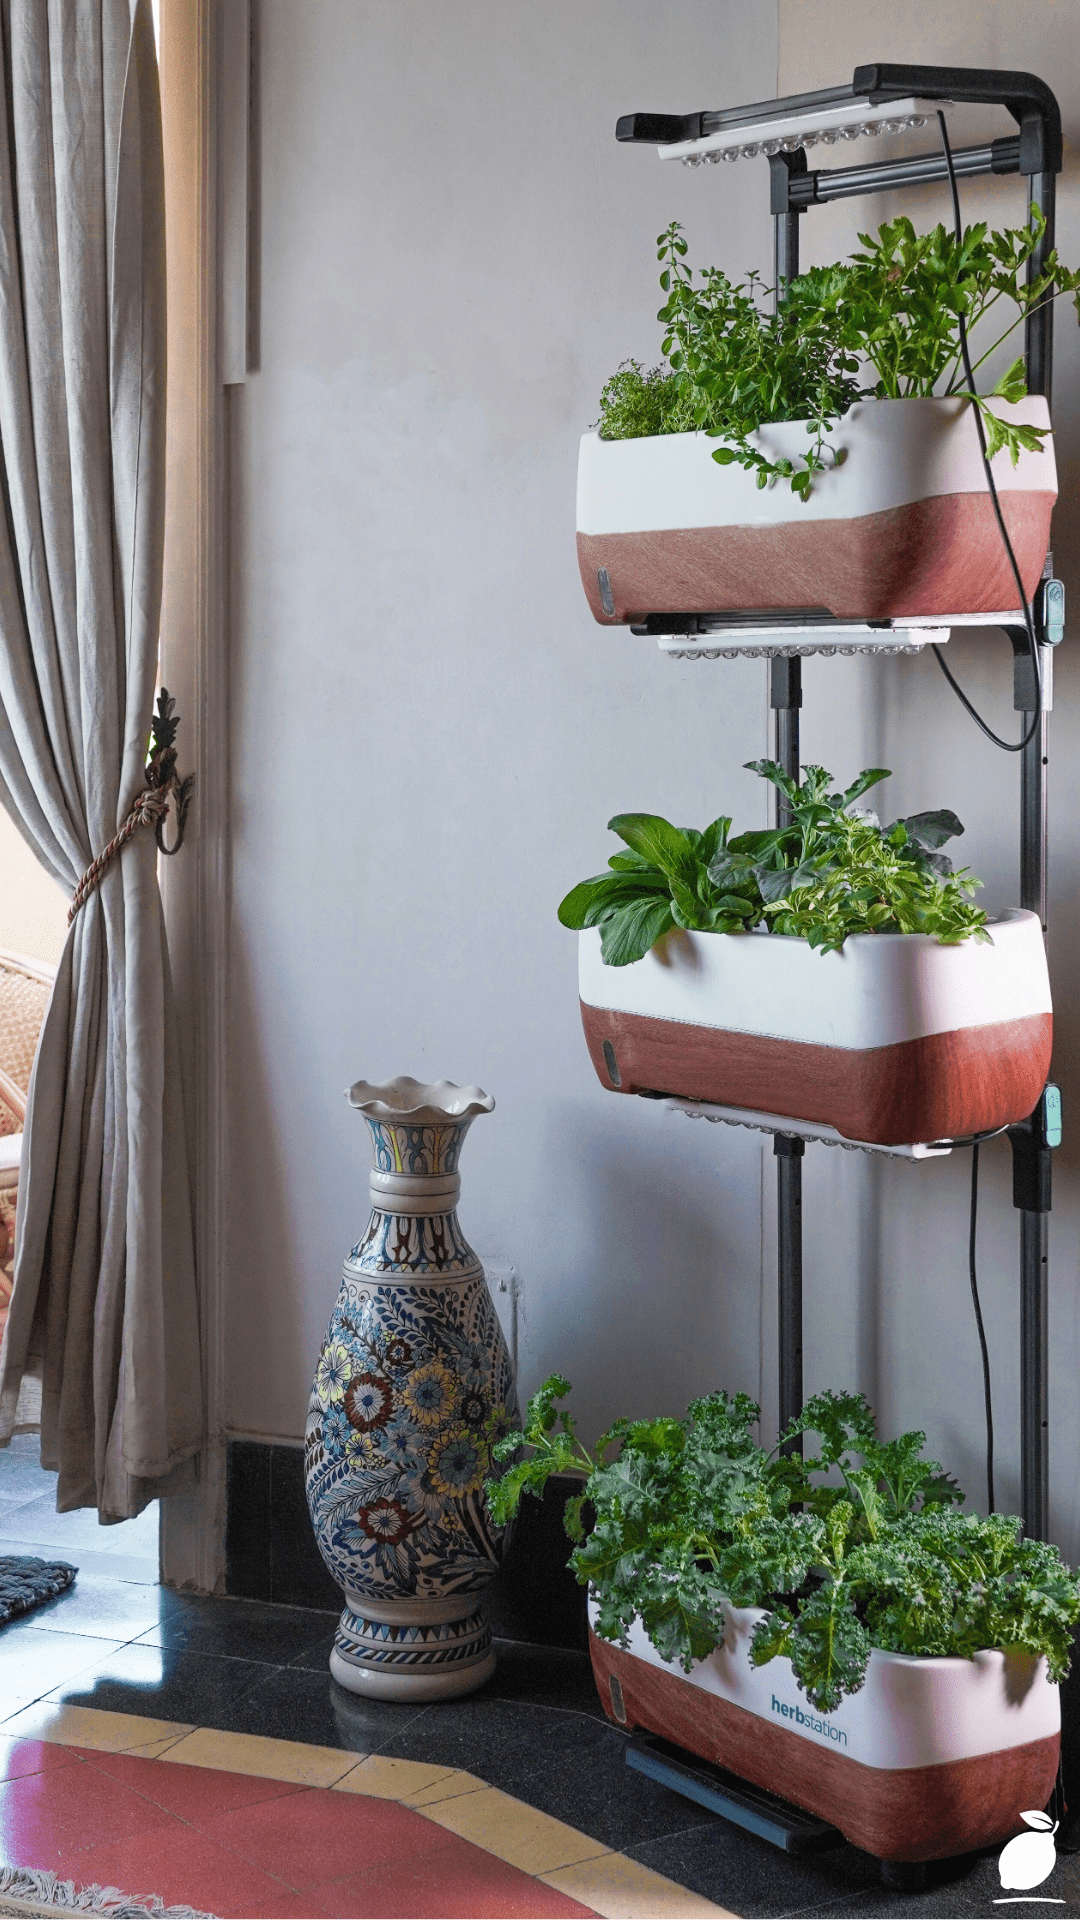
The structural backbone of a The structural backbone is the frame is the frame, and getting this right determines how long the system lasts and how good it looks. A black metal tiered frame like the one in the image above is among the most popular choices because it is lightweight, adjustable, and creates a strong visual contrast against a white wall. Alternatives include wall-mounted pegboard systems with individual pot hooks, ladder-style timber frames leaned against the wall, and purpose-built vertical garden pocket panels. Choose a system rated for the weight of filled containers, which is heavier than most people expect once soil and water are factored in.
Step 3: Choose Containers with Proper Drainage
The containers in your vertical herb garden are not just aesthetic; they are the difference between herbs that thrive and herbs that drown. Every container must have drainage holes, full stop. Terracotta containers are particularly well-suited to a are particularly well-suited to this kind of system because they are porous, because they are porous, which means they allow airflow to the roots and dry out more evenly than plastic or glazed ceramic. If you prefer the clean look of white or neutral containers, ensure they are either terracotta-lined or have adequate drainage holes with a saucer underneath each tier to catch runoff without waterlogging the roots below.
Step 4: Select the Right Soil Mix
Standard potting compost is too dense and too moisture-retentive for most herbs in a vertical herb garden. The ideal mix is two parts good-quality peat-free potting compost to one part perlite or coarse sand. This creates a free-draining medium that holds enough moisture for root uptake without sitting wet. Wet, compacted soil is the primary reason herbs fail in container systems. Filling your Filling the containers with the right mix containers with the right mix from the start is the single most effective thing you can do for long-term plant health.
Step 5: Plant Your Herbs Strategically by Tier
Not all herbs want the same conditions, and the tier position in your vertical herb garden determines how much light each plant receives. Place your most light-hungry herbs, basil, thyme, and rosemary in the top container where they get unobstructed exposure. The middle tier suits moderately demanding herbs like parsley, chives, and coriander. The lower tier, which receives the least direct light and stays slightly more moist from drainage above, is ideal for mint, lemon balm, and other shade-tolerant, moisture-loving herbs. This tiered planting strategy is what makes a This tiered planting strategy is what makes the whole setup genuinely productive rather than just decorative.
Step 6: Establish a Watering and Feeding Routine
Consistency is everything in a vertical herb garden. Water from the top tier and allow gravity to do some of the work, but check each container individually. The bottom tier often retains more moisture than the top and can easily be overwatered if you water all tiers equally every time. A general rule is to water when the top centimetre of soil feels dry to the touch. Feed with a diluted liquid seaweed fertiliser every two weeks during active growing periods. The The system that gets a regular ten-minute check each week that gets a regular ten-minute check each week will consistently outperform one that is watered heavily and then ignored.
Step 7: Harvest Regularly to Encourage Growth
The most common mistake new vertical herb garden owners make is not harvesting enough. Herbs are triggered to produce more growth by regular harvesting, cutting back the top third of each stem encourages the plant to bush out and produce new growth rather than going woody or bolting to seed. Use your Use it actively: snip herbs into every meal that calls for them, pinch back any flower buds before they open, and trim each plant back by a third every two to three weeks, even when you do not need the herbs immediately. Active use is the best maintenance routine a Active use is the best maintenance routine the garden can have. can have.
Expert Secrets for Success
Pro-Tips for Better Results
- Group herbs by water needs, not just aesthetics. Mediterranean herbs like rosemary, thyme, and oregano prefer to dry out between waterings. Moisture-lovers like mint and lemon balm prefer consistently damp soil. Separating them by tier in your Separating them by tier dry herbs at the top, moisture-tolerant herbs at the bottom lets you water the system naturally without over- or under-serving any plant.
- Rotate the frame quarterly. Even against a bright wall, the front-facing side of a the front-facing side of the system receives more light than the back. receives more light than the back. Rotating the entire frame 180 degrees every three months ensures even growth and prevents plants from leaning heavily toward the light source.
- Use a moisture meter. A basic moisture meter removes all guesswork from watering. Push the probe into each container before watering it takes thirty seconds and eliminates the most common cause of herb failure in any the most common cause of herb failure in any indoor herb system. system.
- Add one non-herb plant for visual interest. A small trailing plant a pothos, a string of pearls, or a compact fern in the bottom tier of a in the bottom tier adds textural contrast adds textural contrast and softens the overall composition without competing with the herbs above it for light.
- Label your containers from the start. Herbs look remarkably similar as seedlings and in the early weeks of growth. Small labels pushed into each container make the make the whole display useful to everyone in the household, useful to everyone in the household, not just the person who planted it.
Common Mistakes to Avoid
- Overcrowding the containers. It is tempting to plant multiple herbs in a single container to maximise variety, but overcrowded roots compete for nutrients and moisture and invariably result in all plants underperforming. One herb type per container is the rule for a productive b type per container is the golden rule for any productive herb setup.
- Placing the system too far from the kitchen. A A garden that requires a walk to another room that requires a walk to another room to harvest from will be used far less than one positioned within arm’s reach of where you cook. Convenience drives consistency. Site the garden as close to its point of use as your light conditions allow.
- Neglecting the wall behind the system. Water splashes, soil residue, and humidity from a vertical herb garden will mark a wall over time if there is no protection behind it. A simple sheet of clear acrylic fixed to the wall behind the frame takes five minutes to install and protects the surface indefinitely.
- Starting with too many herb varieties at once. A A setup with twelve different herbs with twelve different herbs across three containers is harder to manage and style than one with four or five well-chosen varieties. Start with the herbs you actually cook with most: basil, parsley, chives, thyme, and expand once the system is established and thriving.
- Treating all herbs as annuals. Rosemary, thyme, chives, and mint are perennials they will regrow year after year if properly maintained in a if properly cared for in a container system. Only basil and coriander are true annuals that need replacing each season. Knowing which is which saves you from replacing plants that were simply dormant.
Why a Vertical Herb Garden Matters
There is a particular kind of satisfaction in cooking with something you grew yourself. It is not just the flavour, though fresh herbs harvested seconds before use genuinely taste different from anything that has spent three days in a refrigerator. It is the quiet sense of connection between the act of growing and the act of feeding people. A vertical herb garden installed in your home makes that connection a daily reality rather than a seasonal aspiration. You walk past it in the morning. You snip from it before dinner. You notice when it needs water. That rhythm of noticing and tending is one of the gentlest and most grounding routines available in a modern home, and research in horticultural therapy consistently supports what gardeners have always known: caring for growing things reduces stress, improves mood, and creates a sense of purposeful engagement that screen-based activities rarely replicate.
For families, a For families, this kind of living garden delivers something beyond the practical. Children who help plant, water, and harvest from a home garden eat more adventurously and engage more readily with cooking than children who have no connection to where food comes from. A wall garden in the kitchen or living room on a kitchen or living room wall is a daily, visible reminder that food grows, that living things need care, and that small acts of attention yield real results, a lesson worth teaching at any age. Families who cook together from a shared garden share something that goes beyond the meal itself.
And for anyone navigating the particular modern exhaustion of too much noise and too little stillness, a this kind of project offers exactly the right kind of task: offers exactly the right kind of task: small, tangible, responsive, and slow. It does not demand your full attention. It simply rewards the attention you give it, gradually, over time, in the form of green growth and flavour and the quiet pleasure of a wall that is alive. That is not a small thing to find in three stacked containers on a black metal frame. But it is exactly where it tends to be found.
Frequently Asked Questions
What herbs grow best in a vertical herb garden indoors?
The most reliable performers in an indoor The most reliable indoor performers are basil, chives, parsley, mint, thyme, and lemon balm. These herbs tolerate the lower light levels and variable humidity of interior spaces better than more demanding Mediterranean varieties like rosemary and lavender, which need very bright, dry conditions to thrive. For a beginner setup, starting with basil, chives, and parsley gives you the three most commonly used culinary herbs and the most forgiving plants to learn the system with.
How much light does a vertical herb garden need?
Most culinary herbs need four to six hours of bright light per day, minimum. A south- or west-facing wall with unobstructed window access is ideal. If your available wall position receives fewer than four hours of natural light, supplement with a full-spectrum LED grow light positioned 15–30cm above the top tier. Grow lights on a timer set to twelve hours per day will fully compensate for low natural light and allow a and allow herbs to thrive in almost any interior location. to thrive in almost any interior location.
How often should I water a vertical herb garden?
Water frequency depends on the containers, the soil mix, the room temperature, and the specific herbs in each tier. As a baseline, check the top centimetre of soil in each container every two to three days and water when it feels dry. Terracotta containers in a warm room may need watering every other day in summer. The top tier of a The top tier typically dries out faster typically dries out faster than the lower tiers and needs more frequent attention. A moisture meter removes all guesswork and is worth the small investment for any serious indoor gardening setup.
Can I set up a vertical herb garden in a rented home?
Yes freestanding freestanding frames require no wall fixings at all frames require no wall fixings at all and are entirely suitable for rented properties. Floor-standing tiered systems like the one in the image above can be positioned against any wall without drilling a single hole. For added stability, freestanding frames can be secured to the wall with removable adhesive strips rather than permanent fixings, which leaves no damage when the system is moved.
How do I stop my vertical herb garden from making a mess on the floor?
The key is drainage management. Ensure every container in the every container has a saucer underneath it has a saucer underneath it to catch water runoff from each tier. Water slowly and in small amounts rather than flooding each container, and allow the soil to partially dry between waterings to reduce overall drainage volume. Placing a waterproof mat or a decorative tile tray beneath the entire frame catches any residual drips and protects the floor surface, particularly important on the geometric and decorative tiles visible in setups like the one above.