
The backyard had been on the “someday” list for three summers. Not neglected, mowed, watered, maintained, but completely unbuilt. Just a rectangle of lawn that nobody actually used because there was nowhere to sit, no shade, and no reason to stay. We would have dinner parties inside and watch through the kitchen window at a perfectly good outdoor space, doing nothing. Every year, I told myself we’d figure out the wood patio situation, and every year, the project felt too big to start and too expensive to finish. The quotes I got from contractors confirmed my fear that a built deck attached to the house would cost more than I had budgeted for the entire backyard.
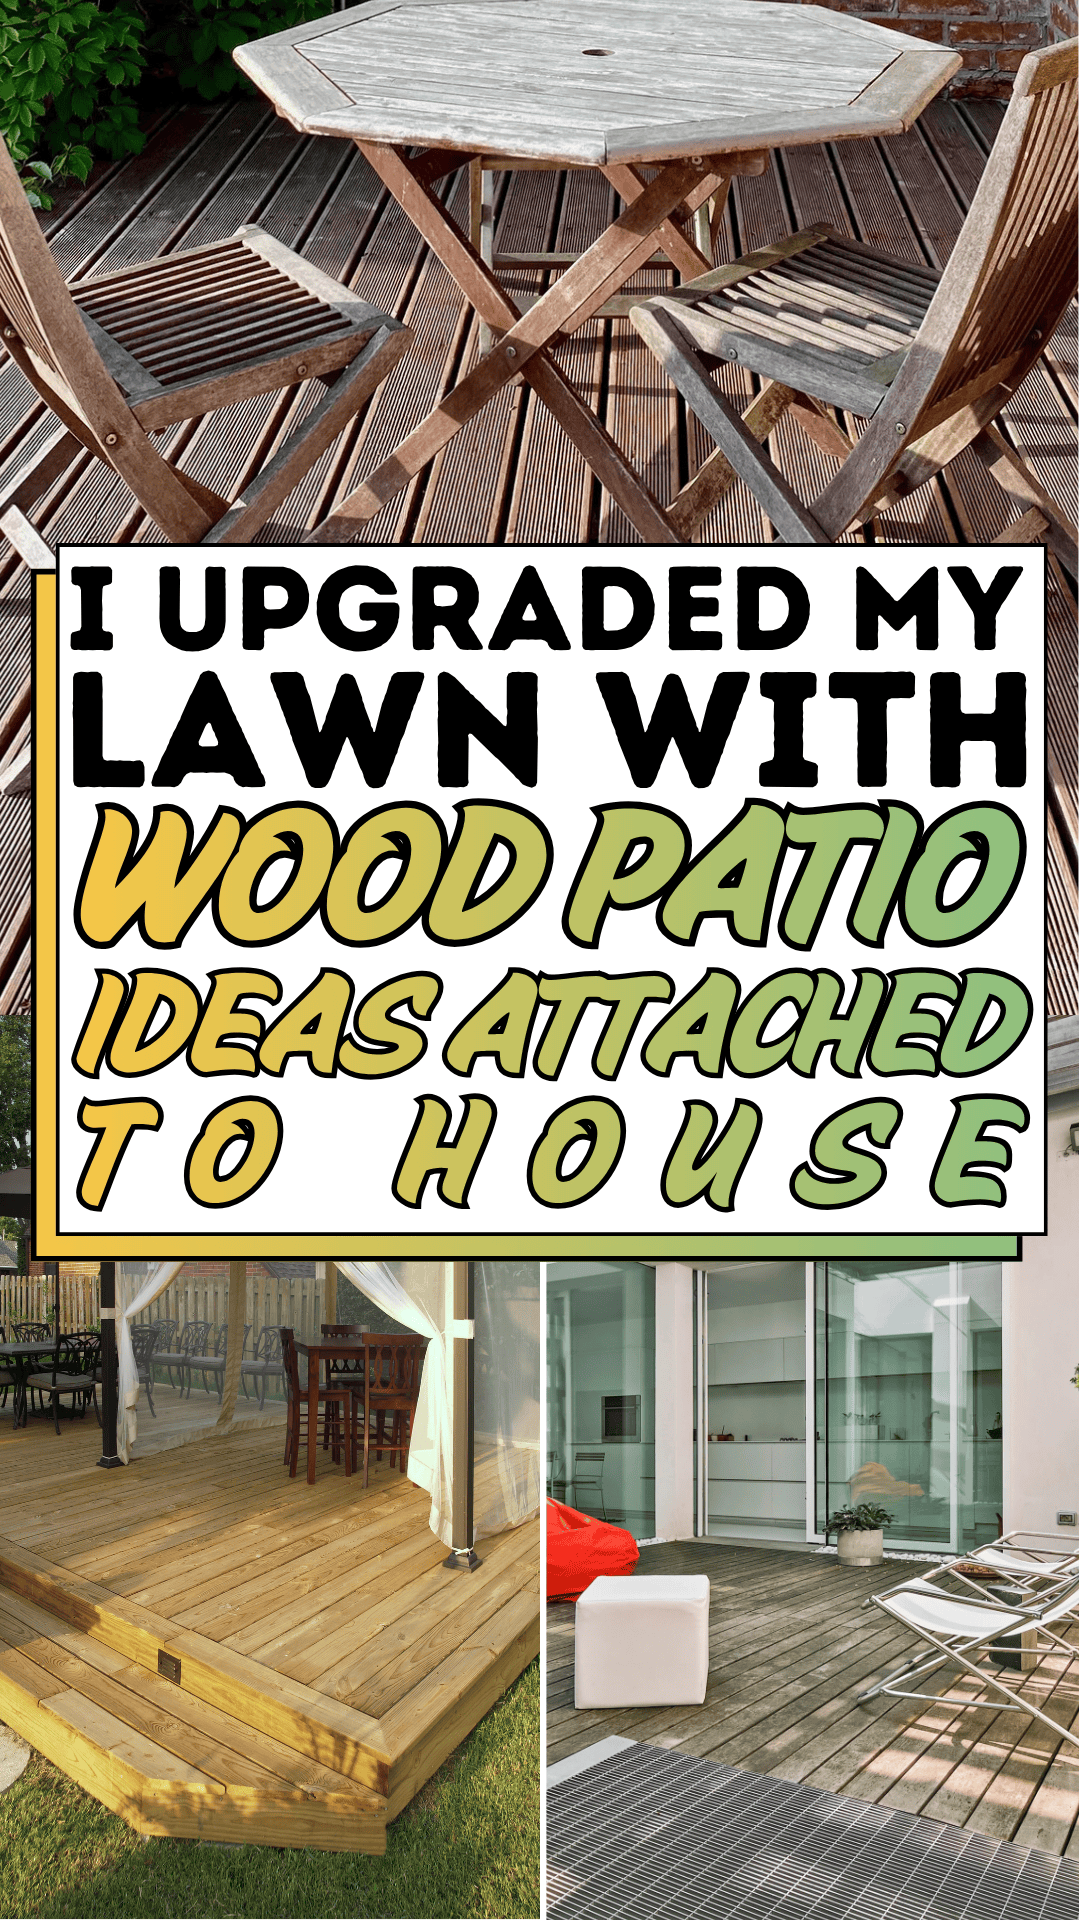
Then I found a middle path: a freestanding wood patio structure that functions like an attached deck without requiring foundation permits, structural engineers, or the kind of commitment that makes a project feel permanent before it even begins. The image above shows exactly what that can look like. A light-colored wood patio made of horizontal planks, two steps leading up from the lawn, a covered gazebo with black metal poles and white sheer curtains creating a private outdoor dining room, a dark wood table and chairs underneath. It’s private, shaded, beautiful, and critically achievable without a general contractor. That wood patio is not the result of a $40,000 deck build. It’s the result of a specific set of decisions made in the right order.
This guide documents those decisions. From material selection through layout planning, post-installation, decking, and the gazebo structure that takes a plain wood patio from functional to genuinely special, these steps cover the complete project. If you’ve been staring at your lawn and waiting for the right moment, these wood patio ideas are the moment.
The Wood Patio Blueprint
Step 1: Plan the Wood Patio Layout and Footprint
Every successful wood patio project begins with a clear layout plan, not a rough sketch, but measured dimensions on paper that establish the patio’s footprint, its relationship to the house, and its orientation to the sun. The most common wood patio planning mistake is sizing based on gut feeling rather than furniture dimensions. Measure the dining set you plan to use, add 90cm clearance on all sides for chair movement, and that number tells you the minimum functional floor area your wood patio needs.
For a wood patio with a gazebo structure like the one in the image, plan for a minimum footprint of 4m × 4m for a four-person dining set, or 5m × 5m for six people. The two steps visible in the image add approximately 90cm to the total footprint depth factor those into the overall lawn space calculation. Sketch the layout with the sun’s path in mind: a wood patio that receives full afternoon sun with no shade structure will be uncomfortable from noon onward, regardless of how well it’s built.
Mark the planned footprint with garden stakes and string, and live with the outline for 48 hours before breaking ground. Walking around it, sitting near it, and seeing it from the kitchen window during that period consistently reveal proportion or positioning adjustments that a paper sketch alone never catches.
Step 2: Choose the Right Wood Patio Material
The light-colored horizontal planks in the image are the wood patio’s most visible surface, the element guests see first, and that determines the space’s overall character. Wood patio material choice affects not just appearance but maintenance commitment, longevity, and cost, and the decision made here shapes every subsequent choice in the project.
Pressure-treated pine is the most affordable and most widely available wood patio material at $2 to $5 per linear foot. It resists rot and insect damage, takes stain well, and is structurally sound for decades when properly sealed and maintained annually. The light color visible in the image is consistent with new or recently sealed pressure-treated pine. For a wood patio that ages with character rather than requiring paint, pressure-treated pine with a clear or lightly tinted deck sealant is the most practical choice for most DIY builders.
Cedar is the mid-range wood patio material at $4 to $8 per linear foot, naturally rot-resistant without chemical treatment, lighter in weight than pressure-treated pine, and with a warm reddish-brown tone that weathers to a distinguished silver-gray if left unsealed. Composite decking (a wood-plastic blend) at $8 to $15 per linear foot is the low-maintenance premium option; it never needs staining, resists fading, and will not warp or splinter over time. For a wood patio that functions as a primary outdoor living area used year-round, composite decking’s long-term maintenance savings often justify the higher upfront cost.
Step 3: Build the Wood Patio Frame and Foundation
A wood patio frame is what separates a stable, level, long-lasting deck from a surface that sags, heaves, and requires constant attention within two to three years. The frame consists of concrete footings, support posts, beams, and joists, the structural skeleton to which the visible decking boards are fastened. For a freestanding wood patio not attached to the house foundation (which avoids permit requirements in most jurisdictions), the footings are poured-concrete tube forms installed at least 60cm below the frost line in temperate climates.
For a 4m × 4m wood patio, plan for nine footings in a 3×3 grid at 200cm center-to-center spacing. Each footing receives a post base hardware anchor while the concrete is wet. Once cured (48 to 72 hours), 10cm × 10cm pressure-treated posts are set into the anchors, beams are run across the posts, and 5cm × 15cm joists are installed at 40cm spacing across the beams. This joist spacing is the wood patio structural specification that most directly determines the finished deck’s rigidity. Joists at 40cm centers produce a surface that feels solid underfoot with no flex or bounce.
Check every frame member for level with a 1.2m spirit level before fastening permanently. A wood patio frame that is out of level by even 5mm over its full length produces a visible slope in the finished decking that cannot be corrected without disassembling the frame.
Step 4: Install the Wood Patio Decking Boards
The horizontal decking pattern visible in the image is the standard wood patio board orientation, with boards running parallel to the house and perpendicular to the joists, fastened with 3-inch exterior screws or hidden deck fasteners. Hidden fasteners (small clips that hold the board from the side without visible screws on the surface) produce the cleanest wood patio surface but cost approximately three times as much as screw fastening and take significantly longer to install.
Leave a 6mm to 8mm gap between each decking board to allow for the wood’s natural expansion in humidity and to allow water to drain off the surface. This gap is the wood patio detail that most distinguishes boards installed by experienced builders from boards installed by first-time DIYers. Gaps that are too small cause boards to buckle in summer heat, and gaps that are too large catch heels and debris.
Run a string line from one end of the wood patio frame to the other before installing the first board to confirm the frame’s straightness. Install from the house-facing edge outward, checking the gap consistency every three to four boards with a spacer cut from scrap material rather than eyeballing each gap individually.
Step 5: Add the Gazebo Structure
The covered gazebo with black metal poles and white sheer curtains in the image is the wood patio element that transforms a functional outdoor floor into an outdoor room, the structure that provides shade, privacy, and the specific enclosed-but-open quality that makes a wood patio genuinely usable in most weather conditions. A freestanding gazebo kit installed on a completed wood patio surface is the most accessible way to achieve this transformation without custom construction.
Freestanding metal gazebo kits for a 3m × 3m or 4m × 4m wood patio footprint are available from most home improvement retailers and online suppliers at $300 to $1,500 depending on roof type, material quality, and included features. The black metal pole structure visible in the image is consistent with a mid-range powder-coated steel gazebo kit. These kits include all hardware for post-to-deck fastening, typically through-bolted base plates that fasten directly through the decking boards into the joists below.
The white sheer curtains on the image’s gazebo are standard curtain panels threaded onto a rod mounted between the posts, a DIY addition to most gazebo kits that costs $20 to $40 per panel and dramatically increases the structure’s privacy and atmosphere. Choose outdoor-rated polyester sheer fabric rather than indoor sheer curtains, which degrade rapidly in UV exposure and humidity.
Step 6: Seal, Stain, and Maintain the Wood Patio
A wood patio that is not sealed within the first season loses its clean, light color within 12 to 18 months as the wood weathers, grays, and becomes susceptible to mold and moisture penetration. Apply a quality exterior deck sealant or penetrating stain within the first month of installation, specifically after the wood has dried completely from any construction moisture but before the first significant rain exposure.
For pressure-treated pine wood patio surfaces, use a penetrating oil-based deck stain rather than a film-forming paint or solid stain. Penetrating stains enter the wood fiber rather than forming a surface layer, which means they do not peel, crack, or blister when the wood expands and contracts seasonally. Apply with a brush or roller on a dry day with temperatures between 10°C and 30°C, working with the grain and applying a second coat within 24 hours while the first coat is still slightly tacky.
Reapply deck sealant every 18 to 24 months as part of a regular wood patio maintenance schedule. Clean the surface with a deck cleaner solution and a stiff brush or pressure washer before each reapplication to remove oxidized wood fiber, mold, and accumulated debris that would prevent the new sealant from penetrating.
Expert Secrets for Success
Pro-Tips for a Better Result
Buy 10 to 15 percent more decking material than your calculations require. Wood patio boards always have some waste from end cuts, knots that require removal, and the occasional board that splits during installation. Purchasing slightly more material than needed from the same production batch ensures consistent color and grain matching across the full wood patio surface, a detail that becomes significant once the deck is complete and the eye moves across the full surface.
Use stainless steel or hot-dipped galvanized fasteners throughout. Standard zinc-plated screws react with pressure-treated wood’s preservative chemicals and rust within two to three years, leaving dark streaks down the face of every board. Stainless steel or hot-dipped galvanized screws cost approximately 30 percent more and will never rust, a small premium that permanently protects the wood patio surface’s appearance.
Set gazebo posts 30cm in from the wood patio perimeter rather than at the edge. Positioning the gazebo posts inside the deck perimeter rather than at the outer edge gives the wood patio a visual border of decking visible beyond the structure, a design detail that makes the outdoor space feel larger and more intentional than a gazebo installed at the exact edge of the deck.
Add solar-powered string lights inside the gazebo’s perimeter for evening use. The image shows a daytime wood patio scene, but the space’s usability doubles when evening lighting is included. Solar string lights strung between gazebo poles require no wiring, no electrician, and no outlet access one of the easiest and most impactful wood patio finishing touches available at under $30.
Common Mistakes to Avoid
Don’t skip the concrete footings in favor of deck blocks or surface supports. Deck blocks placed on top of the soil without concrete embedment are vulnerable to frost heave in cold climates, which causes the wood patio frame to lift unevenly over winter and settle crookedly in spring. Properly poured footings below the frost line eliminate this movement.
Don’t install decking boards with no gap. Boards butted tightly together with no expansion gap will buckle in summer humidity as the wood swells, a structural failure that requires removing and reinstalling the affected boards. The 6mm to 8mm gap is not a design choice; it is a structural requirement.
Don’t choose a gazebo kit too small for the wood patio footprint. A gazebo that covers only a portion of the wood patio leaves an awkward uncovered zone that functions as neither a covered outdoor room nor an open deck effectively. Size the gazebo to cover at minimum 75 percent of the wood patio’s total area, or design the deck specifically to the gazebo kit’s dimensions so the covered zone and the deck perimeter are aligned.
Don’t seal pressure-treated wood before it has dried. New pressure-treated lumber is sold wet with preservative solution and must dry for 30 to 90 days before sealant will penetrate properly. Sealing too early traps moisture in the wood and causes the sealant to peel within one season. Perform the water bead test: sprinkle water on the wood surface; if the water beads, the wood is still too wet to seal.
Why Wood Patio Matters
A wood patio is not simply an outdoor surface; it is the decision that converts backyard space from potential into daily life. The yards that never get used are almost always the yards that give people nowhere specific to be: no surface to sit on, no shade to rest under, no defined area that signals “this is where we gather.” A wood patio creates that signal. It tells everyone in the household and every guest that this space was designed for people, not just maintained for appearances.
Research in environmental psychology consistently identifies access to quality outdoor living space as a significant contributor to daily wellbeing, stress reduction, and family cohesion. Families who eat meals outdoors regularly report higher satisfaction with their home environment than equivalent families who eat exclusively indoors. The wood patio is the specific domestic infrastructure that makes outdoor meals, weekend mornings, and evening conversations happen not occasionally, but as a default, because the space makes them easy rather than effortful.
Easy Peasy Life Matters is built on the belief that home improvement at its best is not about square footage or property values; it is about creating the conditions for a daily life that feels genuinely good to live. A well-built wood patio with a gazebo, curtains, and a dining table underneath is one of the most direct and most immediate of all available home improvements: it creates an entirely new room, outdoors, in a single weekend of focused work. The lawn you’ve been meaning to use is waiting.
Frequently Asked Questions
Do I need a permit to build a wood patio attached to the house?
Permit requirements vary by municipality, but in most jurisdictions, a freestanding wood patio (not structurally attached to the house foundation) below a certain height and square footage, typically under 30 square meters and under 60cm above grade, does not require a building permit. A deck attached to the house’s structural frame almost always requires a permit. Check with your local building department before breaking ground, as permit requirements and fines for unpermitted structures vary significantly by location.
How long does a wood patio last?
A properly built and regularly maintained wood patio using pressure-treated pine will last 15 to 25 years before requiring major structural replacement. Cedar lasts 20 to 30 years under similar maintenance conditions. Composite decking carries manufacturer warranties of 25 to 50 years and requires the least maintenance of any option. In all cases, the primary longevity factor is annual or biennial sealant reapplication. A wood patio that is never sealed or maintained will show significant deterioration within five to seven years, regardless of the original material quality.
What is the best wood for a wood patio in a wet climate?
In climates with high annual rainfall, cedar and composite decking outperform pressure-treated pine because of their superior moisture resistance and reduced tendency to warp, cup, and develop mold under constant wet-dry cycling. If pressure-treated pine is the chosen material for budget reasons, specify ground-contact-rated pressure-treated lumber (rated for direct soil and water contact) for all framing members, and apply a penetrating deck sealant designed for high-moisture environments every 12 to 18 months.
Can I build a wood patio myself, or should I hire a contractor?
A freestanding wood patio of the type and scale shown in image 4m × 4m, with a gazebo kit, is within the skill range of a competent DIYer with basic carpentry tools. The frame and foundation work requires careful measurement and level checking, but no specialized skills. The gazebo kit installation is designed for homeowner self-installation with standard hardware. Professional help is most valuable for the concrete footing work if you are not comfortable with the mixing, pouring, and setting sequence, and for any electrical work if you plan to add wired lighting.
How much does a wood patio with a gazebo cost to build?
Material costs for a basic 4m × 4m wood patio using pressure-treated pine decking, standard frame lumber, nine concrete footings, and a mid-range freestanding gazebo kit typically range from $2,500 to $5,000, including all hardware, sealant, and curtain panels. Cedar construction at the same scale costs $3,500 to $6,500. Composite decking raises the material total to $5,000 to $9,000. Professional contractor labor adds $3,000 to $8,000 to any of these material budgets, depending on regional labor rates and project complexity.







